background image

14

1. Allgemeines/Standort:

Bevor Sie mit dem Aufbau beginnen, wählen Sie einen geeigneten 

Standort für Ihr Teleskop. Es wird Ihnen helfen, wenn Sie dieses Gerät 

an einem Ort aufbauen, an dem Sie gute Sicht auf den Himmel, einen 

stabilen Untergrund und genügend Platz haben.

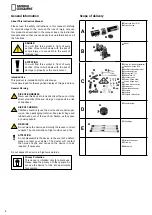
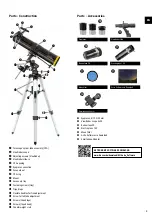
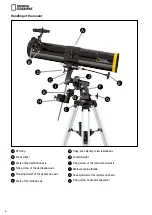
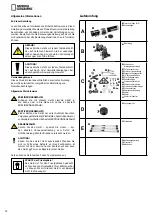
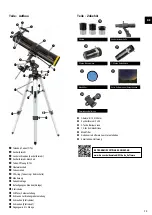
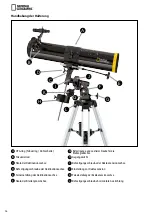
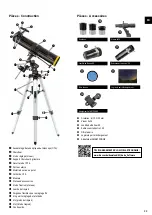
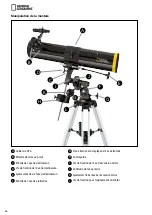
Nehmen Sie zuerst alle Teile aus der Verpackung. Überprüfen Sie anhand 

des Schaubildes, ob alle Teile vorhanden sind.

Hinweis: Ziehen Sie alle Schrauben nur „handfest“ an und vermeiden Sie 

so „Überdrehen“ der Schrauben.

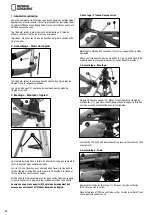
2. Aufbau- Stativbeine:





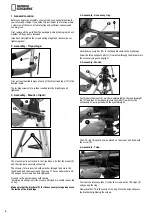
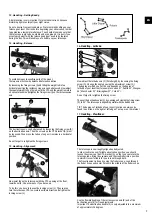
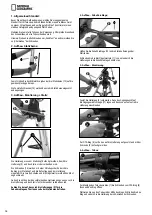
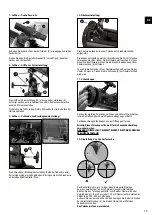
Zuerst ziehen Sie das Mittelstück jedes der drei Stativbeine (12) auf die 

gewünschte Länge heraus.


Die Feststellschrauben (15) werden dann in die Stativbeine eingesetzt 

und angezogen.

3. Aufbau - Mont Stativ:



X

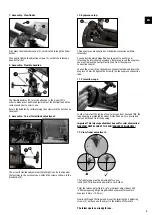
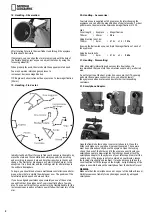
Die Halterung muss am Stativkopf befestigt werden, damit die 

Halterung (9) und das Stativ sicher verbunden sind.


Die Schrauben (16) werden mit einer Unterlegscheibe durch die 

Bohrung im Stativkopf und die Befestigung an der Halterung 

eingeführt. Die zweite Scheibe und die Flügelmutter werden handfest 

angeschraubt.

Gehen Sie mit den beiden verbleibenden Halterungen genauso vor, bis 

die Halterung und das Stativ fest miteinander verbunden sind.

Achten Sie darauf, dass sich die Halterungen (X) für die 

Zubehörablage auf der Innenseite der Stativbeine befinden.

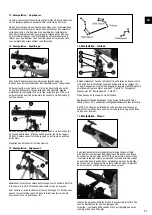
4. Aufbau - Zubehörablage:





Halten Sie die Zubehörablage (10) an die Stativhalterungen der 

Stativbeine. 

Schrauben Sie die drei Flügelmuttern (11) von unten durch die 

Halterungen in die Zubehörablage handfest an.

5. Aufbau - Montierung:



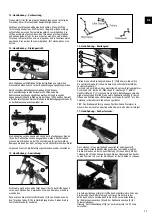
Zuerst die Halterung (9) vorbereiten. Dazu das Gegengewicht auf 

die Gegengewichtsstange (17) legen und dann von unten fest in die 

Halterung einschrauben.

X

Der OTA-Ring (8) sollte nun auf die Halterung aufgesetzt und mit der 

Schraube (X) befestigt werden.

6. Aufbau - Tubus:

Zur Montage des Teleskoprohres (1) die Schrauben vom OTA-Ring (8) 

lösen und den Ring öffnen. 

Platzieren Sie nun den Tubus in der Mitte des Rings. Schließen Sie den 

Ring und sichern Sie die Halterung durch Anziehen der Schrauben.

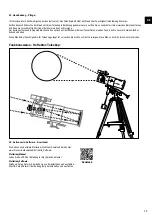
Summary of Contents for National Geographic 76/700 EQ

Page 1: ...TELESCOPE 76 700 EQ Operating instructions Bedienungsanleitung Mode d emploi Handleiding Istruzioni per l uso Instrucciones de uso Manual de utiliza o Instrukcja obs ugi DE EN FR NL IT ES PT PL Art N...

Page 2: ...ildren should only use the device under adult super vision Keep packaging material like plastic bags and rubber bands out of the reach of children as they pose a choking hazard FIRE RISK Do not place...

Page 3: ...for fine adjustment Screw for latitude adjustment Screws tripod legs Screws tripod head Counterweight rod Parts Accessories Eyepieces Viewfinder 5x24 Barlow lens 3X Erecting lens 1 5X Moon filter Astr...

Page 4: ...in the tripod head and the mounting on the mount The second washer and the wing nut are screwed on and tightened Proceed in the same manner with the two remaining mountings until the mount and tripod...

Page 5: ...interchaning eyepieces Before you insert the eyepiece you must remove the dust protection cap from the eyepiece connection tube 6 Loosen the screw X on the eyepiece connection tube and insert the eye...

Page 6: ...e rectascension axis C Scale of the declination axis J Rectascension attitude D Fixing screw of the declination axis K Fine adjustment of the rectascension axis E Fine adjustment of the declination ax...

Page 7: ...ont towards north Use a compass if you have one To do this you have to loosen the locking screw L Then you can turn the telescope OTA in accurate northern direction Retighten the locking screw L 16 Ha...

Page 8: ...th 3 eyepieces By interchanging the eyepieces you can alter the magnification of your telescope For best performance the maximal recommended magnification is 152X Hint Focal length Eyepiece Magnificat...

Page 9: ...a lint free soft cloth which you have previously treated with some alcohol If dust or moisture has gotten inside your telescope do not try to clean it yourself you should send it to your service cente...

Page 10: ...has a 3X Barlow lens Focal length Everything that magnifies an object via an optic lens has a certain focal length The focal length is the length of the path the light travels from the surface of the...

Page 11: ...your device You can get more information on the proper dis posal from your local waste disposal service or environmental authority WARRANTY The regular warranty period is 2 years and begins on the day...

Page 12: ...er d rfen das Ger t nur unter Aufsicht benutzen Verpackungsmaterialien Plastikt ten Gummib nder etc vonKindernfernhalten EsbestehtERSTICKUNGSGEFAHR BRANDGEFAHR Setzen Sie das Ger t speziell die Linsen...

Page 13: ...g Schraube zur Breitengradeinstellung Schrauben Stativbeine Schrauben Stativkopf Gegengewicht Stange Teile Zubeh r Okulare Sucherfernrohr 5x24 3 fache Barlow Linse 1 5 fache Umkehrlinse Mondfilter Ast...

Page 14: ...ung im Stativkopf und die Befestigung an der Halterung eingef hrt Die zweite Scheibe und die Fl gelmutter werden handfest angeschraubt Gehen Sie mit den beiden verbleibenden Halterungen genauso vor bi...

Page 15: ...e austauschen Vor dem Einsetzen des Okulars m ssen Sie die Staubschutzkappe aus dem Okulareinschub 6 entfernen L sen Sie die Schraube X am Okulareinschub und setzen Sie das Okular 30 mm ein Ziehen Sie...

Page 16: ...ektaszensionsachse C Skala der Deklinationsachse J Einstellung zur Rektaszension D Befestigungsschraube der Deklinationsachse K Feineinstellung der Rektaszensionsachse E Feineinstellung der Deklinatio...

Page 17: ...en Sie nun das gesamte Teleskop mit der Tubus ffnung nach vorne nach Norden aus Verwenden Sie einen Kompass wenn Sie einen haben Dazu m ssen Sie die Feststellschraube L l sen Sie k nnen nun den Telesk...

Page 18: ...s ver ndern F r die beste Leistung wird eine maximale Vergr erung von 152X empfohlen Hinweis Brennweite Okular Vergr erung 700 mm 30 mm 23 x Verwendung der Umkehrlinse 1 5x 700 mm 8 mm 87 5x x 1 5 131...

Page 19: ...inem fusselfreien weichen Tuch das Sie zuvor mit etwas Alkohol behandelt haben Wenn Staub oder Feuchtigkeit in Ihr Teleskop gelangt ist versuchen Sie nicht es selbst zu reinigen Sie sollten es an Ihr...

Page 20: ...eskop hat eine 3 fach Barlow Linse Brennweite Alles was ein Objekt ber eine Optik Linse vergr ert hat eine bestimmte Brennweite Die Brennweite ist die L nge des Weges den das Licht von der Oberfl che...

Page 21: ...hten Entsorgung erhalten Sie bei den kommunalen Entsorgungsdienstleistern oder dem Umweltamt GARANTIE Die regul re Garantiezeit betr gt 2 Jahre und beginnt am Tag des Kaufs Um von einer verl ngerten f...

Page 22: ...t appareil que sous la surveillance d un adulte Maintenez les enfants loign s des mat riaux d emballage sacs plastiques bandes en caoutchouc etc RISQUE D INCENDIE Ne placez pas l appareil en particuli...

Page 23: ...pour un r glage fin Vis pour le r glage de la latitude Vis pieds du tr pied Vis t te de tr pied Contrepoids Pi ces Accessoires Oculaires Viseur 5x24 Lentille de Barlow 3X Redresseur terrestre 1 5X Fi...

Page 24: ...et la fixation sur la monture La deuxi me rondelle et l crou ailettes sont viss s et serr s Proc dez de la m me mani re avec les deux autres fixations jusqu ce que la fixation et le tr pied soient so...

Page 25: ...culaires Avant d ins rer l oculaire vous devez retirer le cache de protection contre la poussi re du porte oculaire 6 Desserrez la vis X du porte oculaire et ins rez l oculaire de 30 mm Resserrez la v...

Page 26: ...ascension droite C chelle de l axe de d clinaison J L attitude de l axe polaire D Vis de fixation de l axe de d clinaison K Ajustement fin de l axe de l ascension droite E Ajustement fin de l axe de d...

Page 27: ...rture de l OTA l avant vers le nord Utilisez une boussole si vous en avez une Pour ce faire vous devez desserrer la vis de blocage L Ensuite vous pouvez tourner le t lescope OTA dans la direction pr c...

Page 28: ...ssissement de votre t lescope Pour une performance optimale le grossissement maximal recommand est de 152X Un conseil Distance focale Oculaire Grossissement 700 mm 30 mm 23 x Utilisation de le redress...

Page 29: ...oux et non pelucheux que vous aurez pr alablement trait avec de l alcool Si de la poussi re ou de l humidit s est infiltr e dans votre t lescope n essayez pas de le nettoyer vous m me vous devez l env...

Page 30: ...istance focale Tout ce qui grossit un objet via une optique lentille a une certaine longueur focale La longueur focale est la longueur du chemin parcouru par la lumi re depuis la surface de la lentill...

Page 31: ...cernant les r gles applicables en mati re d limination de ce type des produits veuil lez vous adresser aux services communaux en charge de la gestion des d chets ou de l environnement GARANTIE La p ri...

Page 32: ...er toezicht gebruiken Houd verpakkingsmateriaal zoals plastic zakken elastiekjes enzovoort buiten het bereik van kin deren Er bestaat VERSTIKKINGSGEVAAR BRANDGEVAAR Stel het apparaat vooral de lenzen...

Page 33: ...hroef voor de instelling van de breedtegraad Schroeven statiefpoten Schroeven statiefkop Contragewicht Staaf Onderdelen Accessoires Oculairs Zoekerkijker 5x24 3x Barlow lens 1 5x Omkeerlens Maanfilter...

Page 34: ...met een sluitring door het gat in de statiefkop en de bevestiging aan de beugel gestoken De tweede ring en de vleugelmoer worden handvast aangedraaid Doe hetzelfde met de twee resterende beugels totda...

Page 35: ...u voor uw telescoop wilt gebruiken Voordat u het oculair plaatst moet u de stofkap van de focuser 6 verwijderen Draai de schroef X aan de focuser los en plaats het 30 mm oculair Draai de schroef X aan...

Page 36: ...roef van de rechte klimming as C Scala van de declinatie as J Instelling rechte klimming D Montageschroef van de declinatie as K Fijnregeling van de rechte klimming as E Fijnregeling van de declinatie...

Page 37: ...de hele telescoop met de buisopening naar voren dus naar het noorden Gebruik hierbij zo mogelijk een kompas Daarvoor moet u de borgschroef L losdraaien U kunt nu de telescoopbuis OTA in noordelijke ri...

Page 38: ...van uw telescoop veranderen Voor het beste resultaat wordt een maximale vergroting van 152X aanbevolen Opmerking Brandpuntsafstand Oculair Vergroting 700 mm 30 mm 23 x Gebruik van de 1 5x omkeerlens...

Page 39: ...doek die u vooraf met een beetje alcohol hebt behandeld Als er stof of vocht in uw telescoop is gekomen moet u het niet zelf proberen schoon te maken Neem eerst contact op met uw servicecentrum en st...

Page 40: ...ulair Deze telescoop heeft een 3x Barlow lens Brandpuntsafstand Alles wat een voorwerp via optiek lens vergroot heeft een bepaalde brandpuntsafstand De brandpuntsafstand is de lengte van de weg die he...

Page 41: ...juiste manier van afval verwerking kan worden verkregen bij de gemeentelijke afvalverwerkingsdienst of het Milieuagentschap GARANTIE De normale garantieperiode is 2 jaar en gaat in op de dag van aanko...

Page 42: ...adulto Conservare i materiali di imballaggio come sacchetti di plastica ed elastici fuori dalla portata dei bambini per evitare il rischio di soffocamento RISCHIO DI INCENDIO Non esporre il prodotto i...

Page 43: ...fine Vite di regolazione della latitudine Viti gambe del treppiede Viti testa del treppiede Contrappeso asta Componenti Accessori Oculari Cercatore 5x24 Lente di Barlow 3X Lente di inversione 1 5X Fi...

Page 44: ...e staffe della montatura Quindi inserire la seconda rondella e il dado a farfalla e serrarli Procedere allo stesso modo con le due staffe rimanenti Assicurarsi che la montatura sia fissata saldamente...

Page 45: ...otettivo dal connettore per oculare 6 Allentare la vite X sul connettore per oculare e inserire l oculare da 30 mm Serrare nuovamente la vite X sul connettore per oculare 11 Cappucci di protezione Per...

Page 46: ...la dell asse di declinazione J Altitudine dell ascensione retta D Vite di fissaggio dell asse di declinazione K Manopola di regolazione fine dell asse di ascensione retta E Manopola di regolazione fin...

Page 47: ...are l intero telescopio con l apertura dell OTA rivolta verso nord Si raccomanda di usare una bussola Per fare ci allentare la vite di fissaggio L Quindi ruotare il tubo OTA verso nord Serrare la vite...

Page 48: ...sibile modificare l ingrandimento del telescopio Per le migliori prestazioni l ingrandimento massimo raccomandato 152X Suggerimento Lunghezza focale Oculare Ingrandimento 700 mm 30 mm 23 x Con la lent...

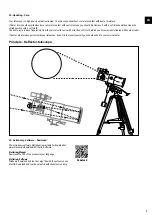
Page 49: ...con dell alcol Se polvere o umidit sono penetrate all interno del telescopio non tentare di pulirlo ma portarlo presso un centro di assistenza Principio di funzionamento del telescopio riflettore 24...

Page 50: ...ormazioni vedere la voce Oculare Questo telescopio dotato di una lente di Barlow 3X Lunghezza focale Tutto ci che ingrandisce un oggetto tramite un ottica lente ha una certa lunghezza focale La lunghe...

Page 51: ...giori informazioni sul corretto smaltimento con tattare il gestore della raccolta dei rifiuti o un agenzia ambientale GARANZIA Il periodo di garanzia regolare di 2 anni a decorrere dalla data di acqui...

Page 52: ...lo solo bajo supervisi n de un adulto Mantenga los materiales de embalaje como bol sas de pl stico y bandas de goma fuera del alcance de los ni os ya que pueden suponer un riesgo de asfixia RIESGO DE...

Page 53: ...para ajuste de precisi n Tornillo de ajuste de latitud Tornillos patas del tr pode Tornillos cabeza de tr pode Contrapeso rod Piezas Accesorios Oculares Visor 5x24 Lentes Barlow 3X Inversor de imagen...

Page 54: ...jaci n en el soporte La segunda arandela y la tuerca de mariposa se enroscan y aprietan Proceda de la misma manera con las dos fijaciones restantes hasta que la montura y el tr pode est n s lidamente...

Page 55: ...lares Antes de colocar el ocular debe retirar la tapa de protecci n contra el polvo del tubo de conexi n del ocular 6 Afloje el tornillo X del tubo de conexi n del ocular e introduzca el ocular 30 mm...

Page 56: ...scensi n derecha C Escala del eje de declinaci n J Posici n de rectascensi n D Tornillo de fijaci n del eje de declinaci n K Ajuste fino del eje de rectascensi n E Ajuste fino del eje de declinaci n L...

Page 57: ...A en la parte delantera hacia el norte Utilice una br jula si la tiene Para ello hay que aflojar el tornillo de bloqueo L A continuaci n puede girar el telescopio OTA en la direcci n norte exacta A co...

Page 58: ...biando los oculares puede modificar el aumento de su telescopio Para un mejor rendimiento el aumento m ximo recomendado es de 152X Sugerencia Distancia focal Ocular Aumentos 700 mm 30 mm 23 x Inversor...

Page 59: ...uave que no suelte pelusa y que haya sido tratado previamente con un poco de alcohol Si el polvo o la humedad han entrado en su telescopio no intente limpiarlo usted mismo debe enviarlo a su centro de...

Page 60: ...arlow de 3X Distancia focal Todo lo que aumenta un objeto mediante una ptica lente tiene una determinada distancia focal La distancia focal es la longitud del camino que recorre la luz desde la superf...

Page 61: ...con su punto limpio m s cercano o la autoridad local com petente para saber el procedimiento a seguir si tiene dudas GARANT A El per odo de garant a es de 2 a os y comienza el d a de la compra Para b...

Page 62: ...enha o material de empaco tamento como sacos de pl stico e el sticos fora do alcance das crian as pois estes constituem um risco de asfixia RISCO DE INC NDIO N o coloque o dispositivo especialmente as...

Page 63: ...ara ajuste da latitude Parafusos pernas do trip Parafusos cabe a do trip Contrapeso haste Pe as Acess rios Oculares Apontador 5x24 Lente Barlow de 3X Lente ergon mica de 1 5V Filtro para a Lua Softwar...

Page 64: ...pe a do encaixe A segunda anilha e a porca de asas s o enroscadas e apertadas Proceda do mesmo modo com os dois encaixes restantes at que o encaixe e o trip estejam bem fixados um ao outro Certifique...

Page 65: ...ulares Antes de inserir a ocular tem de retirar a tampa de prote o contra o p do tubo de liga o da ocular 6 Desaperte o parafuso X no tubo de liga o da ocular e insira a ocular de 30 mm Volte a aperta...

Page 66: ...a ascens o reta C Escala do eixo da declina o J Altitude da ascens o reta D Parafuso de fixa o do eixo da declina o K Ajuste preciso do eixo da ascens o reta E Ajuste preciso do eixo da declina o L Pa...

Page 67: ...bertura TOT na frente virada para norte Use uma b ssola se tiver uma Para isso tem de desapertar o parafuso de fixa o L Depois pode rodar o TOT do telesc pio de forma precisa na dire o do norte Volte...

Page 68: ...amplia o do seu telesc pio Para um melhor desempenho a amplia o m xima recomendada de 152X Dica Dist ncia focal Ocular Amplia o 700 mm 30 min 23 x Usando a lente ergon mica de 1 5x 700 mm 8 mm 87 5x x...

Page 69: ...ente embebido previamente com algum lcool Se o p ou humidade entrarem no telesc pio n o tente fazer a limpeza sozinho Dever contactar o centro de repara o Princ pio Telesc pio refletor 24 Download do...

Page 70: ...ser aumentada Consulte tamb m Ocular Este telesc pio tem uma lente Barlow de 3X Dist ncia focal Tudo o que amplia um objeto atrav s de uma lente tica tem uma certa dist ncia focal A dist ncia focal a...

Page 71: ...o seu dispositivo Pode obter mais infor ma es sobre a elimina o adequada no seu centro de elimina o de res duos local ou autoridade ambiental GARANTIA O per odo normal da garantia de 2 anos a partir...

Page 72: ...od nadzorem osoby doros ej Przechowuj materia y opa kowaniowe takie jak plastikowe torby i gumki w mie jscu niedost pnym dla dzieci poniewa stwarzaj one ryzyko ud awienia RYZYKO PO ARU Nie umieszczaj...

Page 73: ...szeroko ci geograficznej ruby nogi statywu ruby g owica statywu Przeciwwaga pr t Cz ci akcesoria Okulary Szukacz 5 24 Soczewka Barlowa 3 Soczewka odwracaj ca 1 5 Filtr ksi ycowy Oprogramowanieastrono...

Page 74: ...z otw r w g owicy statywu i mocowanie na monta u Druga podk adka i nakr tka motylkowa s przykr cane i dokr cane Post puj w ten sam spos b z dwoma pozosta ymi mocowaniami a monta i statyw zostan solidn...

Page 75: ...zenia chcesz u y do teleskopu wymieniaj c okulary Przed w o eniem okularu nale y zdj nasadk chroni c przed kurzem z wyci gu okularowego 6 Odkr rub X na tubie cz cej okularu i w okular 30 mm Ponownie d...

Page 76: ...ruba mocuj ca o rektascensji C Skala osi deklinacji J Rektascensja D ruba mocuj ca o deklinacji K Precyzyjna regulacja osi rektascencji E Precyzyjna regulacja osi deklinacji L ruba mocuj ca justowani...

Page 77: ...w kierunku p nocnym U yj kompasu je li masz Aby to zrobi musisz poluzowa rub blokuj c L Nast pnie mo esz obr ci teleskop OTA dok adnie w kierunku p nocnym Ponownie dokr rub blokuj c L 16 Obs uga szero...

Page 78: ...c okulary mo esz zmieni powi kszenie teleskopu Aby uzyska najlepsz wydajno maksymalne zalecane powi kszenie wynosi 152 Rada Ogniskowa Okular Powi kszenie 700 mm 30 mm 23 x Korzystanie z soczewki odwr...

Page 79: ...pi ca si mi kka szmatka lekko zwil ona alkoholem Je li kurz lub wilgo dosta y si do wn trza teleskopu nie pr buj go samodzielnie czy ci wy lij go do centrum serwisowego Zasada teleskop zwierciadlany 2...

Page 80: ...tak e Okular Teleskop ten ma soczewk Barlowa 3 Ogniskowa Wszystko co powi ksza obiekt za pomoc uk adu optycznego soczewki ma okre lon ogniskow Ogniskowa to d ugo cie ki kt r wiat o przemieszcza si od...

Page 81: ...Wi cej informacji na temat w a ciwego usuwania odpad w mo esz uzyska w lokalnym zak adzie utylizacji odpad w lub w urz dzie ds ochrony rodowiska GWARANCJA Standardowy okres gwarancji wynosi 2 lata i...

Page 82: ...82...

Page 83: ...83...

Page 84: ...e fr nl it es pt pl_NATGEO_v032022a Bresser GmbH Gutenbergstr 2 46414 Rhede Germany www bresser de info bresser de National Geographic Partners LLC All rights reserved NATIONAL GEOGRAPHIC and Yellow B...

Reviews: