


31
2.5 Kamera-Bedienungsanleitung
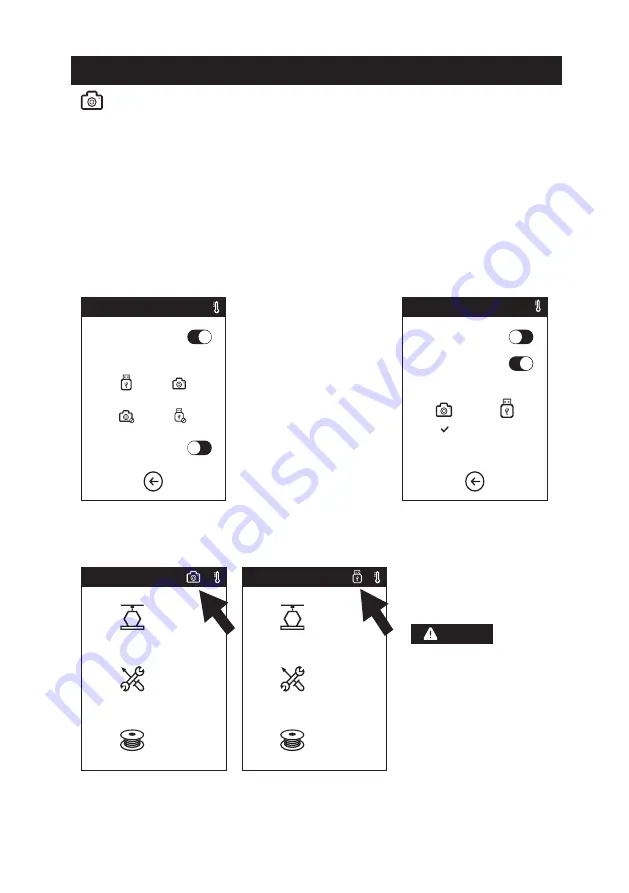
Auto Mode
Idling
Printing
Manual Mode
Auto Mode
Manual Mode
Werkzeuge
Fillament
Werkzeuge
Fillament
Kamera-Bedienungsanleitung
2.5.1. Sie kann über den angeschlossenen Computer geschaltet werden.
Die Kamera und der USB-Wechseldatenträger nutzen dieselbe Schnittstelle.
Die Kamera des W-LAN 3D-Drucker und der USB-Stick des W-LAN 3D-Drucker sind nicht
miteinander kompatibel (das heißt, dass immer nur eines dieser beiden Geräte verwendet
werden kann: entweder die Kamera oder die USB-Wechselfestplatte).
Sie können in der Cloud oder am lokalen Computer zwischen der Kamera und der
USB-Wechselfestplatte umschalten.
Die Verwendung der W-LAN 3D-Drucker-Kamera wird nachstehend erläutert.
Die W-LAN 3D-Drucker-Kamera hat zwei Betriebsmodi: Automatikmodus (Standardmodus) oder
manueller Modus. Der Zugriff auf die Kamera erfolgt über „Werkzeuge -> Einstellungen -> Kamera)
(Werkzeuge-Einstellungen-Kamera) (auf der zweiten Seite). Für den Zugriff auf die relevante Seite,
berühren Sie die Schaltfläche „Kamera“.
Sobald die Kamera erfolgreich eingeschaltet wurde, wird das Kamerasymbol in der
Statusleiste angezeigt. Sobald die Kamera ausgeschaltet wird, wird anstelle des
Kamerasymbols das USB-Wechselfestplattensymbol in der Statusleiste angezeigt.
Automatischer Modus: Während des Druckerbetriebs wird die
Kamera eingeschaltet und die USB-Wechselfestplatte deaktiviert.
Während der Drucker inaktiv ist, wird die Kamera ausgeschaltet
und die USB-Wechselfestplatte ist aktiviert.
Manueller Modus: Der Benutzer kann
nach Belieben zwischen der Kamera
und der USB-Wechselfestplatte
umschalten
.
Wenn die Bilder im Browser
angezeigt werden sollen,
müssen Drucker und PC in
demselben Intranet aktiv sein
(das heißt, Drucker und PC sind mit
demselben Router verbunden).
Hinweis
Tools
Filament
Tools
Filament
2�5 The Guide of Using Camera
Camera User Manual
Camera and USB Disk use the same interface, so the use of WIFI 3D Printer‘s camera is
different from that of other models. The use of WIFI 3D Printer‘s camera and the use of
WIFI 3D Printer‘s USB Disk are incompatible (that is, only one (camera or USB Disk) can
be used in the same time). The switching between camera and USB Disk can be realized
through the Cloud or the lower computer. The use of WIFI 3D Printer‘s camera is introdu-
ced as follows.
In respect of the use of WIFI 3D Printer‘s camera, there are two modes, that is automatic mode
(default mode) and manual mode. The route is (Tools->Settings (on the second page) ->
Camera), the user can click the “Camera” button to enter the relevant page.
2�5�1� The switching can be controlled by the lower computer�
Automatic Mode: When the printer is working (such as
the printer is printing the files), the camera is turned on
and USB Disk is turned off� When the printer is not wor-
king, the camera is turned off and USB Disk is turned on�
Manual Mode: The switching
between camera and USB Disk
can be controlled by the user
at will�
Notices
When the user wants to use the
browser to view the images,
the printer and PC must be in
an intranet (that is, the printer
and PC connect to the same
router).
After the camera is turned on successfully, the icon of camera will appear in
Status Bar. After the camera is turned off, the icon of USB Disk will appear in
Status Bar in case of successful insertion of USB Disk.
Auto Mode
Idling
Printing
Manual Mode
Manual Mode
Auto Mode


