background image

6

ABOUT THIS INSTRUCTION MANUAL

These operating instructions are to be considered 
a component of the device. Please read the 

safety instructions and the operating instructions 
carefully before use. Keep these instructions for 
renewed use at a later date. When the device is sold 
or given to someone else, the instruction manual must 
be provided to the new owner/user of the product.

This product is intended only for private use.  

GENERAL WARNINGS

 CHOKING HAZARD!

Keep packaging material, like plastic bags and rubber 
bands, out of the reach of children, as these materials 
pose a choking hazard.

 RISK of ELECTRIC SHOCK!

This device contains electronic components that 
operate via a power source (batteries). Children should 
only use the device under adult supervision. Only use 
the device as described in the manual; otherwise, you 
run the risk of an electric shock.

 RISK of FIRE/EXPLOSION!

Do not expose the device to high temperatures. Use 
only the recommended batteries. Do not short-circuit 
the device or batteries, or throw them into a fi re. 
Excessive heat or improper handling could trigger a 
short-circuit, a fi re or an explosion!


 NOTE!

Do not immerse the unit in water. 

Do not subject the unit to excessive force, shock, dust, 
extreme temperature or high humidity, which may result 
in malfunction, shorter electronic life span, damaged 
batteries and distorted parts.

Do not disassemble the device. In the event of a defect, 
please contact your dealer. The dealer will contact 
the Service Centre and can send the device in to be 
repaired, if necessary. 

Use only the recommended batteries. Always replace 
weak or empty batteries with a new, complete set of 
batteries at full capacity. Do not use batteries from 
different brands or with different capacities. Remove 
the batteries from the unit if it has not been used for 
a long time.

The manufacturer is not liable for damage related to 
improperly installed batteries!

SCOPE OF DELIVERY 

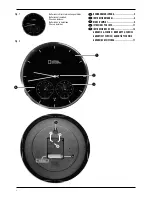
(Fig. 1)

Wall clock, Instruction manual
Required batteries: 1 x 1.5V battery (Size AA/LR6)
Batteries not included with purchase.

PARTS OVERVIEW

Wall clock 

(Fig. 2)

1. Dial plate
2. Clock hands (hours, minutes)
3. Humidity display (indoor)
4. Temperature display (indoor)
5. Wall mount             
6. Battery compartment
7. M.SET button
8. RESET button
9. REC button

GETTING STARTED/POWER SUPPLY


 NOTE!

Insert the batteries for the remote sensor fi rst and 
then insert the batteries for the wall clock. Make sure 
to place the batteries strictly according to the right 
polarities (+/-) as shown in the battery compartment.

1. Remove the locking pin from the clockwork. 
  The clock can be operated only after the pin has  
 been 

removed.

2.  Insert one battery (1.5V, AA/LR6) into battery 

compartment (6).

TIME SETTING


 NOTE!

After the clock received the DCF time signal the time 
will be set according to the Central European time 
(CET). Summer and winter time change (and reverse) 
is also set automatically. Other deviating times can be 
set manually only.

Summary of Contents for 90-66500

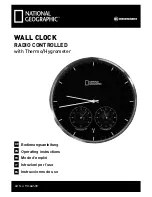
Page 1: ...Art No 90 66500 WALL CLOCK RADIO CONTROLLED with Thermo Hygrometer Bedienungsanleitung Operating instructions Mode d emploi Istruzioni per l uso Instrucciones de uso DE EN FR IT ES...

Page 2: ...PER L USO 11 ES INSTRUCCIONES DE USO 14 GARANTIE SERVICE WARRANTY SERVICE GARANTIE ET SERVICE GARANT A Y SERVICIO GARANZIA E ASSISTENZA 17 Batterien nicht im Lieferumfang enthalten Batteries not incl...

Page 3: ...Wasser Setzen Sie das Ger t keinen starken St en Ersch t terungen Staub dauerhaft hohen Temperaturen oder extremer Feuchtigkeit aus Dies kann zu Fehlfunktio nen Kurzschl ssen Besch digung der Batteri...

Page 4: ...rz um die Uhr zeit in Minutenschritten einzustellen Halten Sie die M SET Taste gedr ckt um die Uhrzeit kontinuierlich zu verstellen 3 Wenn die M SET Taste nicht mehr bet tigt wird wird die eingestellt...

Page 5: ...r ordnungsgem en Entsorgung erhalten Sie beim kommunalen Entsor gungsdienstleister oder Umweltamt Werfen Sie Elektroger te nicht in den Hausm ll Gem der Europ ischen Richtlinie 2002 96 EG ber Elektro...

Page 6: ...Do not disassemble the device In the event of a defect please contact your dealer The dealer will contact the Service Centre and can send the device in to be repaired if necessary Use only the recomm...

Page 7: ...r temperature 4 will be displayed MOUNTING POSITIONING NOTE Make sure you have mounted or placed the device in a safe way Otherwise the device may fall down and heavy damages can occur for which the m...

Page 8: ...d emballage sacs plastiques bandes en caoutchouc etc RISQUE D ETOUFFEMENT RISQUE D ELECTROCUTION Cet appareil contient des pi ces lectroniques raccord es une source d alimentation lectrique batteries...

Page 9: ...r signal DCF Une fois les pile ins r es l heure est automatiquement r gl e par signal radio DCF Ce processus peut durer quelques minutes Pendant ce temps les aiguilles tournent plusieurs fois en marqu...

Page 10: ...s aiguilles se placent en position de r ception 12 h 00 et l horloge murale radio entreprend une tentative de r ception du signal DCF 3 Attendez environ 2 5 minutes jusqu ce que l heure actuelle soit...

Page 11: ...parecchio in acqua Non esporre l apparecchio a urti e vibrazioni violente polvere temperature elevate per lunghi periodi o umidit estrema Si possono causare malfunzionamenti cortocircuiti danni alle b...

Page 12: ...to M SET per impostare l ora in passaggi da un minuto Tenere premuto il tasto M SET per continuare a modi care l ora 3 Rilasciando il tasto M SET l ora impostata viene acquisita automaticamente e si e...

Page 13: ...no smaltimento conforme sono disponibili presso il servizio di smaltimento comunale o l Agenzia per l ambiente locale Non smaltire gli apparecchi elettronici con i ri uti domestici Secondo la Direttiv...

Page 14: ...as indicaciones de seguridad y el manual de instrucciones Guarde el presente manual de instrucciones por si necesita volver a utilizarlo m s tarde En caso de venta o entrega a terceros del aparato se...

Page 15: ...Pulse el bot n M SET 7 durante unos 3 segundos 2 Cuando el minutero empiece a moverse podr con gurar la hora manualmante Presione el bot n M SET durante un instante para con gurar la hora minuto a mi...

Page 16: ...las del aparato si no se va a usar durante un periodo prolongado ELIMINACI N Elimine los materiales de embalaje separados por tipos Obtendr informaci n sobre la eliminaci n reglamentaria en los provee...

Page 17: ...garantie ainsi que les informations concernant la prolongation de la garantie et les prestations de service sur www bresser de warranty_terms Vous souhaitez un mode d emploi d taill pour ce produit da...

Page 18: ......

Page 19: ......

Page 20: ...ergstr 2 DE 46414 Rhede www bresser de info bresser de 2016 National Geographic Partners LLC All rights reserved NATIONAL GEOGRAPHIC and Yellow Border Design are trademarks of the National Geographic...

Reviews: