Breckwell SPG9000 Owner'S Operation And Instruction Manual Download Page 16

16 Ussc

THE FIRST FIRES

The first few fires in your new appliance needs to be small so as to cure the fresh paint and preserve it’s quality. To do 

so, fill the pre-chamber with 1/2 charge (approximately 5-7 obs.) of premium wood pellets. Close the fuel lid and dump 

fuel into main fuel chamber. Open the Viewing Door and light pellets. Close Viewing Door once the pellets have properly 

ignited. Pull the primary control knob out to achieve a meduim burn rate. Never open the air control more than necessary.

Make sure that there’s enough air circulation while curing the stove. The odors could be present during the first 3 or 4 fires. 

Never start your stove outside. You will not be able to see if you are over heating.

IGNITION

CAUTION

:

  NEVER USE GASOLINE, GASOLINE-TYPE LANTERN FUEL, KEROSENE, CHARCOAL 

LIGHTER FLUID, OR SIMILAR LIQUIDS TO START OR “FRESHEN UP” A FIRE IN THIS 

HEATER. KEEP ALL SUCH LIQUIDS WELL AWAY FROM THE HEATER WHILE IT IS IN USE. 


  HOT WHILE IN OPERATION.  KEEP CHILDREN, CLOTHING AND FURNITURE AWAY. CON-

TACT MAY CAUSE SKIN BURNS.

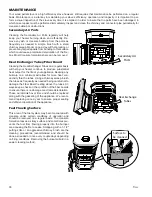
●  Open fuel loading lid. Fill pre-chamber with pellets. Close lid and use fuel charging system to dump fuel into the main 

fuel chamber. 

NOTE: DO NOT add more than 15 lbs. of pellets into the pre-chamber or more than 30 lbs. of pellets into the main 

chamber at one time.

●  Open the viewing door and see that pellets have fallen into the burnpot. 

●  Squirt only a small amount of fire starter gel on top of the wood pellets.

●  Light the fire starter and allow the pellets to ignite. (Close the viewing door and latch securely).

●  Do not agitate the fire during the ignition process.

There will be a transition period between startup and operational levels. As with a conventional wood stove, please allow 

20 -30 minutes for stove to reach operation temperatures.  During the 25 minute start up period, DO NOT  agitiate the fire. 

OPERATION

●  DO NOT open viewing door during operation.
●  DO NOT open ash pan during operation – make sure the ash pan is properly sealed. 
●  DO NOT actuate fuel charging system during operation unless fuel loading lid is completely closed.

When operating the agitator, be careful not to agitate too often or too much at one time. Pushing or pulling the agitator knob 

approximately six (6) times should be sufficient. However, under different burn conditions or fuel quality, this number may 

differ slightly. Experience burning your appliance will help you understand more of the amount to agitate during operation. 
NOTE: This appliance does not have a “quick” shutdown method. Once the appliance has been charged with fuel, ignited 

and burning, it will burn until all fuel

 has been consumed by combustion. Please note that once the fire does cease, the 

appliance may still be quite warm or HOT and could remain Hot for an undetermined amount of time depending on firing 

conditions. Experience burning your appliance, will tell you how many pellets to put in the burn chamber in order to burn 

for a desired period of time. This unit may run anywhere from 5-12 hours on a single 30lb charge depending on the air 

adjustment setting and quality of fuel used.

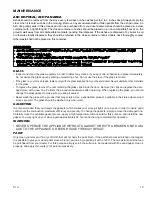
You may use the below primary air settings as a good starting point when burning your new appliance. Please note that 

these settings may vary depending on certain factors that may affect combustion.

Primary Air Settings

(Slide Damper is located on the right side of stove)

(Damper Adjustment: Pulling out on damper increases air)

Burn Rate

Adjust Damper from fully closed

Low

1/4” (6.3mm)

Medium - Low

3/8” (9.5mm)

Medium - High

1/2” (12.7mm)

High

approx. 3” (76mm)

CAUTION: Never alter the damper slide or the adjustment range to increase firing for any reason. Doing so could 

result in heater damage and will void your warranty.

Summary of Contents for SPG9000

Page 1: ...N Please read this entire manual before you install or use your new room heater Failure to follow instructions may result in property damage bodily injury or even death Improper Installation Could Void Your Warranty United States Stove Company 227 Industrial Park Road P O Box 151 South Pittsburg TN 37380 SAVE THESE INSTRUCTIONS THIS MANUAL WILL HELP YOU TO OBTAIN EFFICIENT DEPENDABLE SERVICE FROM ...

Page 2: ...s Steel SPGLS Combustible Hardwood Pellets Colors Black Flue Pipe Diameter 6 152 5mm Flue Pipe Type Standard Single Wall or Double Wall Black or Blued Steel 2100 F 650 C Minimum Chimney Hieght 12 3 7m Dimensions Overall Depth x Width x Height 25 x 23 1 2 x 43 635mm x 596 9mm x 1092 2mm Door Opening Width x Height 22 x 19 1 2 558 8mm x 495 3mm Pyroceramic Glass Door Viewing Width x Height 12 7 8 x ...

Page 3: ..._______ Reason for Purchase qAlternative Heat qMain Heat Source qDecoration qCost qOther _________________________ What was the determining factor for purchasing your new appliance _______ I have read the owner s manual that accompanies this unit and fully understand the Installation q Operation q and Maintenance q of my new appliance Print Name Signature Date Please attach a copy of your purchase...

Page 4: ...4 Ussc CUT HERE CUT HERE Ê É Fold Here Fold Here United States Stove Company P O Box 151 South Pittsburg TN 37380 Fold Here PLACE STAMP HERE ...

Page 5: ...refueling your stove WARNING DO NOT INSTALL IN SLEEPING ROOM Aworking smoke detector must be installed in the same room as this product Install vent at clearances specified by the vent manufacturer Do not connect the vent to a vent serving any other appliance or stove Do not install a flue damper in the exhaust venting system of this unit Your stove requires periodic maintenance and cleaning see M...

Page 6: ... NOT PROPERLY INSTALLED AHOUSE FIRE MAY RESULT TO REDUCE THE RISK OF FIRE FOLLOW THE INSTALLATION INSTRUCTIONS CONSULT YOUR MUNICIPAL BUILDING DEPARTMENT OR FIRE OFFICIALS ABOUT PERMITS RESTRICTIONS AND INSTALLATIONS REQUIREMENTS IN YOUR AREA USE SMOKE DETECTORS IN THE ROOM WHERE YOUR STOVE IS INSTALLED KEEP FURNITURE AND DRAPES WELL AWAY FROM THE STOVE NEVER USE GASOLINE GASOLINE TYPE LANTERN FUE...

Page 7: ... hallway or near a staircase since it may block the way in case of fire or fail to respect required clearances DESCRIPTION SCALE SIZE REV REAR Model Front Sides Rear SPG9000 25 635mm 8 203mm 6 152mm FRONT SIDE SIDE FLOOR PROTECTOR Your wood pellet stove should be placed on a 1 inch non combustible surface with a k factor of 0 84 For multiple layers add R values of each layer to determine the overa...

Page 8: ...ue pipe The chimney connector must not pass through an attic or roof space closet or similar concealed space a floor or a ceiling For Canadian installations where passage through a wall or partition of combustible construction is desired the installation must conform to CAN CSA B365 A flue pipe crossing a combustible wall must have a minimum clearance of 18 457 2mm To reduce flue clearances from c...

Page 9: ...the section toward the chimney Any installation with a horizontal run of chimney pipe must conform to NFPA 211 You may contact NFPA National Fire Protection Association and request the latest edition of the NFPA Standard 211 To insure a good draft the total length of the coupling pipe should never exceed 8 to 10 2 4m to 3 04 m Except for cases of vertical installation cathedral roof style where th...

Page 10: ... the draft effect your stove s performance is directly dependent on an adequate draft from your chimney The following recommendations may be useful for the installation of your chimney 1 DO NOT CONNECT THIS UNIT TO A CHIMNEY FLUE SERVING ANOTHER APPLIANCE 2 It must rise above the roof at least 3 0 9m from the uppermost point of contact 3 The chimney must exceed any part of the building or other ob...

Page 11: ...e same manufacturer and install the ceiling support package or wall pass through and T section package firestops where needed insulation shield roof flashing chimney cap etc Maintain proper clearance to the structure as recommended by the manufacturer The chimney must be the required height above the roof or other obstructions for safety and proper draft operation ...

Page 12: ...As sociation NFPA by having it inspected by a professional Make sure there are no cracks loose mortar or other signs of deterioration and blockage Have the chimney cleaned before the stove is installed and operated When connecting the stove through a combustible wall to a masonry chim ney special methods are needed ...

Page 13: ... chimney connector and a minimum 24 gage ventilated wall thimble which has two air channels of 1 25 4 mm each construct a wall pass through There shall be a minimum 6 152 4 mm sep aration area containing fiberglass insulation from the outer surface of the wall thimble to wall combustibles Support the wall thimble and cover its opening with a 24 gage minimum sheet metal sup port Maintain the 6 152 ...

Page 14: ...EV Outside Air Connection Dryer Venting Kit Installation If using outside combustion air you can purchase a standard 4 Dryer Vent kit from your local hardware supply store and install it on the rear of the appliance If using a Dryer venting kit the outlet cover must be of a design that DOES NOT close by means of a flap or trap door You must purchase a style that allows a continuous in flow of air ...

Page 15: ... open could potentially cause a smoke hazard C Access Panel Open Access Panel to expose the main door latches Release latches to perform periodic maintenance like cleaning the glass burnpot or cleaning the firebox of flyash NEVER open door during operation DO NOT attempt to clean glass or empty burnpot while unit is hot D Primary Air Control You will pull push on the knob to adjust the combustion ...

Page 16: ...tove to reach operation temperatures During the 25 minute start up period DO NOT agitiate the fire OPERATION DO NOT open viewing door during operation DO NOT open ash pan during operation make sure the ash pan is properly sealed DO NOT actuate fuel charging system during operation unless fuel loading lid is completely closed When operating the agitator be careful not to agitate too often or too mu...

Page 17: ...nd Need for Removal When wood is burned slowly it produces tar and other organic vapors which combine with expelled moisture to form creosote The creosote vapors condense in the relatively cool chimney flue of a slow burning fire As a result creosote residue accumulates on the flue lining When ignited this creosote makes an extremely hot fire The chimney connector and chimney should be inspected a...

Page 18: ...Board Cleaning the Heat Exchanger Tubes on a regular basis will help your heater continue to produce substantial heat output for the life of your appliance Keeping any build up to a minimum will allow for more heat con ductivity thru the tubes Using a chimney sweep brush the tubes as frequently as needed being careful not to damage the Fiber Board resting above the tubes Al ways keep a check on th...

Page 19: ... the glass supplied from your heater dealer Never substitute other materials for the glass To replace the glass remove the nuts retaining the glass clips inside the door Remove the clips and replace the dam aged piece with a new one Perform the procedure backwards after replacing When replacing the glass you should change the glass gasket to make sure you keep it sealed Never wash the glass with a...

Page 20: ...nted 40515 1 83506 3 8 x 1 1 4 Roll Pin 1 891135 Spring Handle LG 1 88066 Rope Gasket 5 8 4 6 Ft 88087 Glass Gasket 1 8 thk x 1 wide 3 7 Ft 891131 Ceramic Glass 1 25464 Top Glass Retainer 1 25465 Bottom Glass Retainer 1 83202 10 24 x 3 8 Pan Head Phillips Screw 4 83278 Washer 7 32 ID x 1 2 OD 4 ...

Page 21: ...Ussc 21 NOTES ...

Page 22: ...MODEL NUMBER WHICH IS ON THE NAMEPLATE ATTACHED TO THE HEATER WHEN ORDERING REPAIR PARTS ALWAYS GIVE THE FOLLOWING INFORMA TION AS SHOWN IN THIS LIST 1 THE PART NUMBER 2 THE PART DESCRIPTION 3 THE MODEL NUMBER ________________________ 4 THE SERIAL NUMBER ________________________ HOW TO ORDER REPAIR PARTS UNITED STATES STOVE COMPANY 227 INDUSTRIAL PARK ROAD P O BOX 151 SOUTH PITTSBURG TN 37380 423 ...

Reviews: