7
EN
the specifications of your mains. When the unit is
used in the mains with 60 Hz frequency, it does not
need any additional settings.
BLADES (1,2)
• Blades (1, 2) are consumable and they are not
covered by warranty.
• The consumer should check the condition of the
cutting edges of the blades (1, 2) by himself, as
sharpening (polishing) of cutting edges is not covered
by warranty.
Checking the correct installation of the blades.
• Before cutting, make sure that the blades are
positioned correctly, the lower blade (1) should
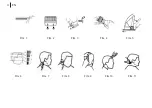
protrude 1.2 mm relative to the upper blade (2) (fig.
1).
• Loosen the mounting screws of the lower blade (1)
and align the blade (1), tighten the mounting screws
(fig. 2).
BLADES LUBRICATING
•
Clean the blades off cut hair and lubricate it after
every use. It is also recommended to lubricate the
blades (1,2) before using the hair clipper.
• Detachable blade block (6) is consumable and is not
covered by the warranty.
•
Clean the blade block (6) off cut hair and lubricate it
after every use. It is also recommended to lubricate
the blade block (6) before using the hair clipper.
• For lubricating the blades use the oil (14), supplied
with the unit, or the oil intended for similar devices.
• Do not use vegetable oil or oil that contains solvents.
Solvents will evaporate, and the remaining thick oil
may slow down the blades motion.
• To remove the blade block place the hair clipper with
the blades towards you and press on the upper edge
of the blade block (6) with your thumb (pic. 6).
• Apply the lubricating oil (14) to the junctions between
the fixed and moving parts of the blades (pic. 2).
• Install the blade block (6) back to its place. To do this,
first insert its lower part to the installation place and
then press on the upper edge of the blade block (6).
Make sure that the blade block (6) is installed and
fixed properly (pic. 9).
• Switch the hair clipper on by moving the switch (5) to
the position «I» and let it operate for approximately
30 seconds to spread the oil across the rubbing
surfaces of the blades.
•
Switch the hair clipper off by moving the switch (5) to
the position «0» and remove the excessive oil with a
paper towel or a dry cloth.
INSTALLING AND REMOVING THE
ATTACHMENT COMB
• Install one of the combs (8, 9, 10 or 11) on the blades
(1,2) (fig.4)
• Install one of the combs (8, 9, 10 or 11) on the
blades, teeth up, and press the ledge in the bottom
Summary of Contents for BR3433
Page 1: ...Instruction manual BR3433 Hair clipper BR3433 brayer ru...
Page 2: ...EN 3 DE 12 RU 22 KZ 34...
Page 4: ...4 EN FIG 1 FIG 2 FIG 3 FIG 4 FIG 5 FIG 6 FIG 7 FIG 8 FIG 9 FIG 10 FIG 11...
Page 13: ...13 DE Abb 1 Abb 2 Abb 3 Abb 4 Abb 5 Abb 6 Abb 7 Abb 8 Abb 9 Abb 10 Abb 11...
Page 22: ...22 RU BR3433 1 2 3 4 5 0 I 6 7 8 3 9 6 10 9 11 12 12 13 RU...
Page 23: ...23 RU P 1 P 2 P 3 P 4 P 5 P 6 P 7 P 8 P 9 P 10 P 11...
Page 24: ...24 RU 80...
Page 25: ...25 RU...
Page 26: ...26 RU 3 60 1 2 1 2 1 2 1 1 2 2 1 1 1 2 1 2...
Page 28: ...28 RU 1 2 8 9 10 11 8 3 9 6 10 9 11 12 6 11 12 1 2 13 7 8 9 10 5 I...
Page 29: ...29 RU 9 11 8 8 9 10 11 10 8 9 3 6 10 11 9 12 11 8 9 10 11 8 9 10 11 3 3 5 5 0 4 1 2 13 1 2 3...
Page 31: ...31 RU 3...
Page 32: ...32 KZ BR3433 1 2 3 4 5 0 I 6 7 8 3 9 6 10 9 11 12 12 13 KZ...
Page 33: ...33 KZ 1 2 3 4 5 6 7 8 9 10 11...
Page 34: ...34 KZ 80...
Page 35: ...35 KZ...
Page 36: ...36 KZ 3 60 1 2 1 2 1 2 1 2 1 2 1 1 1 2 1 2 12...
Page 38: ...38 KZ 8 9 10 11 8 3 9 6 10 9 11 12 6 11 12 1 2 13 7 8 9 10 5 I...
Page 39: ...39 KZ 9 11 8 8 9 10 11 10 8 9 3 6 10 11 9 12 11 8 9 10 11 8 9 10 11 3 3 5 5 0 4 1 2 13...
Page 41: ...41 KZ 3...
Page 42: ......
Page 44: ...brayer ru...

