Brandt SA2362E Instructions For Use Manual Download Page 20

20

Installation

Take utmost care when handling your
appliance so as not to cause any damages to
the cooling unit with consequent possible fluid
leakages.

• During normal operation, the condenser and

compressor at the back of the appliance heat up
considerably. Always ensure that there is adequate
ventilation as a failure to do this will result in
component failure and possible food loss. See
installation instructions.

Important:

if the supply cord is damaged, it must

be replaced by a special cord or assembly availa-
ble from the manufacturer or its service agent.
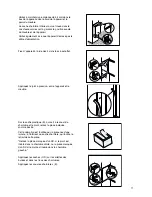
Positioning

• Unpack the cabinet and check that it is in good

condition and free of any transport damage.

• Place the refrigerator away from direct sunlight and

heat sources.

• Avoid prolonged exposure of the appliance to

direct sunlight.

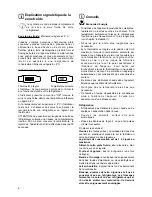
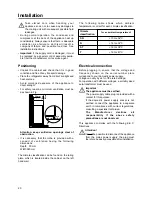
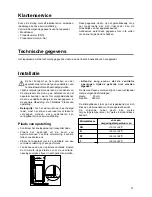
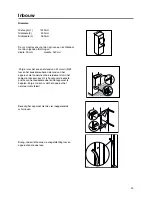
• For safety reasons, minimum ventilation must be

as shown in Fig.

Attention: keep ventilation openings clear of
obstruction.

• It is necessary that the niche is provided with a

conduct of venti-lation having the following
dimensions:
Depth 50 mm
Width 540 mm

The climate classification can be found on the rating
plate, which is located inside the cabinet on the left
hand wall.

50 mm

min.
200 cm

2

200 cm

2

min.

D526

The following table shows which ambient
temperature is correct for each climate classification:

Climate
classification

SN

+10 to +32°C

+16 to +32°C

+16 to +38°C

+16 to +43°C

N

ST

T

for an ambient temperature of

Electrical connection

Before plugging in, ensure that the voltage and
frequency shown on the serial number plate
correspond to your domestic power supply.
Voltage can vary by ±6% of the rated voltage.
For operation with different voltages, a suitably sized
auto-transformer must be used.

Important
The appliance must be earthed.

The power supply cable plug is provided with a
contact for this purpose.
If the domestic power supply socket is not
earthed. connect the appliance to a separate
earth in compliance with current regulations,
consulting a specialist technician.

The Manufacturer declines all
responsibility if the above safety
precautions are not observed.

This appliance complies with the following E.E.C.
Directives.

Attention!

It must be possible to disconnect the appliance

from the mains power supply; the plug must
therefore be easily accessible after installation.

Summary of Contents for SA2362E

Page 1: ...FR GUIDE D INSTALLATION D UTILISATION EN INSTRUCTIONS FOR USE NL GEBRUIKSAANWIJZING DE BEDIENUNGSANLEITUNG R frig rateur Refrigerator Ijkast K hlschrank 2223 534 81 SA2362E...

Page 2: ...rent une fra cheur optimale vos aliments gr ce un espace de conservation organis Vous trouverez galement dans la gamme de produits Brandt un choix tendu d appareils en parfaite harmonie avec l esth ti...

Page 3: ...eux pour les enfants Ils peuvent s touffer En cas d limination de l appareil couper le c ble d alimentation et neutraliser le dispositif de fermeture de la porte de mani re ce que les enfants ne puiss...

Page 4: ...symbole O Utilisation Avant la mise en service A cause du syst me de transport I huile contenue dans le compresseur pourrait s couler dans le circuit r frig rant Attendez 2 heures au moins avant de b...

Page 5: ...ts Il est possible de changer de place le balconnet central D gagez le balconnet en agissant dans le sens indiqu par les fl ches Remontez le balconnet la hauteur d sir e Pour un nettoyage plus soign l...

Page 6: ...clayette Fruits et l gumes bac s l gumes une fois nettoy s Beurre et fromage enveloppez les soigneusement dans des feuilles d aluminium ou de poly thyl ne et mettez les dans les casiers appropri s Lai...

Page 7: ...ttoyer l appareil vous risquez de l endommager Pour faciliter le nettoyage les balconnets peuvent tre ais ment enlev s Nettoyez p riodiquement l int rieur de votre appareil avec de l eau ti de et du b...

Page 8: ...s que n cessaire Le trou d coulement de l eau de d givrage est bouch Nettoyez l orifice d coulement avec le b tonnet se trouvant dans l orifice Les bruits sont typiques des appareils frigorifiques Il...

Page 9: ...nstallation est termin e Lors du transport et de l installation de l appareil veiller n endommager aucune partie du circuit frigorifique Pendant le fonctionnement normal le condenseur et le compresseu...

Page 10: ...nt PR0 540 50 3 2 1 R versibilit de la porte L appareil est livr avec l ouverture droite Pour changer le sens d ouverture de la porte suivez les indications ci dessous avant l installation 1 D vissez...

Page 11: ...e D724 Fixez l appareil l aide des 4 vis livr es cet effet I I Appliquez les caches C D sur les ailettes des but es et dans les trous des charni res Appliquez les couvres charni res E E E D C Sur le c...

Page 12: ...externes Apr s avoir pratiqu les trous fixer la glissi re avec les vis fournies 21 mm 21 mm ca 50 mm 90 90 ca 50 mm Fixer par encliquetage le couvercle Hc sur la glissi re Ha PR33 Hc Ha PR167 Ha Hb 8...

Page 13: ...r la glissi re et fixer avec les vis fournies Pour effectuer l ventuel alignement de la porte du meuble utiliser le jeu des trous ovales A la fin des op rations il est n cessaire de contr ler que la p...

Page 14: ...anual for the new owner Domestic Use The domestic refrigerators and freezers are designed to be used specifically for the storage of edible foodstuffs only Check the appliance for transport damage Und...

Page 15: ...nstructions booklet Notes which are important for your safety or for the proper functioning of the appliance Supplementary information regarding operation and practical applications of the appliance T...

Page 16: ...ll damage the finish Remove safety elements used for transportation Starting the appliance Insert the plug into the wall socket and turn the thermostat knob clockwise beyond position O OFF Turn the th...

Page 17: ...spot in the refrigerator Meat can only be stored safely in this way for one or two days at the most Cooked food cold cuts jelly etc these should be well covered and can be stored on any of the glass s...

Page 18: ...ducts or wax polishes to clean the interior as these will damage the surface and leave a strong odour Clean the inside with warm water and bicarbonate of soda Rinse and dry thoroughly To guarantee a s...

Page 19: ...frost thaws on the cooling plate Place the drain hose at the back of the cabinet above the drain bowl Sometimes this is normal Temperature control may cause clicking sounds when the system is connecte...

Page 20: ...dth 540 mm The climate classification can be found on the rating plate which is located inside the cabinet on the left hand wall 50 mm min 200cm2 200 cm 2 min D526 The following table shows which ambi...

Page 21: ...th 540 mm Building in PR0 540 50 3 2 1 Door reversal The appliance is supplied with the door opening to the right For door opening in the opposite direction perform the following actions prior to inst...

Page 22: ...n of the kitchen furniture and the appliance Also make sure that the appliance does not clamp the mains cable 1 2 44mm E I I Apply covers C D on joint cover lugs and into hinge holes Snap hinge covers...

Page 23: ...he screws supplied 21 mm 21 mm ca 50 mm 90 90 ca 50 mm Ha 8mm K Remove the brackets and mark a distance of 8 mm from the outer edge of the door where the nail must be fitted K PR167 Ha Hb 8mm Open the...

Page 24: ...n and fix it with the screws supplied Should the lining up of the furniture door be necessary use the clearance of slots At the end of operations it is necessary to check if the door of the furniture...

Page 25: ...e u spijzen en dranken bewaart of invriest Ontdooide diepvriesproducten mogen om gezondheidsredenen niet wederom ingevroren worden De vriezende binnenwanden of vlakken in het apparaat bevatten koelmid...

Page 26: ...ete tot zeer hete delen Milieubescherming Het koelsysteem en het isolatiemateriaal van dit apparaat bevatten geen koelgassen die schadelijk zijn voor de ozonlaag Het apparaat mag niet worden afgevoerd...

Page 27: ...en van de temperatuur De temperatuurregelaar bevindt zich in de koelruimte rechts boven Bij het instellen van de juiste stand dient u er rekening mee te houden dat de temperatuur in het apparaat afhan...

Page 28: ...ng Thermostaat die afgesteld moet worden Goede temperatuur De temperatuuraanduiding maakt het mogelijk de goede werking van uw ijskast te controleren Op de aanduiding verschijnt het opschrift OK wanne...

Page 29: ...ijvoorbeeld ten gevolge van zeer warme omgevingstemperatuur of het snel willen koelen van grote hoeveelheden dranken de compressor continu loopt waardoor automatische ontdooiing van de koelverdamper n...

Page 30: ...ere hoeveelheden warme levensmiddelen opgeslagen Deur slechts zo lang open laten als nodig is Dooiwaterafvoer is verstopt Gebruik voor het doorprikken het staafje dat zich in het gaatje bevindt Geluid...

Page 31: ...ts van opstelling Belangrijk Als het aansluitsnoer beschadigd raakt moet het snoer eventueel met stekkers vervangen worden deze onderdelen zijn verkrijgbaar bij onze service afdeling Plaats van opstel...

Page 32: ...een speciaal drieaderig snoer geschikt voor een geaard stopcontact Mocht het stopcontact in uw woning niet geaard zijn dan dient een erkend installateur het apparaat volgens de geldende normen te aard...

Page 33: ...vier rneegeleverde schrm even Breng onder lichte druk de voegafdichting tussen apparaat en meubel aan D724 Zorg ervoor dat er een afstand van 44 mm vrij blijft tussen het keukenmeubel en de rand van...

Page 34: ...ier is geplaatst in het tegenovergestelde geval het onderdeel gemarkeerd met SX verwijderen Onderdelen Ha Hb Hc Hd scheiden zoals u in de tekening ziet PR266 Ha Hb Hc Hd 21 mm 21 mm ca 50 mm 90 90 ca...

Page 35: ...ekking Hd op geleider Hb vastklikken Verwijder de haken en zet met de spijker K een teken op 8 mm van de buitenste rand van de deur Ha 8mm K Plaats het ijzer opnieuw op de geleider en bevestig het met...

Page 36: ...le des K hlraums Tipps 39 Wartung Abtauen Reinigung Innenbeleuchtung 40 Wenn etwas nicht funktioniert 41 Kundendienst und Ersatzteile Technische Angabe 41 Installation Aufstellung Elektrischer Anschlu...

Page 37: ...r Faktoren Raumtemperatur H ufigkeit des T r ffnens Menge der eingelagerten Lebensmittel Aufstellung des Ger tes Die Temperatur wird automatisch geregelt Stellung 1 w rmste Innentemperatur Stellung 6...

Page 38: ...bitte in umgekehrter Reihenfolge vornehmen Die Glasablage ber der Gem seschale und die Flascheablage m ssen immer in der Stellung verbleiben um eine korrekte Luftzirkulation zu gew hrleisten D338 Var...

Page 39: ...Aufstellung nachsehen T r nur so lange wie n tig ge ffnet lassen H chste K lteeinstellung bei hoher Raumtemperatur und erheblicher Lebensmittelmenge kann fortdauernden K hlschrank Betrieb verursachen...

Page 40: ...en Benutzen Sie nie Metallgegenst nde um das Ger t zu reinigen da es besch digt werden k nnte Den Innenraum mit lauwarmem Wasser und einem neutralen Reinigungsmittel reinigen Gut nachwaschen und sorgf...

Page 41: ...Innerhalb der letzen 24 Std wurden gr ere Mengen warmer Lebensmittel eingelagert T r nur so lange wie n tig ge ffnet lassen Die Ablauf ffnung an der R ckwand im Ger teinnenraum ist verstopft Mit einem...

Page 42: ...0cm2 200 cm 2 min D526 Die Klimaklasse finden Sie auf dem Typschild das sich links im Innenraum des Ger tes befindet Nachstehende Tabelle zeigt welche Umgebungstemperatur welcher Klimaklasse zugeordne...

Page 43: ...ranschlag von rechts geliefert Falls einen gegen berliegenden T ranschlag erfordert wird gehen Sie wie folgt vor bevor Sie das Ger t einbauen 1 Obere Scharnierstift abschrauben und Kunstoffteil entfer...

Page 44: ...zwischen K chenm bel und Ger t Dar ber hinaus darf das Ger t das Netzkabel nicht quetschen I I In die Befestigungs und Scharnierl cher beiliegende Abdeckkappen C D eindr cken Scharnierabdeckungen E au...

Page 45: ...l cher anzeichnen Nachdem die L cher gebohrt wurden die Schiene mit den mitgelieferten Schrauben befestigen 21 mm 21 mm ca 50 mm 90 90 ca 50 mm PR33 Hc Ha Die Abdeckung Hc in die Schiene Ha eindr cken...

Page 46: ...r Schiene anbringen und mit den mitgelieferten Schrauben befestigen F r eine allf llig notwendige Ausrichtung der M belt r den Spielraum der Langl cher nutzen Nach Beendigung der Arbeiten den einwandf...

Page 47: ...Brandt Group Suisse SA Service Apr s Vente Route de Soleure 12 2072 St Blaise NE T l 032 756 49 89 Fax 032 756 49 99 Num ro vert 0800 81 12 34 E mail serviceCH elcobrandt com...

Page 48: ...Tarif en vigueur au 1 avril 2004 Service fourni par FagorBrandt SAS locataire g rant Etablissement de Cergy 5 7 avenue des B thunes 95 310 Saint Ouen L Aum ne SAS au capital social de 20 000 000 euros...

Reviews: