background image

The hood must be installed in conformity with the applicable regulations
concerning the ventilation  of premises.  In France, these regulations are
detailed in DTU 61.1 from the CSTB.  In particular, the evacuated air must not

be channelled into a duct used to evacuate fumes from appliances using gas or
other combustible fuels.  Disused ducts may only be used after approval from a
competent specialist.
The minimum distance between the cooking surface and the lowest part of the
hood must be 70 cm.  If the instructions for the hob installed under the  hood 
specify a distance of more than 70 cm, this requirement must be respected.

I

nstalling your hood ?

If you possess an outlet to the exterior:

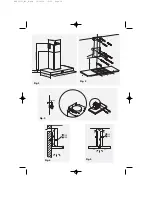
fig. 4

Your hood can be connected to this using a flue (minimum Ø 125 mm, enamelled, made from

aluminium, flexible or made from a non-flammable material).  If your flue is below 125 mm in

diameter, 

you must obligatorily use the "recycling" mode. 

If you do not possess an outlet to the exterior: 

fig. 5

All of our appliances can be used in recycling mode.

In this case, you should add an active carbon filter which will keep in odours.

- Draw a horizontal line 70 cm minimum from the cooktop.

- Draw a vertical line on the wall running from the ceiling to the lower edge of the hood.
- Place the mounting hole template against the wall 

(fig. 2)

.

- Drill the 6 holes. Insert the 6 wall plugs.
- Screw up the top two screws of the hood, but not completely - allow them to 

protrude by 5 mm.

- Remove the metal filter.
- Attach the suction hood to the two screws 

(fig. 3)

.

- Screw up the two screws at the bottom.

A

ssembling your hood

C

onnecting up your hood

This appliance is delivered with a H 05 VVF power cable with 2 conduc-

tors of 0.75 mm2 (neutral, live).  This must be 
connected to the 220-240 V single phase mains network via a CEI 60083

standard plug which must remain accessible following installation.   We will
not be liable in the event of an accident arising following incorrect installation.
The fuse for your installation must be 10 or 16A.  If the power cable is dama-
ged, call the after sales service department in order to avoid danger.

Adjust the level of your hood before fully tightening up all four screws.

GB

99635121_ML_A.qxd  14/12/04  16:52  Page 5

Summary of Contents for Box hood

Page 1: ...User s guide Box hood Le guide d utilisation Hotte box GB FR 99635121_ML_A qxd 14 12 04 16 52 Page 1 ...

Page 2: ...tted cooking hobs ovens dish washers and refrigerators that will match your new BRANDT hood Of course we make every effort to ensure that our products meet all your requirements and our Customer Relations depart ment is at your disposal to answer all your questions and to listen to all your suggestions A specialist in the world of cooking BRANDT works hard to contribute to your culinary success an...

Page 3: ...ombustible fuel burning stove wood coal etc These hoods have been designed for non commercial use in private homes With a view to constantly improving our products we reserve the right to modify their technical functional or aesthetic characteristics making any changes to their features considered necessary or desirable in view of technical progress These hoods are designed exclusively for cooking...

Page 4: ...etal filters Suitable ventilation should be ensured for the room when the suction hood is used at the same time as appliances using gas or another combustible fuel 3 speed model 1 Slow speed 2 Medium speed 3 Fast speed Lighting Important When several speed buttons are pressed in the highest speed applies The hood turns off when none of the buttons are pressed in 99635121_ML_A qxd 14 12 04 16 52 Pa...

Page 5: ... can be used in recycling mode In this case you should add an active carbon filter which will keep in odours Draw a horizontal line 70 cm minimum from the cooktop Draw a vertical line on the wall running from the ceiling to the lower edge of the hood Place the mounting hole template against the wall fig 2 Drill the 6 holes Insert the 6 wall plugs Screw up the top two screws of the hood but not com...

Page 6: ...so placing this against the ceiling Take care to centre the deflector vis à vis the vertical line drawn on the wall fig 7 Prepare your chimney taking care to place the vents toward the top to ensure that they are visible fig 9 Fit the upper part to the plastic deflector Adjust the length of the telescopic chimney by bringing down the lower part and fitting it into the top of the hood To ensure opt...

Page 7: ...t least once a year depending on your level of use Use a commercial household cleaning product then rinse abundantly and dry This cleaning can be carried out in your dishwasher in the vertical posi tion ensure that the cartridge never comes into contact with dirty crockery or silver tableware You should order these filters from your dealer quoting the reference shown on the ID plate located inside...

Page 8: ... apply our adjustment maintenance and repair methods Fully apply our adjustment maintenance and repair methods Use only original parts Use only original parts To submit a complaint or to order spare parts from your distributor please be sure to give him the complete reference for your appliance type of appliance and serial number You can find this information on the identification plate fitted ins...

Page 9: ... BRANDT un vaste choix de fours cuisinières tables de cuisson lave vaisselle fours micro ondes et réfrigérateurs intégrables que vous pourrez coordonner à votre nouvelle hotte BRANDT Bien entendu dans un souci permanent de satisfaire au mieux vos exigences vis à vis de nos produits notre service consom mateurs est à votre disposition et à votre écoute pour répond re à toutes vos questions ou sugge...

Page 10: ...us d un foyer à combustible bois charbon etc n est pas autorisé Ces hottes ont été conçues pour être utilisées par des particuliers dans un lieu d habitation Dans le souci d une amélioration constante de nos produits nous nous réservons le droit d apporter à leurs caractéristiques techniques fonctionnelles ou esthétiques toutes modifi cations de leurs caractéristiques liées à l évolution technique...

Page 11: ...able de la pièce doit être prévue lorsqu une hotte de cuisine est utilisée simultanément avec des appareils utilisants du gaz ou un autre combustible Modèle 3 vitesses 1 Petite vitesse 2 Moyenne vitesse 3 Grande vitesse Éclairage Important Lorsque plusieurs touches de vitesse sont enfoncées la vitesse la plus élevée est privilégiée L arrêt de la hotte se fait lorsque toutes les touches ne sont pas...

Page 12: ...la possibilité de fonctionner en mode recyclage Dans ce cas ajoutez un filtre à charbon actif qui retiendra les odeurs Tracez un trait horizontal à 70 cm minimum du plan de cuisson Tracez un trait vertical sur le mur allant du plafond jusqu au bord inférieur de la hotte Placez contre le mur les gabarits de montage fig 2 Percez les 6 trous Enfoncez les 6 chevilles Vissez les deux vis du haut de la ...

Page 13: ...in de centrer le déflecteur par rapport au trait vertical tracé sur le mur fig 7 Préparez votre cheminée en prenant soin de placer les ouïes vers le haut de maniè re qu elles soient visibles fig 9 Fixez la partie supérieure sur le déflecteur plastique Ajustez la longueur de la cheminée télescopique en descendant la partie inférieure et l emboîter dans le sommet de la hotte Pour une utilisation opt...

Page 14: ...t être changé au moins tous les ans en fonction de votre utilisation Avec un nettoyant ménager du commerce puis rin cez abondamment et séchez Ce nettoyage peut être effectué dans votre lave vaisselle en position verticale ne pas mettre en contact avec de la vaisselle sale ou des couverts en argent Commandez ces filtres chez votre revendeur sous la référence indi quée sur la plaque signalétique sit...

Page 15: ...reil type de l appareil et numéro de série Ces renseignements figurent sur la plaque signalétique fixée à l intérieur de l appareil Les descriptions et les caractéristiques apportées dans ce livret sont données seulement à titre d infor mation et non d engagement En effet soucieux de la qualité de nos produits nous nous réservons le droit d effectuer sans préavis toutes modifications ou améliorati...

Page 16: ... 70 cm 1 2 125 150 533 mm 650 1102 mm 900 mm 274 mm 271 mm 500 mm 75 mm 125 150 Fig 1 Fig 2 Fig 4 Fig 5 5mm Fig 3 99635121_ML_A qxd 14 12 04 16 52 Page 16 ...

Page 17: ... Fig 6 Fig 7 Fig 8 Fig 9 Fig 12 Fig 10 Fig 11 99635121_ML_A qxd 14 12 04 16 52 Page 17 ...

Page 18: ...99635121_ML_A qxd 14 12 04 16 52 Page 18 ...

Page 19: ...99635121_ML_A qxd 14 12 04 16 52 Page 19 ...

Page 20: ...99635121 12 04 99635121_ML_A qxd 14 12 04 16 52 Page 20 ...

Reviews: