background image

3

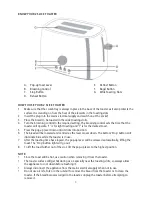
KNOW YOUR 2 SLICE TOASTER 

A.


Pop

up Toast Lever 

B.


Browning Control

C.


Stop Button 

D.


Reheat Button 

E.


Defrost Button 

F.

Bagel Button

G.


Wide Toasting Slots

HOW TO USE YOUR 2 SLICE TOASTER 

1.


Make

sure

that

the

crumb

tray

is

always

in

place

in

the

base

of

the

toaster

as

it

also

protects

the

surface

it

is

standing

on

from

the

heat

of

the

elements

in

the

toasting

slots.

2.

Insert the plug into the mains electrical supply and switch on at the socket.

3.


Place

the

bread

to

be

toasted

in

the

wide

toasting

slot/s.

4.


Turn

the

browning

control

to

the

required

setting.

The

browning

control

sets

the

time

that

the

toaster

will

operate.

‘1’

is

for

light

toasting

and

‘7’

is

for

the

darkest

toast.

5.


Press

the

pop-up

lever

down

until

it

clicks

into

position.

6.


The

bread

will

be

lowered

and

centred

as

the

lever

moves

down.

The

bottom

‘Stop’

button

will

illuminate

blue

while

the

toaster

is

in

use.

7.


After

the

toasting

time

has

elapsed,

the

pop-up

lever

will

be

released

automatically,

lifting

the

toast.

The

‘Stop’

button

light

will

go

out.

8.


To

lift

the

toast

further

out

of

the

slot,

lift

the

pop-up

lever

to

the

highest

position.


NOTE: 


Since

the

toast

will

be

hot,

use

caution

when

removing

it

from

the

toaster.


The

toaster

surface

will

get

hot

during

use,

especially

near

the

toasting

slots,

so

always

allow

the

appliance

to

cool

down

before

touching

it.


Always

disconnect

the

appliance

from

the

mains

electrical

supply

when

not

in

use.


Do

not

use

a

knife,

fork

or

other

utensil

to

remove

the

bread

from

the

toaster

or

to

clean

the

toaster.

If

the

bread

becomes

lodged

in

the

toaster,

unplug

the

toaster

before

attempting

to

remove

it.


Summary of Contents for BBEK1022

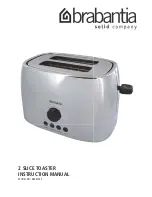
Page 1: ...INSTRUCTION MANUAL 2 SLICE TOASTER INSTRUCTION MANUAL ...

Page 2: ...2 SLICE TOASTER INSTRUCTION MANUAL MODEL NO BBEK1022 ...

Page 3: ... or damage to the appliance 12 Care should be taken when using the 2 Slice Toaster as it reaches very high temperatures particularly in the area of the openings for the bread 13 Bread may burn Therefore the 2 Slice Toaster must not be used near or below curtains and other combustible materials 14 Do not place the cable or any other object over the toaster slots whilst the 2 Slice Toaster is in ope...

Page 4: ...r use the 2 Slice Toaster if it is damaged in any way 27 A qualified electrician should do all repairs Improper repairs may place the user at risk 28 When handing this product over to a third party ensure that this instruction manual is supplied with the appliance TECHNICAL DATA Power 220 240V 50Hz Power 760 900W 3 YEAR GUARANTEE ...

Page 5: ...ver down until it clicks into position 6 The bread will be lowered and centred as the lever moves down The bottom Stop button will illuminate blue while the toaster is in use 7 After the toasting time has elapsed the pop up lever will be released automatically lifting the toast The Stop button light will go out 8 To lift the toast further out of the slot lift the pop up lever to the highest positi...

Page 6: ...omatically and the lights will go out Stop Button 1 This button is always illuminated blue when the toaster is in use 2 The toasting operation can be halted at any time by pressing the blue illuminated Stop button 3 The pop up lever will lift the toast automatically and the light will go out Bagel Button 1 The Bagel button is used for toasting bagels 2 Bagels should be cut through the middle befor...

Page 7: ...t cloth before re use 7 NOTE DO NOT use abrasives or chemical cleaners on any part of this appliance STORAGE 1 Never wrap the cord around the outside of the Toaster 2 When not in use remove the power plug from the mains supply and store the Toaster in a dry safe place out of reach of children ENVIRONMENT FRIENDLY DISPOSAL This marking indicates that this product should not be disposed of with othe...

Page 8: ...MODEL NO BBEK 4 50 45 3 BRABANTIA CU4TOMER CARE LINE FOR RSA ONLY 0861 RANK SA 7265 72 ...

Reviews: