bplan Pegasos II Instruction Manual Download Page 11

Step 

-

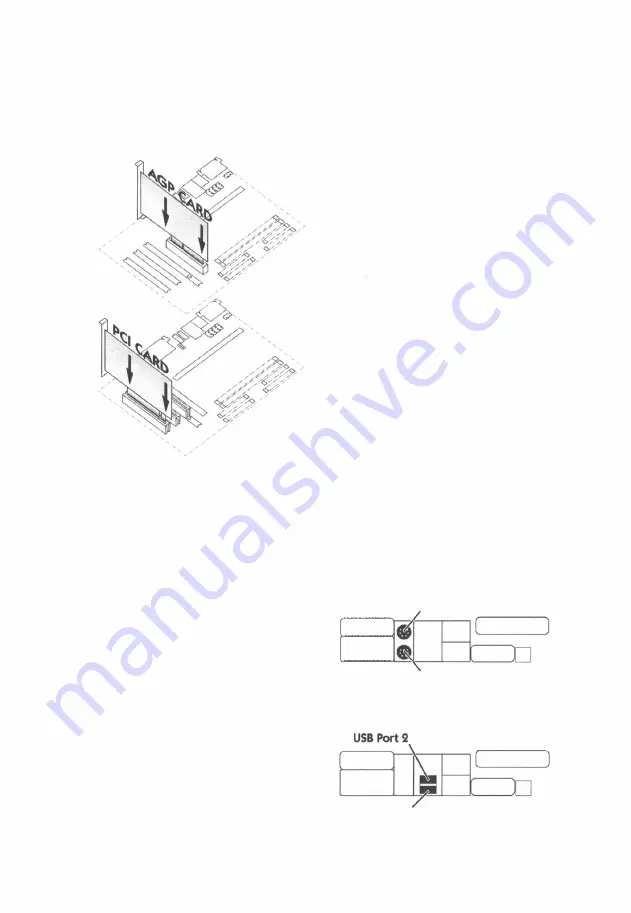
Install Add-On Cards in Expansion Slots 

1 . AGP  and  PCI  cards  plug  into  their 
respective  slots  with  the  metal  plate 
fitting  into  a  slot  at  the  back  of  the 
case.  Make  sure  the  card  is  the 
correct  way  around,  otherwise  it 
shall  not fit.  Make  sure  the  card  is in 

the  right  slot,  the  AGP  slot  is  for 

graphics cards. 

2.  Set  the  card  in  its  slot  and  push 
downwards.  It  may  need  a  pretty 
good push, but do not use excessive 
force  as  that  can  damage  the 
motherboard. 

Note: Check if the voltage of your 

AGP card is 3.3V.  Otherwise,  your 

card will not fit physically. 

Step 9 

-

Connect  External Peripherals to Back-Panel 

1.  PS/2 Mouse and Keyboard 

PS/2 Mouse 

PS/2 Keyboard 

2.  USB Ports 

USB Port 

11 

Summary of Contents for Pegasos II

Page 1: ...t of this document In no event shall the manufacturer be liable for direct indirect special incidental or consequential damages arising from any defect or error in this manual or product Product names appearing in this manual are for identification purposes only and trademarks and product names or brand names appearing in this document are the property of their respective owners This document cont...

Page 2: ...ipherals lDE Devices Page 9 Step 6 Connecting Other Internal Peripherals Page 10 Step 7 Connecting Power Supply Page 10 Step 8 Installing Add On Cards in Expansion Slots Page 11 Step 9 Connecting External Peripherals to Back Panel Page 11 Step 10 Finishing Touches Page 13 Software Installation Step 1 Booting from CD Page 14 Step 2 Configuring a Harddisk Page 14 Step 3 Formatting all Partitions Pag...

Page 3: ...vailable to all PEGASOS owners on a restricted server Moreover there is a mailing list available which informs about new OS updates and add on files In order to get access please send an email to the following address support morphos net For news forums and other online ressources concerning MorphOS please visit the following websites www morphzone org www morphos news de If you are interested to ...

Page 4: ...l for connecting high speed peripherals There are B rts ernal 1 internal 1 on the AGP slot These allow for the connectioff of rna a 8 riPherals such as Mouse Keyboard Printer Digital Camera etc 0 Pegasos 11 has two dual channel ATA100 connectors for attaching a total of four IDE devices such as harddisks CDROM drives DVO drives CD DVO burners etc Standard AC97 Audio is supported providing a variet...

Page 5: ... Memory Slots Frontpanel Connectors Primary IDE Port Floppy Port Secondary r IDE Port LJi I I I I U 1 1 1 1 11 Riser Port I I LJ rl ATX Power Connector I I Internal Audio Connectors PCI Slots AGP Slot Processor Slot 5 ...

Page 6: ...body Step by Step Installation Step 1 Install the Processor Card 6 1 Your processor card includes a heat sink Check if it is fitted correctly and is in full contact with the surface of the processor The cooler should not be loose but fit tightly against the processor 2 Plug the processor card in the processor slot which is in the centre of the motherboard as seen on the illustration on this page M...

Page 7: ...stall Malnboard In a MlcroATX or ATX Case 1 Check if the case is on a steady surface or on the floor 2 The mainboard is mounted in the case via studs small screws with holes in their back or spacers plastic parts Check which holes in the computer case line up with the holes in the motherboard 3 Screw the studs or spacers in those holes in the case 4 Add the mainboard and place it on top of the spa...

Page 8: ...puter In order to make these things work as expected you have to connect various cables found in your case to a header on your mainboard 1 ATX Soft Power On Off PWR PT 2 Hardware Reset Switch RST 3 Power LED PLED 4 Harddisk LED HLED 5 PC Speaker SPEAK 6 Other Connectors Optional 8 IR GNO IR RX2 IR 1X nwcc B i 111 iII AiJ 1 B i fII Ai 1 B fIt A I 111 T IR Infrared Connector USB Third USB Connector ...

Page 9: ... your IDE devices harddisks CDROM DVD drives etc into the system case 3 Connect an IDE cable on the back panel of each IDE device to the corresponding headers on the mainboard Close the tabs to secure the connector Please note that IDE cables are directional and cannot fit correctly unless proper1y oriented Important You need to use ATA 100 IDE100 or better cables for your IDE devices Old 40 wire ...

Page 10: ...at the Power Supply Unit is without electricity 2 Check again if the Power Supply Unit is really without electricity 3 Plug the ATX power cable into the ATX connector on your mainboard Microphone MIC 1 0 Headphones HP 1oi F Audio In AUXJN J 4 f Audio In VIO IN Audio In CO JN 11 11 It I1 11 11 co r ...

Page 11: ...ure the card is in the right slot the AGP slot is for graphics cards 2 Set the card in its slot and push downwards It may need a pretty good push but do not use excessive force as that can damage the motherboard Note Check if the voltage of your AGP card is 3 3V Otherwise your card will not fit physically Step 9 Connect External Peripherals to Back Panel 1 PS 2 Mouse and Keyboard PS 2 Mouse I Eb P...

Page 12: ...5 Parallel Port 6 Serial Port 7 MIDI Game Port 8 Audio Ports 12 I I I Firewire 1 2 1 I Ethernet 1GBIT Ethernet 100MBIT Parallel Centronic Port 1 I EEO l l Serial port MIDI Game Port r11 Ft o I I Audio Audio Mic Digital Audio Out Out In ...

Page 13: ... not loose 2 Check if all PCI AGP cards sit correctly in their respective slots 3 Make sure all memory modules were placed correctly 4 Check again all cables 5 Close your computer case 6 Connect a power cable with the power supply unit 7 Turn on the system power 13 ...

Page 14: ...d and press the ENTER key This will show if your CD drive works as expected You may press F9 in order to switch to a smaller font size so you can see more text on the screen Pressing F6 will switch back to the bigger font size 3 Next type boot pcVide cd boot img and press the ENTER key MorphOS should now successfully boot from CD and load the Ambient environment Step 2 Configuring a Harddisk 14 1 ...

Page 15: ...e If you are unsure what size Please ignore any requesters would be best 4096 saying that this setting might Megabytes should be sufficient not be optimal as a start You may still add 0 Set the check mark for the new partitions for your data Boot option later on 0 Set the check mark for the 0 Select SFS Smart File System Mount option by clicking on as the filesystem for this it partition 0 Set the...

Page 16: ...type Is pcVide disk O O at the SmartFirmware prompt With this command you may check if the partitions were installed correctly The first zero in the command stands for Channel 0 the second for Master If the unit number you wrote down before is not 0 you have to alter the command the following way Unit 0 Ipci ideldisk O O Unit 1 IpcVideldisk O 1 Unit 2 IpcVideldisk 1 0 Unit 3 IpcVide disk 1 1 okls ...

Page 17: ...ory and select the Fonnat Disk entry 4 Choose one of the two partitions 5 Enter a name in the Laber text field As a suggestion name hdOn as Work and label bootO as Morphosn 6 Click on the Fonnatn button 7 Repeat the same steps for the other partition Step 4 Installing MorphOS on a Harddlsk 1 Double click on the CD symbol 2 Double click on the HDlnstalln icon 3 Follow the instructions given by the ...

Page 18: ...vious steps went okay your Pegasos will now boot MorphOS Step 6 Auto booting You do not have to type the command line mentioned In Step 5 everytime you start your computer After a reboot type the following lines on the OpenFirmware prompt 1 setenv boot file boot img ramdebug 2 setenv boot device pcVide disk O O O Check the unit number 3 setenv auto boot timeout 3000 Auto boot after 3 seconds 4 set...

Page 19: ... Intel compatible PC before and has a MBR Master Boot Record In order to solve this problem open a MorphOS Shell window by using the menu at the top of the Ambient screen Click the right mouse button to see the menu and select NewShell from the Ambient category A new window will be opened Now type HDwrite ide device unit MOSSYS C reboot 0 in the Shell window Note You have to replace unit with the ...

Page 20: ...deon 7200 R100 o Radeon 7500 RV200 o Radeon 8500LE R200 o Radeon 9000 RV250 o Radeon 9000 Pro RV250 o Radeon 9100 RV200 3dfx o Voodoo3 2000 Avenger 3D o Voodoo3 3000 Avenger 3D o Voodoo3 3500 Avenger 3D o Voodo04 4500 VSA 100 3D o VoodooS 5500 VSA 100 3D SiS o 305 o 300 o 6326 3d Labs Texas Instruments o Permedia2 o Permedia2v For uptodate information on supported hardware please check www morphos...

Page 21: ......

Reviews: