background image


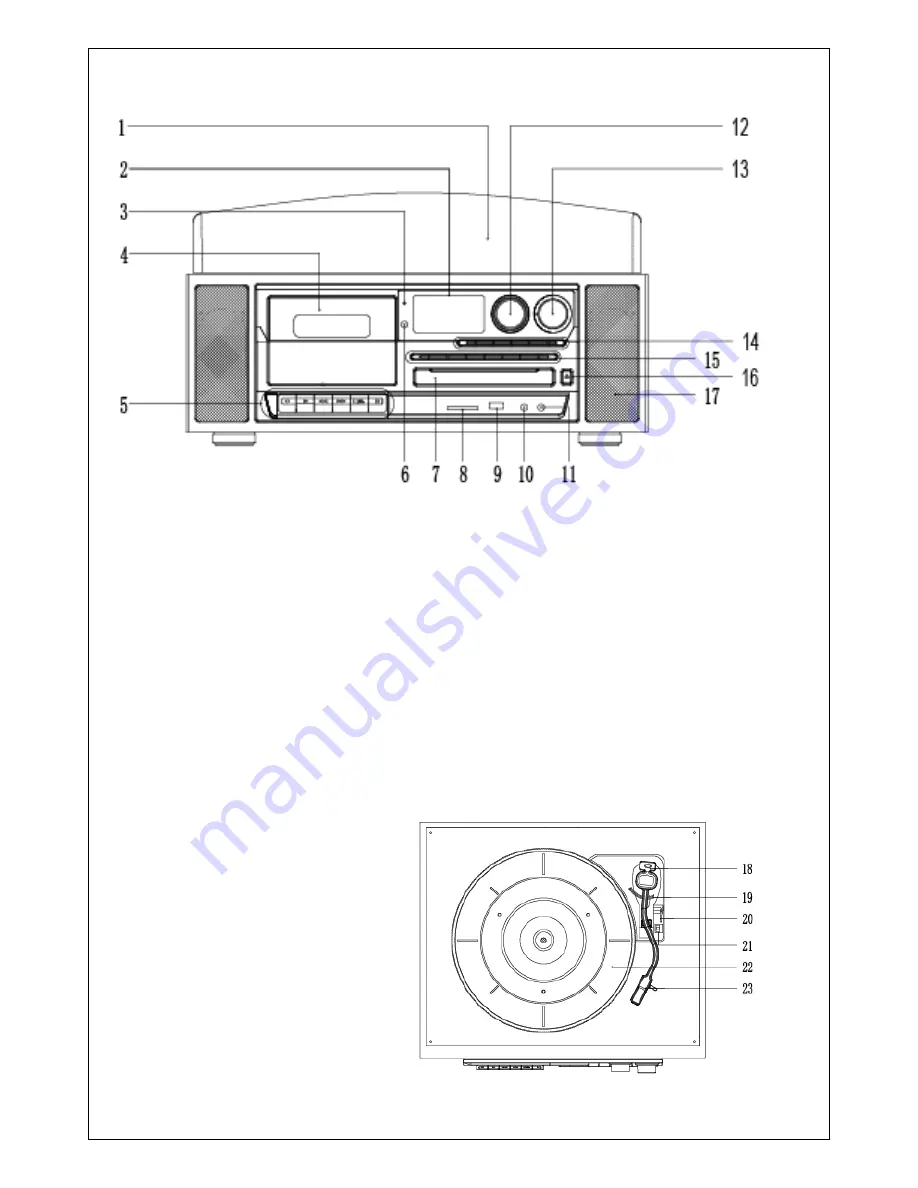
LOCATION OF CONTROLS AND INDICATORS 


1)    Dust Cover       

2)    LCD display 

3)    Bluetooth Indicator       

4)    Cassette Door 

5)    Cassette operation buttons   

6)    IR Remote Receiver 

7)    CD Door           

8)    SD/MMC Card slo 

9)    USB slot 

10) Aux In Jack 

11) Headphone Jack 

12) Tuning Knob       

13) Power Switch & Volume Knob                     

14) Function Selector Button 

15)  CD/USB/SD  PlayBack  Control 

Button             

16) CD-Rom Open/close button 

17) Speaker Grill 


PHONOGRAPH   

18) Tone Arm 

19) Tone arm Holder                                                                                                             

20) 

Lift lever 

21) 

Speed selector (33/45/78 rpm)                                                                                                         

22) 

Turntable Platter                     

23) 

Stylus       


Summary of Contents for BT-38SM

Page 1: ...1 CLASSICAL TURNTABLE WITH AM FM RADIO MODEL BT 38SM Operating Instructions Manual ...

Page 2: ...rs that produce heat 8 Protect the power cord from being walked on or kinked in particular where the plug is fitted and at the point where it exits from the apparatus 9 Only use attachments accessories specified by the manufacturer 10 Unplug this apparatus during lightning storms unused for long periods of time 11 Refer all servicing to qualified service personnel Servicing is required when the ap...

Page 3: ... SET UP Carefully remove the unit from the display carton and remove all packing material from the unit Unwind the AC power cord and extend it to its full length Unwind the FM Antenna wire and extend it to its full length Place the unit on a stable level surface convenient to an AC outlet out of Direct sunlight and away from sources of excess heat dust moisture humidity or strong magnetic fields R...

Page 4: ...eiver 7 CD Door 8 SD MMC Card slo 9 USB slot 10 Aux In Jack 11 Headphone Jack 12 Tuning Knob 13 Power Switch Volume Knob 14 Function Selector Button 15 CD USB SD PlayBack Control Button 16 CD Rom Open close button 17 Speaker Grill PHONOGRAPH 18 Tone Arm 19 Tone arm Holder 20 Lift lever 21 Speed selector 33 45 78 rpm 22 Turntable Platter 23 Stylus ...

Page 5: ...OL 27 Mute button 28 Program button 29 Repeat button 30 Function Mode button 31 Skip down button 32 Play Pause button 33 Record button 34 Stop button 35 Skip up button 36 Folder up button 37 Folder down button NOTE All the buttons on the remote control just use for CD USB SD function ...

Page 6: ...ove AM reception 8 FM reception the receiver has a built in FM wire antenna hanging at the rear cabinet For best reception completely unravel and extend this wire 9 When you have finished listening to the radio turn the volume knob in a coun terclockwise direction to switch the unit off Unplug it from the power supply if you are not going to use it for a while FM and FM stereo FM Stereo Receiving ...

Page 7: ...ight or left 11 At the end of the record move the lift lever towards the back to raise the tone arm and move it back to the tone arm park and then move the lift lever towards the front to lower the arm onto its rest 12 Alternatively lift the tone arm off the record and return it to the arm rest manually 13 When you have finished playing records engage the tone arm lock to protect it from accidenta...

Page 8: ... the display 7 To finish encoding press the stop button The display will show END and return to PHONO mode NOTE The recording speed is 1 1 Recording will take as long as playing the record The recording format is preset at MP3 bit rate 128 kbps Cassette Operation 1 Cassette Button Indicators 2 Cassette Button Control a RECORDER Copy RADIO PHONO AUX IN CD USB SD to TAPE b PLAYER Play tape tracks c ...

Page 9: ...ock close the door Press RECORDER PLAYER together same time Now start the recording songs to the tape Press PAUSE button if need to pause recording press it again to continue recording b Press STOP to stop recording c When recording finished Tape is full end RECORDER PLAYER Auto Key up IMPORTANT When using the cassette deck Make sure to insert the cassette in the correct direction To avoid damagin...

Page 10: ...icon will be flashing on the display 5 To finish encoding press the stop button The display will show END and return to TAPE AUX mode NOTE The recording format is preset at MP3 bit rate 128 kbps The recording speed is 1 1 Recording will take as long as playing the record CD Operation 1 Turn the volume knob clockwise to turn the equipment on 2 Press the CD Rom switch then the disk tray door opens 3...

Page 11: ...ording will take as long as playing the record The recording format is preset at MP3 bit rate 128 kbps The USB Port and SD Card Slot Playback of music in MP3 WMA format via USB device or memory card The system is able to decode and playback all MP3 WMA files stored in the memory media connected to the USB port or SD MMC card slot 1 Turn the volume knob clockwise to turn the equipment on 2 Followin...

Page 12: ...P DOWN Press this button once to play the previous file press and hold this button to fast reverse through the files tracks TUNING KNOB Turn this knob to the right left to search a folder backward or forward REPAT CD USB SD PlayBack press and hold this button to one All repeatedly Important notes The system can detect and read files in MP3 WMA format only via the USB port or SD card slot You can c...

Page 13: ...button twice Copying of MP3 WMA files The system allows you to copy files from USB to SD MMC or vice versa You can copy a single file track a folder of files tracks all files tracks on the storage medium Copying a single file track 1 Insert a USB storage device and SD MMC card then select USB SD mode as described previously 2 Press the record REC button during playback of the track you want to cop...

Page 14: ...confirm 3 The USB or SD icon will be flashing on the display while the system is copying the files tracks 4 When all files tracks have been copied the USB or SD icon will stop flashing on the display NOTE If you press the record REC button during playback in USB or SD mode the file will copy from USB to SD or vice versa Deleting files from the USB device SD card The system is able to erase files s...

Page 15: ...ly When the system has recognised the device press the stop button 2 Press the delete DEL button ONE will be flashing on the display Press the SKIP UP or SKIP DOWN button to select ALL on the display Press the delete DEL button again to confirm 3 While the system is deleting the files tracks the USB or SD icon will be flashing on the display until the deletion is complete NOTE Pressing the delete ...

Page 16: ...nction selector to select PHONO AUX mode and then insert a memory de vice USB drive SD or MMC card 2 Press the record REC button it will take 3 4 seconds to read the memory de vice then the USB or SD icon will be flashing on the LC display 3 Press the skip up or skip down button to select the desired mode USB or SD for encoding then press the record REC button again to confirm You can skip this st...

Page 17: ...Your Bluetooth device show Boytone Turntable in list and then select it for pair ing 6 You can start to music play on your Bluetooth device when the device is in paired and show connected If not select tap the relate menu and choose connect to connect the Bluetooth turntable manually It s depended on your Bluetooth device version and designed function 7 If an external audio device is connected to ...

Page 18: ...ure the CD is dealt face up When playing a CD via the AUX IN connection make sure the cable is firmly con nected all controls on the CD player are properly set the disc tray is closed and the disc is clean and undamaged When playing music from USB device or SD MMC card make sure the memory device is properly inserted in USB port SD MMC card slot and correct MODE is selected Problems with radio rec...

Page 19: ...19 ...

Reviews: