background image

54

Expand 

Logo (including Logo and Logo PIN Code lock setup) 
You may use this function to select Logo screen, Logo 
PIN Code lock, change power on password, and set 
up default logo screen.
1) Press 

 button to select [Logo] menu.

2) Press <OK> button.

3) Press 

  button to select required items.

Logo Select

Select this to set up the logo screen when power on 

your projector: 

Normal....

Display factory default logo screen.

User......

 ..Display capture logo screen.

Off......

 .....Display countdown logo screen.
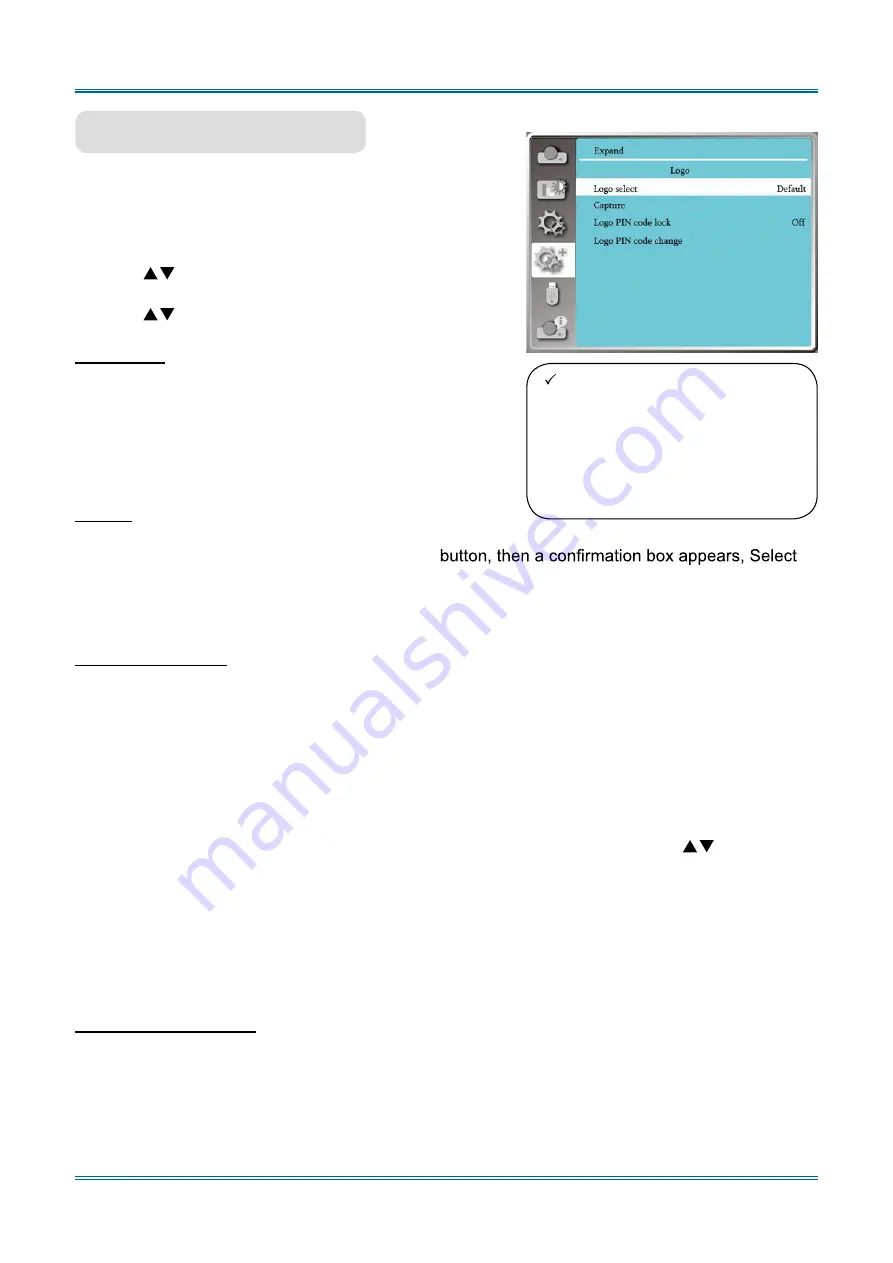
Logo 

Logo menu

Capture

Enable us to capture images beeing projected and use it for a startup display or interval of presentattions.

Upon captureing the projected image, press OK 

Yes to capture it .

After capturing the projected images,go to "select a logo" , and set it to ”User”.Then,the captured 

image is displayed when the projector is turned on next time.

Logo PIN Code lock

LOGO PIN Code lock

This function helps preventing unauthorized personnel from changing the Logo screen.

Off......The Logo screen may be changed with the Logo menu..

On.... ..You may not alter the logo screen without the Logo PIN Code.

To change the logo screen password protection, press OK key, and the Logo PIN Code change 

popup dialog box prompts. Follow stepsbelow to enter a logo screen password.
   

· 

Press arrow 



button to select a number, then press OK button to enter it and move the

       cursor.The number you typed is displayed as “ * ”. To edit number you have entered, press 


MENU button to move the cursor to the number you want to change, press  

  button to 

       select the correct one.
   

· 

Repeat this step to type in a 3-digit number.Move the cursor to SET after you have typed the 

       3-dit number. Press OK button.
   

· 

If the password is invalid, the password displayed as “ *** ” will be in red. Please try again with 

       a valid one.

  · 

After you have entered valid logo screen PIN code, you may press



button to toggle 

       switch Off and On.

Logo PIN Code Change
You may change the Logo PIN Code to any 3-digit number you like. Press OK key to select Logo

PIN Code change. The Logo PIN Code change dialog box prompts, press arrow 



button to give 

a valid new code. The New Logo PIN Code dialog box prompts. Set up a new Logo PIN Code, 

check contentscontained in the dialog box, select Yes and the new password is set now.

Please remember your new password and keep it safe. 

You cannot change the Logo PIN Code again if you forgot the password you have set.

  Note: 


After changing the Logo PIN 

Code to a new number, please 

remember it and keep it safe 

The Logo PIN Code cannot 

be changed again if the new 

password is lost or forgotten.

Summary of Contents for Route66

Page 1: ...iffer slightly from your product Before using the product please read these instructions carefully and kept it safe for future 2016 08 Presenting A Better Way Route66 LCD Projector OS reference Change...

Page 2: ...provide for better and proper maintenance of the projector Security Function The Security function helps you to ensure security of the projector With the Key lock function you can lock the operation o...

Page 3: ...controller operation 32 Input selectiont 34 Display 36 Auto PC adj 36 Fine sync 36 H position 36 V position 37 H size 37 Aspect 37 Project way 37 Menu position 39 Background display 39 System 40 Color...

Page 4: ...heck your operation and connections and try solutions given in the Troubleshooting section at end of this manual If the problem persists call your dealer or our service center Your projector s lamp is...

Page 5: ...the non repairable components to the sales department or recycling center Chemical Substances table The contents of toxic and hazardous substances in all homogeneous materials of this part is below th...

Page 6: ...matter from falling in your projector through the air outlets as they may touch to your projector Notes Caution Safety precautions GROUND your projector Lens of your projector projects strong light D...

Page 7: ...EU USERS The symbol mark and recycling systems described below apply to EU countries and do not apply to countries in other areas of the world Your product is designed and manufactured with high qual...

Page 8: ...time before returning it back to normal e The projector falls off to ground or its casing is damaged f In case of any abnormal change in your projector during its use then maintenance ser vices would...

Page 9: ...justed subject to internal temperature of your projector Air outlet For heat exhaust Place your projector correctly Use your projector at specified location in correct way Invalid projector location m...

Page 10: ...ctor with improper boxes Your projector may become damaged Please consult your dealers for shipping your projector by express or other shipping service providers Place your projector in box only after...

Page 11: ...hat interference will not occur in a particular installation If this equipment does cause harmful interference to radio or television reception which can be determined by turning the equipment off and...

Page 12: ...12 Accessory Accessory as follows AC Power Cord Remote Control With Batteries AAA 2 VGA Cable Quick Start Guide Note The AC Power Cord of your projector...

Page 13: ...dicator Bottom Adjustment pad Air exhaust Note Kensington Security Slot is for a Kensington lock used to deter theft of the projector Kensington is a registered trade mark of ACCO Brands Corporation N...

Page 14: ...m to other monitors VIDEO IN terminal Connect video output signal to this terminal MONO L R terminal A MoNo audio signal A single audio terminal should be connected to the MONO R L interface AUDIO OUT...

Page 15: ...Source Search Auto PC Adjustment and Auto Keystone OK Enter the OSD menu Select options in the OSD menu INPUT Open or close the INPUT menu WARNING indicator T operating range POWER indicator The POWE...

Page 16: ...lect options in it IMAGE Select image mode KEYSTONE Keystone calibration SCREEN Enter the screen size adjustment menu LAMP Select LAMP mode FREEZE Freeze projected images PATTERN Select built in test...

Page 17: ...your remote controller away from water or other liquids Do not expose your remote controller to environments with high humidity or tem perature Do not drop your remote controller In case of any batter...

Page 18: ...9m 4 946m 6 602m 9 916m Frame Min 1 169m 3 956m 5 946m 7 937m 11 917m 30 30 MAX Frame MIN Frame Midline 0 888m 0 969m 3 017m 3 289m 4 537m 4 946m 6 058m 6 602m 9 099m 9 916m 10 937m 11 917m 0 938 m 1...

Page 19: ...943m 30 Diagonal MAX Frame MIN Frame Midline 0 942 m 0 969m 3 199m 3 289m 4 811m 4 946m 6 423m 6 602m 9 647m 9 916m 11 595m 11 917m 30 30 Diagonal MAX Frame MIN Frame Midline 0 882m 1 111m 3 034m 3 7...

Page 20: ...Input Cables for connection VGA cable Serial cable Cross type HDMI cable HDMI cable This cable is not included RS232 Input VGA Signal Input VGA Signal Input Output HDMI Digital Signal Output RS232 Out...

Page 21: ...ded Dedicated cable is available to your dealer S Video Signal Input S Video Signal Output Component Signal Input Component Signal Output VIDEO Input Signal VIDEO Output Signal Connect to video equipm...

Page 22: ...them Connect to audio equipment Cables for connection Audio cable This cable is not included Audio Input R R L L Audio Input Audio Output Audio Output Audio Input External audio devices Audio cable St...

Page 23: ...s cable is not included Unplug power cords of your projector and all external equipment before connecting any cable to them Connect to USB and Wireless card USB A and USB B Wireless card or USB A stor...

Page 24: ...y other type of power cords or you may face the risks of electric shock In case you have any doubt on type of power cord you are using please call authorized dealer or service cen ter for help Before...

Page 25: ...on Page 54 for details Precautions on password PIN operation You cannot operate a password PIN protected projector without correct password PIN Please set up a new password PIN and keep your operatio...

Page 26: ...it idle for an hour Power off Power off message disappears in 4 seconds Note If the On Start function is set to On your projector will power on once it is connected to an AC power socket Refer to page...

Page 27: ...nter an option 4 Press button to select settings or nav igate options then press OK button to act on the item and exit 5 Press button to return to mainmenu Press the MENU button on remote control ler...

Page 28: ...are Dynamic Normal Cinema Blackboard Green Colorboard or User Image For AV signal input the available color adjust options Contrast Brightness Color Tint White balance Red Green Blue and Sharpness Fo...

Page 29: ...the ZOOM ring to zoom in or zoom out Rotate the FOCUS ring to adjust the image focus Auto setting function Press the AUTO button on the top control panel or your remote controller to auto exe cute se...

Page 30: ...one distortion Corner correction Adjust the projected image when the projector is keystone distortion of four corners Curved correction Adjust the projected image when the projector linearity is uneve...

Page 31: ...e keys to re open the audio effects Mute function is also effective for audio output inter faces Menu operation 1 Press the MENU button on the top control pan el or remote controller and the OSD displ...

Page 32: ...ct required image mode Lamp LAMP Press the Lamp button on remote controller to change screen brightness Info INFO Press the information button on the remote control to display the information of the p...

Page 33: ...en display digital zoom information Only for input as VGA RGBHV and the screen size setting as Normal or Wide Digital Zoom D ZOOM Press the D ZOOM button on remote controller to enter the Digital Zoom...

Page 34: ...VGA 2 Component Video S Video HDMI 1 HDMI 2 MHL DVI Memory Viewer Network USB Display and then press the OK button to select the input source Remote controller Input Top Control Panel Input Select in...

Page 35: ...ls about Memory Viewer function please turn to page 74 76 For further details about USB display function please turn to page 76 78 Remote controller HDMI VGA Video Top Control Panel Input Component Se...

Page 36: ...m 0 to 31 Please adjust to the least interference state Fine sync Only for PC signal input On the premise that the relative position of both pro jector and the screen is set up right you can move the...

Page 37: ...e amount of interference to the minimum Users can point the clock to adjust images 1 Press button to select H size menu 2 Press OK button 3 Press button to adjust H size level Adjustment range is from...

Page 38: ...utton on the remote controller or on the top control panel to display the OSD menu Press button to select the Display menu then press OK or button 1 Press button to select Project way menu 2 press OK...

Page 39: ...left The Menu display on the lower left corner of the screen Lower right The Menu display on the lower right corner of the screen Menu position Menu position menu Select this function can adjusts back...

Page 40: ...tion will make neces sary adjustment to your projector to project valid images If images are displayed incorrectly adjust it manually No PC signals detected Check the connection between PC and your pr...

Page 41: ...the image is not projected out correctly please adjust it to match your computer manually No signal input come from PC Please check the connections Video S video input signal Auto When projector sele...

Page 42: ...ur projector can come to na tional color Cinema Enriched grayscale for viewing movies Blackboard Green An image mode designed for displaying on a black board Green It boosts quality of image projected...

Page 43: ...rightness range from 0 63 press button to increase brightness range from 0 63 Color temp Press button to select required color temperature Low Mid and High High temp Become blue gradually Mid temp Sui...

Page 44: ...e from 0 63 Brightness Press button to decrease brightness range from 0 63 press button to increase brightness range from 0 63 Color Press button to decrease saturation press button to increase satura...

Page 45: ...select Standby mode menu 2 Press OK button 3 Press button to adjust levels ECO mode Some function will be disabled once your projector is in ECO STANDBY mode to reduce power consumption Network and R...

Page 46: ...ote Set high land option ON when you operate the operator at an altitude of 1400 2700 meters Change lamp brightness according to the environment and aim your projector is operating 1 Press button to s...

Page 47: ...tton 3 Press button to switch required menu Normal Running in normal way 60 seconds Running faster than in normal mode with shorter time but a louder sound 0 seconds Select this function allow you to...

Page 48: ...select Terminal menu 2 Press OK button 3 Press button to switch required menu VGA 2 Input signal for VGA 2 Monitor out Output signal to Monitor Terminal Note If you lock the top of the control panel...

Page 49: ...ly from your external output device For external output please refer to the instructions for use of the external device 64 940 When external device such as a blu ray disc player is connected to the HD...

Page 50: ...nd menu Users can selected the language displayed on the screen 1 Press button to select Language menu 2 Press OK button 3 Press button to select required language 4 Press OK button The name of menus...

Page 51: ...to store or reset the Keystone or some related setting after unpluging the AC power Press MENU button on the remote controller or on the top control panel to display the OSD menu Press button to selec...

Page 52: ...e it will be stored when closing the projector H V Keystone Select this function to correct the projected images hori zontally or vertically Conner correction Select this function to correct the proje...

Page 53: ...be adjust ed individually Adjust Curved correction X compensation and Curved correction Y compensa tion after adjusting the X Y Curved correction Press KEYSTONE button on the remote control then the K...

Page 54: ...opup dialog box prompts Follow stepsbelow to enter a logo screen password Press arrow button to select a number then press OK button to enter it and move the cursor The number you typed is displayed a...

Page 55: ...menu 2 Press OK button 3 Press button to switch required item Security Security menu Logo PIN Code lock LOGO PIN Code lock This function helps preventing unauthorized personnel from changing the Logo...

Page 56: ...e the input signal is interrupted and no keys has been pressed for 30 seconds afterwards the No signal message displays in the timer The timer counts down until the lamp turns off Press arrow key to s...

Page 57: ...temperature inside the projector and make reactions On Once tthe projector has checked any filter problem the screen will display a warning icon Filter warning P O Filter counter menu Note The screen...

Page 58: ...tch required item 4 Press OK button Gray scale 1 Gray scale 2 Gray scale 3 Gray scale 4 Color bar Red Green Blue Cross hatch White Black Raster gray Use The OSD menu to display the test pattern Choose...

Page 59: ...play the IP address of wired network 3 Press button to set DHCP On to obtain an IP address subnet gateway and DNS automatically and press OK button to Press button to set DHCP Off then press OK button...

Page 60: ...ent icon will disappears 1 Press button to select Lamp counter menu 2 Press OK or button 3 Press button to select the Lamp replacement Reset and press the OK button The Lamp replacement counter Reset...

Page 61: ...memory when you insert the USB memory into the projector Press MENU button on the remote controller to display the OSD menu Press button to select the Memory Viewer menu then press OK or button 1 Pres...

Page 62: ...ge to be compatible with projection screen 1 Press button to select B menu 2 Press OK button 3 Press button to switch required item On Display images by the aspect ratio of the screen Off Display imag...

Page 63: ...n existence Lamp status Display selected Lamp Lamp counter Display the lamp s usage time Power management Display selected Power management mode Image mode Display selected Image Mode Select Info func...

Page 64: ...utton to select Set press OK button to wait until the Please wait message disappears Network control operation Function This function is designed to remote control computer in the same LAN Preparation...

Page 65: ...nces WI FI display For PC 1 Inset the supplied WIFI dongle into the USB A port For this fuction users need to purchase the WIFI dongle seperately with your suppliers 2 P and Sharing Center and click C...

Page 66: ...ownload and download the corresponding PwPresebter software with your projector 2 Click Download button 4 Click the icon to enter into pwPresenter software Details about pwPresenter operation please t...

Page 67: ...umstances WI FI display For Mobile devices 1 Inset the supplied WIFI dongle into the USB A port For this fuction users need to purchase the WIFI dongle seperately with your suppliers 2 P Setting menu...

Page 68: ...ce and install it 2 Click Download button Click to enter to search select the needed projector and connect it Set the same IP address for example 172 28 120 1 as the projector in VueMagic software NOT...

Page 69: ...settings or control Do not use more than one computer set or control the projector Please change your password If the network does not appear on screen controls please consult your network administra...

Page 70: ...ojector Picture Setup page Brightness Adjust the brightness of the projected image Contrast Adjust the contrast of the projected image Sharpness Adjust the sharpness of the projected image Saturation...

Page 71: ...zontal dimension of the projected image Screen Freeze Select the function to switch the screen freeze on and off Automatic computer adjustment Implement the automatic computer adjustment function Vert...

Page 72: ...when you do not use the DHCP server Subnet Please enter a subnet shield when you do not use the DHCP server Gateway Please enter the gateway when you do not use the DHCP server DNS Please enter the D...

Page 73: ...nding PwPresebter software with your projector Search network projector Click to enter to search select the needed projector and connect it Set the same IP address for ex ample 192 168 1 100 as the pr...

Page 74: ...ed setting JPEG image setting Network port setting White list and Black list etc Parameter Setting Global setting Remote control setting Sound capture and Screen capture etc Multicast setting Volume s...

Page 75: ...75 Network Projector Management Set pwPresenter network user name and password etc Cut off projector connection Network control...

Page 76: ...nto the projector the viewer memory function can projecte the video and pictures stored in the USB memory 1 Press INPUT button on the control panel and on the top control panel and select the input so...

Page 77: ...1 Press 2 Press OK button Full screen display Use the remote control to operate the controller that appears at the bottom of the screen P Play video 1 Press button to select displayed in the left corn...

Page 78: ...oduce abnormal smell close the external device and contact the dealer DO NOT let the water chemicals or oil into the USB memory or it may cause a short circuit DO NOT put foreign matter or metal items...

Page 79: ...y 1 Remove the USB cable directly when terminate USB monitor You never need follow Remove Hardware Safely when USB cable is not connected The termination of USB display Active audio Disable audio Sets...

Page 80: ...ting the above conditions can operate normally 1 Using USB B cable to connect the projector to the USB display terminals Items in grey are not available 2 Press the information source menu on the remo...

Page 81: ...projector s ventilation Check the installation status and any air outlet block Is your projector installed at location close to outlet of air conditioning equipment Keep your projector away from air...

Page 82: ...rough chemical may scratch the lens projector which may lead to dusts accumulated on sur cooling fan effects which in turn will overheat your pro ately whenever the Filter Warning icon displays 1 Pow...

Page 83: ...select Yes to Lamp replacement The lamp warning icon displays when its usage time are more than the life of the projector minus 300H and less than 1 1 times the life of the projector The lamp replacem...

Page 84: ...osion No one else may inspect the internal of your projector except those authorized and well trained technician who also are familiar with its maintenance Or we shall not be held liable for the conse...

Page 85: ...ng power on and a non input mode icon displays A non input or lamp mode icon displays Image looks fuzzy Adjust focus of your projector Provide proper projection distance The projection lens requires c...

Page 86: ...justing function in unavailable in 480p 576p 720p 480i 576i or 1080i mode Settings do not save after power off Make sure you have selected Store after settings adjustment Certain settings do not keep...

Page 87: ...N Code lock Please call your dealer or service center Make sure your projector is correctly connected to external equipment Make sure all devices have plugged in an AC power source and have been power...

Page 88: ...Rear Ceiling Front Ceiling Rear Auto ceiling Front Auto ceiling Rear Menu position Upper Left Upper Righ Center Lower Left Lower Right Background display Black Blue System Auto PAL SECAM NTSC NTSC4 43...

Page 89: ...ooling fast Normal 60s 0s Closed caption Off CC1 CC2 CC3 CC4 Key lock Off Projector Remote controller Iris On Off Terminal VGA 2 Monitor out Sound Volume 0 25 Mute On Off HDMI Setup Image 64 940 0 102...

Page 90: ...et Filter check Text pattern Off Gray scale 1 4 Color bar Red Green Blue Cross hatch White Black Raster gray Network Network setting LAN DHCP On Off IP address Subnet Gateway DNS Network status MAC ad...

Page 91: ...nc Freq V sync Freq Lamp status Lamp counter power management Image mode Input VGA 1 VGA 2 HDMI HDMI2 MHL Component Video S Video Network Memory Viewer USB display Note You can not select the VGA 2 te...

Page 92: ...e Your projector detects the temperature abnormality and switches into standby mode Your projector detects the lamp abnormality and switches into cooling mode Your projector detects the lamp abnormali...

Page 93: ...0p 60 22 1920x1080p 50 23 640x480 60 24 640x480 67 25 640x480 72 26 640x480 75 27 640x480 85 28 800x600 56 29 800x600 60 30 800x600 72 31 800x600 75 32 800x600 85 NO Resolution V freq Hz Source VGA Co...

Page 94: ...MDS Clock Shield 2 TMDS Date2 Shield 12 TMDS Clock 3 TMDS Date2 13 CEC 4 TMDS Date1 14 Reserved N C on device 5 TMDS Datel Shield 15 SCL 6 TMDS Datel 16 SDA 7 TMDS Date0 17 DDC CEC Ground 8 TMDS Date0...

Page 95: ...95 Appendix Dimensions Unit mm Screw Holes for Ceiling Mount Screw M4 Depth 10 0 347 9 7 108 7 67 4 298 5 110 277 5 166 197 1 5 194 104 5XM4 10MM...

Page 96: ...e pixels are effective Due to the nature of the liquid crystal panel a fraction of the pixels 0 01 or less may be ineffective Terminal VGA IN 1 YPbPr S VIDEO IN Mini D sub 15pin x1 VGA IN 2 VGA OUT Mi...

Page 97: ...ojector 1 1 Port setting Project Setpoint Communication method Asynchronous communication Communication rate 9600 Length 8 bit Parity check NO Stop position 1 Flow control NO Computer terminal Project...

Page 98: ...mediatly Command 00 CR Details Power OFF action Send this command can force your projector to power off during in power on state Return Value Receive Successfully Receive Unsuccessfully 2 3 HDMI1 comm...

Page 99: ...etails Select S Video Input Return Value Receive Successfully 00_v2 CR Receive Unsuccessfully 00_v2 N CR 2 4 HDMI 2 command Command 00_d2 CR Details Select HDMI 2 Input Return Value Receive Successful...

Page 100: ...uccessfully 00_u2 CR Receive Unsuccessfully 00_u2 N CR 2 11 USB Display command Command 00_u3 CR Details Select RGBHV Input Return Value Receive Successfully 00_u3 CR Receive Unsuccessfully 00_u3 N CR...

Reviews: