BOXLIGHT MP-86i User Manual Download Page 10

10

Names and functions of each part (continued)

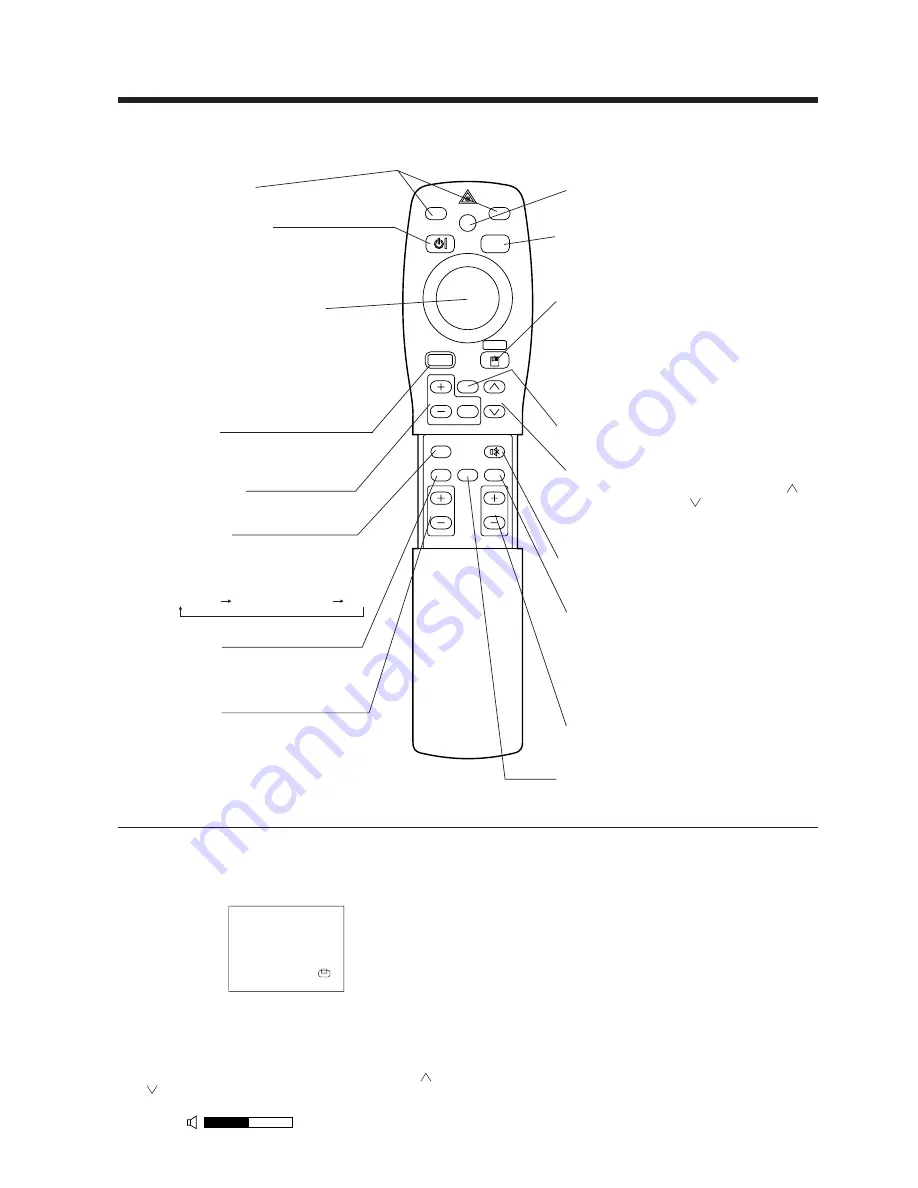
Remote control transmitter

FOCUS button

Used to adjust the focus of the image on the
screen. (Refer to page 13.)

ZOOM button

Used to adjust the size of the image. (Refer to
page 13.)

FREEZE button

Used to turn the freeze (still) image display on and off.
(Refer to page 15.)

AUTO button

Used to execute auto-adjust.

*3

*

These functions do not operate when initial screen message “NO INPUT IS DETECTED” or “SYNC IS OUT OF RANGE” is displayed.

MAGNIFY button

Used to magnify the displayed image.
(Refer to page 16.)

BLANK button

Used to turn blanking on and off.
(Refer to page 20.)

*2  

P in P function

With the P in P function, signals are input to both RGB and
VIDEO. This function operates only when the RGB signal has
been selected. There is no display in the case of the no signal and
when the RGB signal is outside the sync range.
When P in P is used, audio is automatically switched to video.
In P in P, audio input can be switched by pressing the VOL     and
VOL    keys of the remote control, displaying the audio bar and
moving DISK PAD left and right during the display.

VIDEO, RGB button

Press to switch the input. (Refer to page 13, 19.)

VIDEO

STANDBY/ON

RGB

POSITION

LASER

MENU

RESET

MAGNIFY

FREEZE

OFF

VOLUME

P in P

MUTE

AUTO

BLANK

TIMER

FOCUS

ZOOM

STANDBY / ON button

Used to turn the power on and off.
Press for 1 sec. or more to turn the power off
(enter standby status).
(Refer to pages13 and 14.)

POSITION button

Press Position, then use the mouse Disk Pad to adjust
the image position (RGB mode only).
(Refer to page 16.)

DISK PAD / MOUSE button

(1) Used to select menu items when the menu

screen is displayed (refer to page 16 - 18). 

(2) When the menu is not displayed, the mouse

shift function and left click function are active. 

(3) After the POSITION button has been

pressed, the screen can be moved upward,
downward and to the left and right.

MENU button

Used to turn the menu screen display on and off.
(Refer to page 17 - 21.)

MUTE button

Applies Mute. (Press the mute button again to
cancel.)

VOLUME button

Adjusts the volume of the sound. Press [

] to

increase the volume and (    ) to decrease the volume.
When there is no video signal input, operation is not
possible when the input video signal is outside the
sync range.

LASER button

Turns the laser beam on and off. Refer to page
11 conceming usage and observe the cautions.

RESET / MOUSE  RIGHT button

(1)Operates as the RESET button when the menu

is displayed. Press this button to return to the
initial settings.

(2)Used to click the right mouse button when the

menu is not displayed (refer to page 25,26).

(3)Pressing this button after scrolling the screen

with POSITION returns the screen to the original
position.

TIMER button

Turns the display of the time set with the Timer
on the Menu screen on and off.
The timer is not displayed when no input signal
is detected or when SYNC is out of range or
during blanking or during freezing.
Refer to page 21 concerning the method used to
set the timer.

*1

POSITION icon

When the POSITION button is pressed, the moving display icon
will appear at the bottom right of the screen.
While displaying the icon, you can operate POSITION.

*3

Auto adjustment function

The projector automatically adjusts 4 items (V. POSIT, H. POSIT,
H. PHASE, H. SIZE).
When you choose AUTO (move the cursor to the right from the
manual operation position), the AUTO confirmation menu is
shown.

*4

Disk Pad method of operation

• 

Move and select by tilting Disk Pad in the required direction.

Press Disk Pad in to realize the function of the mouse left
button.

A mouse cable is necessary if a mouse is to be used.

(Refer to pages 26, 27.)

P in P button 

*2

Used to turn P in P (Picture In Picture: displays sub video
signal images in the RGB signal) on and off.
Each time this button is pressed, operation will change in
the following sequence: 
(1) Reduce sub screen    (2) Magnify sub screen    (3)Off.
(1) 

(3)

(Refer to page 20.)

R G B / V I D E O

*1

*1

*

*

*

*

*

*

*

*

*

*4

Summary of Contents for MP-86i

Page 1: ...assure a high level of brightness 2 Partial magnification function Interesting parts of images can be magnified for closer viewing 3 Distortion correction function Distortion free images are quickly a...

Page 2: ...ou dispose of it immediately having first removed the fuse to avoid a possible shock hazard by inadvertent connection to the mains supply WARNING THIS EQUIPMENT MUST BE EARTHED IMPORTANT The wires in...

Page 3: ...on This symbol indicates information that if ignored could result possibly in personal injury or physical damage due to incorrect handling Typical Symbols This symbol indicates an additional warning i...

Page 4: ...fire or electrical shock Do not insert foreign objects Do not insert metal objects through the ventilation openings etc of this projector or drop such objects inside because this could result in fire...

Page 5: ...etc on the power plug and make sure terminals are secure Do not allow the laser beam to enter the eyes This remote control is equipped with a laser pointer and a laser beam is emitted from the laser o...

Page 6: ...teries Incorrect loading could result in personal injury or contamination of the surroundings due to battery cracking or leakage Clean the projector interior once every two years Request your dealer t...

Page 7: ...oiled dilute a neutral detergent in water wet and wring out the cloth and afterward wipe with a dry cloth Do not apply undiluted detergent directly to the projector Extended usage When using this proj...

Page 8: ...E Projector unit Remote control Remote control Batteries User s Guide this document ZOOM FOCUS MUTE INPUT MENU POWER TEMP LAMP STANDBY ON RESET Speaker RESET button Used to reset the initial settings...

Page 9: ...accessory power cord RGB IN jack D sub 15 pin shrink 1 2 CONTROL jack D sub 15 pin shrink AUDIO OUT jack RGB VIDEO Stereo mini jack AUDIO IN jack RGB Stereo mini jack Connecting to the AC IN jack Make...

Page 10: ...left and right MENU button Used to turn the menu screen display on and off Refer to page 17 21 MUTE button Applies Mute Press the mute button again to cancel VOLUME button Adjusts the volume of the so...

Page 11: ...ot place the remote control close to the cooling fan of the projector Do not disassemble the remote control in case of malfunction please contact BOXLIGHT Corporation Caution CAUTION LASER RADIATION D...

Page 12: ...projector could overturn or the fingers could get caught and cause personal injury Do not force the adjusters to rotate This could damage the adjusters or cause the lock to fail Lock the adjusters fi...

Page 13: ...ay shown to the right will appear when the FOCUS button is pressed 2 Use the FOCUS button to adjust the focus until the image is sharp 3 The message Focus will disappear if any other button is pressed...

Page 14: ...turn off the main power switch while the lamp is on because this will shorten the service life of the lamp Caution Use the RGB cable included with this projector when using plug play With other cable...

Page 15: ...used to freeze the image being displayed refer to page 10 Cancelling the FREEZE function When there is no input signal the Freeze function is not effective when the input signal is outside the sync ra...

Page 16: ...FF button VIDEO STANDBY ON RGB POSITION LASER MENU RESET MAGNIFY FREEZE OFF VOLUME P in P MUTE AUTO BLANK TIMER Magnify function Changing the magnification ratio Moving the display area Returning to n...

Page 17: ...pear refer to page 18 21 for details 2 Press the MENU buttons of the projector or the DISK PAD button of the remote control to select the menu item to be adjusted The selected menu item will be displa...

Page 18: ...ll be cancelled after the operation Menu Displaying the menu cancels freeze operations Caution SET UP Images and display positions can be adjusted from the SETUP menu Adjustment item VOLUME BRIGHT BRI...

Page 19: ...T U P I N P U T O P T I M A G E RGB VIDEO AUTO NTSC PAL SECAM NTSC4 43 M PAL N PAL S E T U P I N P U T O P T I M A G E Adjustment item RGB VIDEO Adjustment description Displays the following RGB input...

Page 20: ...ettings screen during signal input at start up When canceled the background color will change to blue Selects the P in P sub screen display position IMAGE Projection image inversion etc can be selecte...

Page 21: ...e SYNC ON G feature on off COM SPEED COM BITS TIMER LANGUAGE AUTO OFF SYNC ON G S E T U P I N P U T O P T I M A G E 7N1 8N1 S E T U P I N P U T O P T I M A G E COM SPEED COM BITS TIMER LANGUAGE AUTO O...

Page 22: ...tive polarity Horizontal sync signal TTL level positive negative polarity Vertical sync signal TTL level positive negative polarity Compound sync signal TTL level Audio signal Input 200mV rms 20k or l...

Page 23: ...6 ON OFF Example 16 inch mode Resolution fH fV Rating Signal mode Display mode Note 1 H V kHz Hz 640 400 24 8 56 4 NEC PC9800 Zoom in 640 350 37 9 85 1 VESA VGA 1 Zoom in 640 400 37 9 85 1 VESA VGA 2...

Page 24: ...2 2 20 0 1 0 Computer Signal Vertical signal timimg lines a b c d VGA 1 85Hz 3 60 350 32 VGA 2 85Hz 3 41 400 1 PC 9800 8 25 400 7 TEXT 3 42 480 1 VGA 3 2 33 480 10 Mac 13 mode 3 39 480 3 VGA 3 72Hz 3...

Page 25: ...le to connect Effective with USB only when the mouse is used Do not use with any device other than a personal computer When using with Windows 95 it is necessary to set so that USB can be used with ve...

Page 26: ...evice and change the BIOS setting system setup so that an external mouse can be selected After changing the BIOS setting perform the operations described in 1 3 above Refer to the computer hardware ma...

Page 27: ...ouse jack Mini DIN 4 pin Mouse cable ADB option Serial mouse 1 2 3 4 5 6 7 8 9 10 11 12 13 14 15 GND TD 1 2 3 4 5 6 7 8 9 CD RD TD DTR GND DSR RTS CTS RI 1 2 3 4 5 6 7 8 9 SELO RTS Projector Computer...

Page 28: ...MUNICATE 11h 06h 1 20h 06h 31h 06h 1 40h 06h POWER 11h 11h 1 20h 11h 31h 11h 1 ZOOM 11h 12h 1 31h 12h 1 FOCUS 11h 13h 1 31h 13h 1 MIRROR 11h 14h 1 20h 14h 31h 14h 1 40h 14h INPUT 11h 21h 1 20h 21h 31h...

Page 29: ...03h H V Invert INPUT 11h VIDEO 21h RGB1 22h RGB2 SYSTEM VIDEO 00h 00h Auto 00h 01h NTSC 00h 04h NTSC4 43 00h 02h PAL 00h 03h SECAM 00h 05h M PAL 00h 06h N PAL VOLUME 00h low volume 24h high volume MUT...

Page 30: ...4xH yyH data to the projector 2 When the command sent by the projector cannot be understood the error code 0xH yyH data is returned When the data length is greater than indicated by the data length c...

Page 31: ...onnecting Refer to the instruction manual of each device before connecting Caution AC input Video tape recorder with S jack Video tape recorder Speaker with built in amp Display monitor Computer deskt...

Page 32: ...the lamp with a new one The indicator or message appears when the power is turned on will indicate that the lamp should be replaced At such time it is necessary to replace the lamp with a new one For...

Page 33: ...again Troubleshooting Before requesting repair check in accordance with the following chart If the situation cannot be corrected then contact BOXLIGHT A bright dot may be seen in the picture This is a...

Page 34: ...pixels 800 horizontal 600 vertical Lens Zoom lens F 1 7 2 3 f 49 64mm Lamp 190w UHB Speaker 1 2W 1 2W Stereo Power supply AC100 120V 3 7A AC220 240V 1 5A Power consumption 320W Operating temperature...

Page 35: ...Product WARRANTY LIMITATION AND EXCLUSION BOXLIGHT CORPORATION shall have no further obligation under the foregoing limited warranty if the Product has been damaged due to abuse misuse neglect acciden...

Page 36: ...QR41981 Printed in Japan KY K S...

Reviews: