


2
Positioning the Wall Bracket
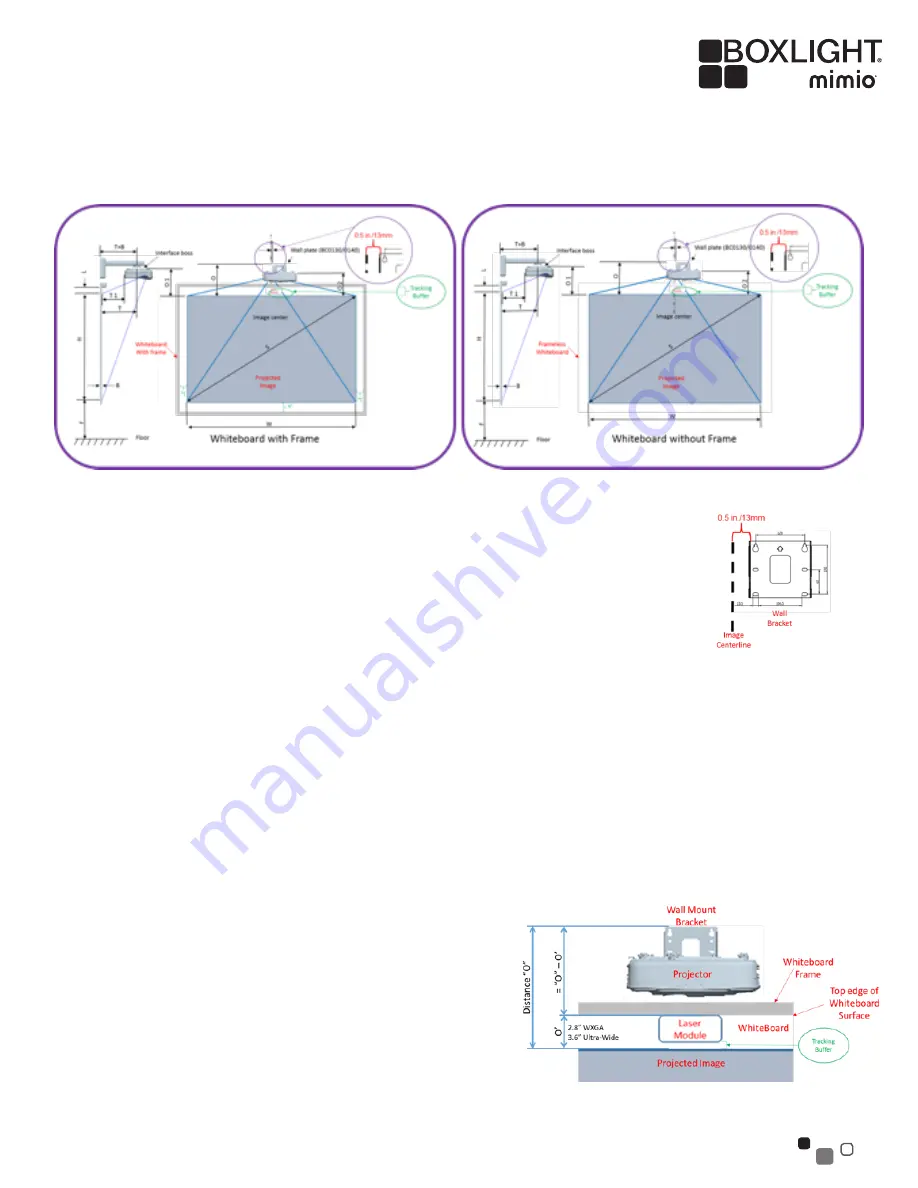
The wall bracket must be positioned horizontally as shown on the diagram at right. The left edge of
the wall bracket must be 0.5” (13mm) to the right of the intended image center. If the wall bracket is
instead centered on the whiteboard, which initially seems the likely placement, the displayed image
will not be centered and proper alignment will not be possible.
Vertical positioning of the wall bracket should be determined from the relevant table below based on
the intended image size and aspect ratio.
Mounting Arms
The 27” (697mm) WallMount-P12W is the model bundled with the WXGA and 16:9 models.
The longer 33” (841mm) WallMount-P12U is the model bundled with the P12 ultra-wide model.
Example One
To produce the largest possible diagonal image at 16:10 aspect ratio on a frameless whiteboard:
• Measure the width and height of the projection surface. In this example, the measured width is 80” and the height 48”.
o Deduct 2” for the Laser Curtain 0.8” for the Tracking Buffer = 2.8”.
o The available height is 48” – 2.8” = 45.2”.
o The WXGA table below shows that a 45.2” height will
allow a diagonal size of 80”, which has a width of 72.1”
and leaves ≈9” of open space on the left and right.
• Determine the horizontal center of the intended image then
mark a point 0.5” (13mm) to the right of this. This mark defines
the horizontal position of the left edge of the wall bracket.
• From the WXGA table below – Distance “O” for the 85” image
is 13.5”.
• Mount the wall bracket so its top edge is that distance above
the top of where the projected image is to be positioned (which
is 2.8” below the top of the whiteboard’s projection surface).
• Attach the projector to the projector mounting bracket, leaving
the four bolts slightly loose so the projector can be adjusted
horizontally.
P12T Touch-Interactive Projector Distance and Positioning Calculator
Figure 2
Figure 3


