BOXLIGHT CP-19t User Manual Download Page 23

23

COMPUTER INPUT

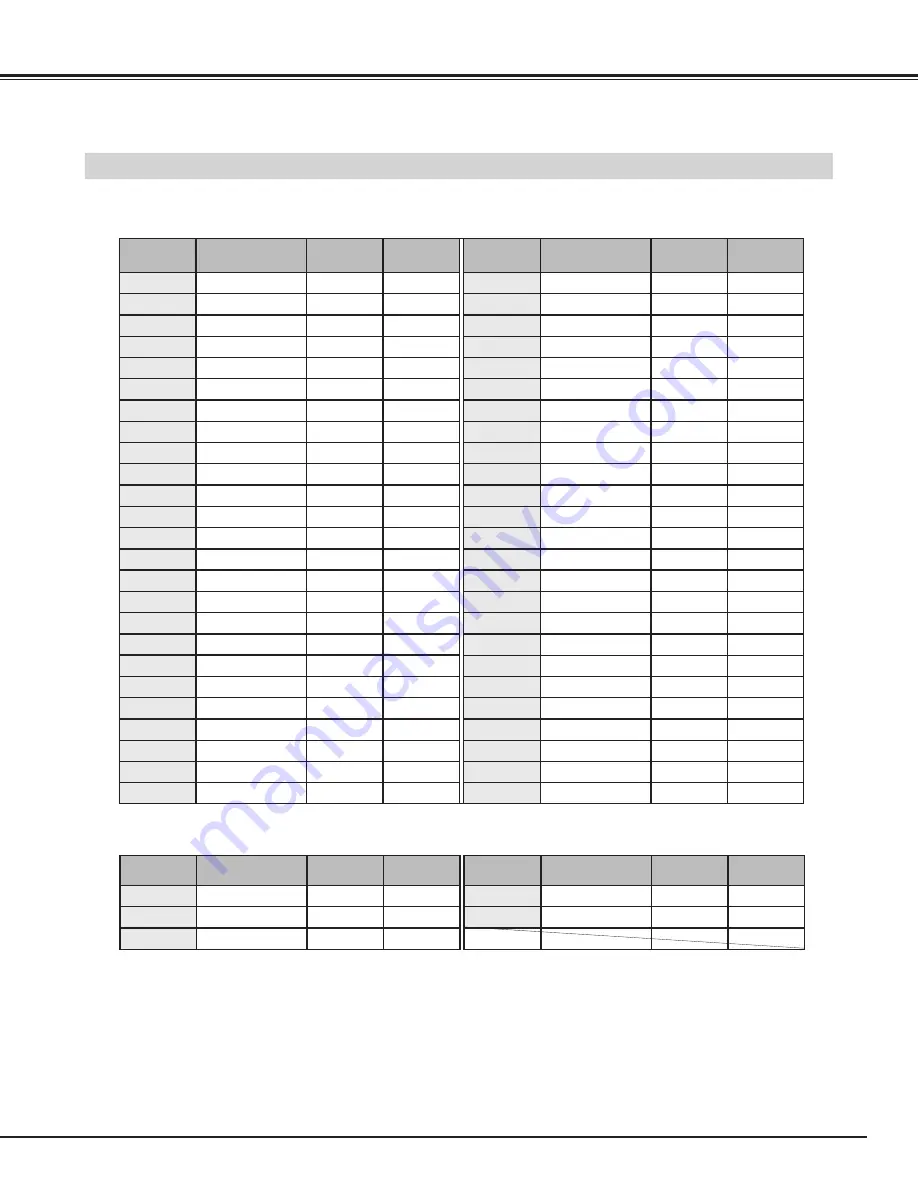
COMPATIBLE COMPUTER SPECIFICATIONS

Basically this projector can accept the signal from all computers with the V, H-Frequency below mentioned and less than 100
MHz of Dot Clock.

NOTE : Specifications are subject to change without notice.

When an input signal is digital from DVI terminal, refer to the chart below.

ON-SCREEN

DISPLAY

RESOLUTION

H-Freq.

(kHz)

V-Freq.

(Hz)

D-VGA

640 x 480

31.469

59.940

D-SVGA

800 x 600

37.879

60.317

D-XGA

1024 x 768

48.363

60.004

ON-SCREEN

DISPLAY

RESOLUTION

H-Freq.

(kHz)

V-Freq.

(Hz)

D-SXGA 2

1280 x 1024

D-SXGA 3   1280 x 1024

60.276

58.069

31.65

29.8

ON-SCREEN

DISPLAY

RESOLUTION

H-Freq.

(kHz)

V-Freq.

(Hz)

VGA 1

640 x 480

31.47

59.88

VGA 2

720 x 400

31.47

70.09

VGA 3

640 x 400

31.47

70.09

VGA 4

640 x 480

37.86

74.38

VGA 5

640 x 480

37.86

72.81

VGA 6

640 x 480

37.50

75.00

MAC LC13

640 x 480

34.97

66.60

MAC 13

640 x 480

35.00

66.67

MAC 16

832 x 624

49.72

74.55

MAC 19

1024 x 768

60.24

75.08

MAC 21

1152 x 870

68.68

75.06

SVGA 1

800 x 600

35.156

56.25

SVGA 2

800 x 600

37.88

60.32

SVGA 3

800 x 600

46.875

75.00

SVGA 4

800 x 600

53.674

85.06

SVGA 5

800 x 600

48.08

72.19

SVGA 6

800 x 600

37.90

61.03

SVGA 7

800 x 600

34.50

55.38

SVGA 8

800 x 600

38.00

60.51

SVGA 9

800 x 600

38.60

60.31

SVGA 11

800 x 600

38.00

60.51

ON-SCREEN

DISPLAY

RESOLUTION

H-Freq.

(kHz)

V-Freq.

(Hz)

XGA 10

1024 x 768

XGA 11

1024 x 768

XGA 12

1024 x 768

XGA 13

1024 x 768

62.04

77.07

XGA 14

1024 x 768

61.00

75.70

XGA 15

1024 x 768

35.522

86.96

(Interlace)

46.90

58.20

XGA 8

1024 x 768

47.00

58.30

XGA 9

1024 x 768

58.03

72.00

SXGA 1

1152 x 864

63.48

79.35

36.00

87.17

(Interlace)

64.20

70.40

SXGA 11

1152 x 900

SXGA 13

1280 x 1024

SXGA 14

1280 x 1024

61.20

65.20

50.00

86.00

(Interlace)

720p (HDTV)

––––––––

50.00

94.00

(Interlace)

45.00

60.00

XGA 1

1024 x 768

XGA 2

1024 x 768

XGA 3

1024 x 768

XGA 4

1024 x 768

48.36

60.00

68.677

84.997

XGA 6

1024 x 768

60.023

75.03

XGA 7

1024 x 768

56.476

70.07

48.50

60.02

44.00

54.58

SXGA 17

1152 x 900

SXGA 18

1280 x 1024

61.85

66.00

46.43

86.70

(Interlace)

XGA 5

1024 x 768

60.31

74.92

VGA 7

640 x 480

43.269

85.00

RGB

––––––––

15.734

60

(Interlace)

RGB

––––––––

15.625

50

(Interlace)

1080i60 (HDTV)

––––––––

33.75

60.00

(Interlace)

1035i (HDTV)

––––––––

33.75

60.00

(Interlace)

SVGA 10

800 x 600

32.70

51.09

1080i50 (HDTV)

––––––––

28.125

50.00

(Interlace)

Summary of Contents for CP-19t

Page 1: ...BOXLIGHT CP 19t USER S GUIDE...

Page 2: ...on at the end of this maual If the problem still persists contact BOXLIGHT TO THE OWNER SAFETY PRECAUTIONS WARNING TO REDUCE THE RISK OF FIRE OR ELECTRIC SHOCK DO NOT EXPOSE THIS APPLIANCE TO RAIN OR...

Page 3: ...abinet slots as they may touch dangerous voltage points or short out parts that could result in a fire or electric shock Never spill liquid of any kind on the projector This projector should be operat...

Page 4: ...frequency energy and if not installed and used in accordance with the instructions may cause harmful interference to radio communications However there is no guarantee that interference will not occur...

Page 5: ...INPUT SOURCE 30 SELECTING VIDEO SYSTEM 31 PICTURE IMAGE ADJUSTMENTS 32 IMAGE LEVEL SELECT 32 IMAGE LEVEL ADJUSTMENT 33 PICTURE SCREEN ADJUSTMENT 34 SETTING MENU 35 LAMP REPLACEMENT 37 LAMP REPLACE 37...

Page 6: ...rench Italian Spanish Portuguese Dutch Swedish Chinese Korean or Japanese One Touch Auto PC Adjustment Incoming computer video signals are recognized and the best adjustment is automatically set by Au...

Page 7: ...s internal temperature and automatically controls operating power of Cooling Fans FRONT This projector is equipped with Cooling Fans for protection from overheating Pay attention to the following to e...

Page 8: ...nplug AC Power Cord when the projector is not in use When this projector is connected to the outlet with AC Power Cord it is in Stand by Mode and consumes a little electric power CONNECTING AC POWER C...

Page 9: ...r to P20 and 35 3 CAUTION Avoid positioning a projector with the angle of more than 20 degrees Projection Lamp may malfunction This projector is designed to project on a flat projection surface The pr...

Page 10: ...CAUTION Carrying Bag supplied is intended for protection from dust and scratches on the surface of a cabinet and it is not designed to protect the projector from external forces Do not transport a pr...

Page 11: ...onnect the composite video output from video equipment to VIDEO Y jack or connect the component video outputs to VIDEO Y Pb Cb and Pr Cr jacks Refer to P13 COMPUTER INPUT DIGITAL ANALOG Media Card Ima...

Page 12: ...connection Cable or adapter is not supplied with this projector Control Cable for PS 2 Port Control Cable for ADB Port Audio Cable stereo NOTE When connecting the cable the power cords of both the pr...

Page 13: ...iority over VIDEO jack When both Y Pb Cb Pr Cr jacks and S VIDEO jack are connected Y Pb Cb Pr Cr jacks has priority over S VIDEO jack S VIDEO Output Audio Input Cables used for connection Cable is no...

Page 14: ...mage in DIGITAL ZOOM mode P29 It is also used as a PC mouse in Wireless Mouse Operation P39 POWER ON OFF BUTTON Used to turn projector on or off P19 MENU BUTTON Used to select MENU operation P17 18 IN...

Page 15: ...ity and be sure the battery terminals are in contact with the pins in the compartment REMOTE CONTROL BATTERIES INSTALLATION 1 2 3 Operating Range Point Remote Control Unit toward projector Receiver Wi...

Page 16: ...projector is turned on And it is bright when the projector is in stand by mode Turns yellow when the life of the projection lamp draws to an end P37 Flashes red when internal projector temperature is...

Page 17: ...ach adjustment on ON SCREEN MENU 2 MOVING POINTER 3 SELECT ITEM Move the pointer see below or adjust the value of item by pressing POINT button s on Top Control or on Remote Control Unit Select the it...

Page 18: ...NU Used to adjust picture image Contrast Brightness Color Tint White balance R G B Sharpness Gamma Refer to P33 34 FOR VIDEO SOURCE Press MENU BUTTON while connecting to VIDEO input source Same functi...

Page 19: ...it at least 5 minutes before turning on projector again When WARNING TEMP Indicator continues to flash follow the procedures below 1 Press POWER ON OFF button to turn the projector off and disconnect...

Page 20: ...ith POINT DOWN button If a projected picture has keystone distortion correct the image with KEYSTONE adjustment BASIC OPERATION ADJUSTING SCREEN Message disappears after 4 seconds Message disappears a...

Page 21: ...ox appears on the screen for a few seconds button to increase volume and button for decreasing Mute Press MUTE button on Remote Control Unit to cut off sound To restore sound to its previous level pre...

Page 22: ...There is no signal input from computer Make sure the connection of computer and a projector is set correctly Refer to TROUBLESHOOTING on page 41 Auto SYSTEM Menu icon Displays system being selected P...

Page 23: ...32 SVGA 3 800 x 600 46 875 75 00 SVGA 4 800 x 600 53 674 85 06 SVGA 5 800 x 600 48 08 72 19 SVGA 6 800 x 600 37 90 61 03 SVGA 7 800 x 600 34 50 55 38 SVGA 8 800 x 600 38 00 60 51 SVGA 9 800 x 600 38...

Page 24: ...mote Control Unit Move a red frame pointer to AUTO PC Adj icon and press SELECT button PC ADJUST MENU Auto PC Adj PC ADJUST Menu icon Store adjustment parameters Adjustment parameters from Auto PC Adj...

Page 25: ...ADJUST Menu icon 1 2 Press POINT DOWN button to move a red frame pointer to the item that you want to adjust and then press SELECT button Adjustment dialog box will appear Press POINT LEFT RIGHT butto...

Page 26: ...Store Closes PC ADJUST MENU Quit Other icons operate as follows 3 To store adjustment parameters move a red frame pointer to Store icon and then press SELECT button Move a red arrow pointer to any of...

Page 27: ...SELECT MENU Normal picture level preset on this projector Standard Picture level with improved halftone for graphics Real User preset picture adjustment in IMAGE ADJUST Menu P28 IMAGE 1 4 IMAGE SELECT...

Page 28: ...arker and POINT RIGHT button to adjust brighter From 0 to 63 Contrast Brightness Press either POINT LEFT button or POINT RIGHT button to obtain better balance of contrast From 0 to 15 Gamma 3 To store...

Page 29: ...s selected on PC SYSTEM Menu P22 Wide cannot be selected when 720p HDTV is selected on PC SYSTEM Menu P22 True and Digital zoom cannot be selected when RGB is selected on PC SYSTEM Menu P22 This proje...

Page 30: ...IDEO Move a pointer to the source and press SELECT button Source Select Menu VIDEO INPUT MENU INPUT button Video Computer Move a pointer to the source that you want to select and then press SELECT but...

Page 31: ...ess SELECT button PAL SECAM NTSC NTSC4 43 PAL M PAL N Projector automatically detects incoming Video signal and adjusts itself to optimize its performance If projector cannot reproduce proper video im...

Page 32: ...Normal picture level preset on this projector Standard Picture level adjusted for the picture with fine tone Cinema User preset picture adjustment in IMAGE ADJUST Menu P33 34 IMAGE 1 4 IMAGE SELECT M...

Page 33: ...obtain better balance of contrast From 0 to 15 Gamma Press SELECT button at this icon to display other items IMAGE ADJUST Menu icon Press POINT LEFT RIGHT buttons to adjust value Press POINT LEFT but...

Page 34: ...1080i is selected on AV SYSTEM Menu P31 Move the red frame to the function and press SELECT button SCREEN MENU SCREEN Menu icon Provides image at a wide screen ratio of 16 9 Wide Provides image at a n...

Page 35: ...d in ON SCREEN MENU is selectable from among English German French Italian Spanish Portuguese Dutch Swedish Chinese Korean and Japanese Display This function decides whether to display On Screen Displ...

Page 36: ...rojector has two different remote control codes the factory set normal code Code 1 and the secondary code Code 2 This switching function prevents remote control interference when operating several pro...

Page 37: ...a projector to cool for at least 45 minutes before you open Lamp Cover The inside of a projector can become very hot ON OFF LAMP REPLACE WARNING TEMP INPUT IMAGE MENU VOLUME This indicator lights yell...

Page 38: ...er similar lamps If the projector indicates that the lamp should be replaced i e if the LAMP REPLACE INDICATOR lights up replace the lamp with a new one IMMEDIATELY after the projector has cooled down...

Page 39: ...Wireless Remote Control Unit as Wireless Mouse a mouse driver must be already installed on your computer No mouse driver is supplied with this projector instead the Wireless Remote Control Unit becom...

Page 40: ...779 7901 for service 3 AIR FILTER Pull up and remove Turn off the projector and disconnect AC power cord from the AC outlet Turn the projector upside down and remove Air Filter by pulling the latches...

Page 41: ...icator lights green again and the projector can be turned on by pressing Power ON OFF button Check WARNING TEMP indicator If the indicator flashes red the projector cannot be turned on See TURNING ON...

Page 42: ...or when using Remote Control Unit Maximum operating range is 16 4 5m Make sure the code of Remote Control Unit is set to conform to projector See SETTING section on page 35 36 Problem Try these Soluti...

Page 43: ...om and focus 3 0 22 6 0 9 m 6 9 m 200 W RCA Type x 3 Video Y Pb Cb Pr Cr and Mini DIN 4 pin x 1 S Video Projection Lens Throw Distance Projection Lamp Video Input Jacks RCA Type x 2 Audio Input Jacks...

Page 44: ...10 18 3 11 19 4 12 20 5 13 21 6 14 22 7 15 23 8 16 24 C1 C2 C3 C5 C4 Pin Configuration Analog Red Input Analog Ground R G B Analog Green Input Analog Horiz sync Analog Blue Input C1 C5 C2 C4 C3 T M D...

Page 45: ...sted below are optionally supplied When ordering those parts give the name and Type No to the sales dealer Control Cable Serial Port Type No CP13T 212 Control Cable ADB Port Type No CP13T 213 MAC Adap...

Page 46: ...46...

Page 47: ...47...

Page 48: ...urther obligation under the foregoing limited warranty if the Product has been damaged due to abuse misuse neglect accident unusual physical or electrical stress unusual physical and electrical stress...

Reviews: