background image

D

D

D

L

L

L

P

P

P


P

P

P

r

r

r

o

o

o

j

j

j

e

e

e

c

c

c

t

t

t

o

o

o

r

r

r

U

U

U

s

s

s

e

e

e

r

r

r


M

M

M

a

a

a

n

n

n

u

u

u

a

a

a

l

l

l


— 

20 

— 

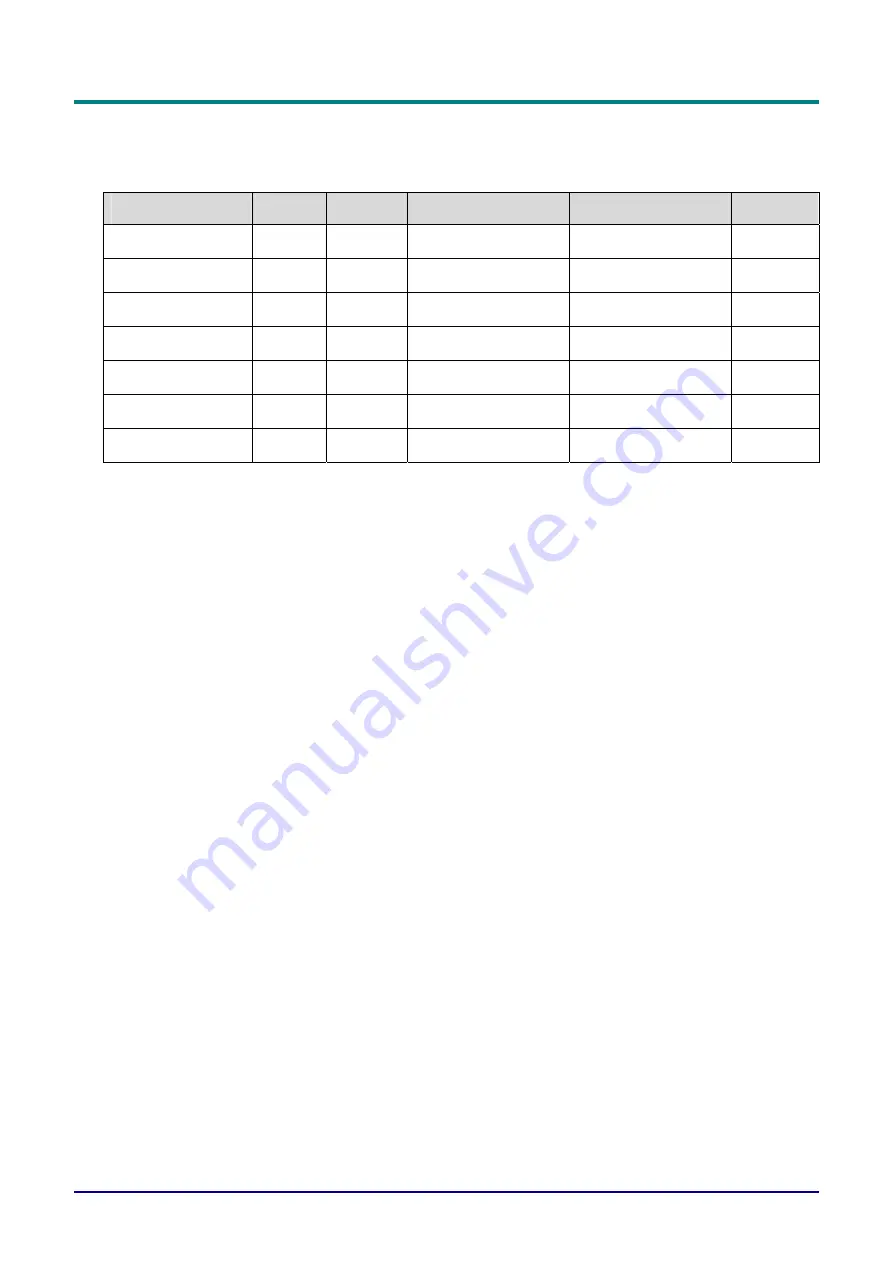
Main Menu Items Supported for Each Input Source 

Depending on the video source not all items in the OSD are available. Items that are available for 
each input source are marked with “X”. Items that are not available can not be selected in the OSD. 

Function 

RGB 

DVI 

Component Video 

Composite Video 

S-Video 

Brightness 

X


X


X


X


X


Contrast 

X


X


X


X


X


Sharpness 

X


X


X


X


X


Color Temperature 

X


X


X


X


X


Color Saturation 


X


X


X


Color Tint 


X


X


X


Gamma 

X


X


X


X


X


Summary of Contents for CD737x

Page 1: ...19462 Powder Hill Place Poulsbo WA 98370 800 762 5757 360 779 7901 www boxlight com CD737x USER MANUAL...

Page 2: ...e without notice The manufacturer makes no repre sentations or warranties with respect to the contents hereof and specifically disclaims any implied warranties of merchantability or fitness for any pa...

Page 3: ...Caution Alerts you to situations that may damage the unit Warning Alerts you to situations that may damage the unit create a hazardous environment or cause per sonal injury Throughout this manual com...

Page 4: ...where it will not be in the way of foot traffic Remove the batteries from the remote control when storing or not in use for a prolonged period Replacing the Lamp Replacing the lamp can be hazardous if...

Page 5: ...SETTINGS 17 ON SCREEN DISPLAY MENU CONTROLS 17 Navigating the OSD 17 Setting the OSD Language 18 Main Menu 19 Setup Menu 21 Advance Feature 22 User Color 23 Config Menu 25 Utility Menu 26 Language Me...

Page 6: ...P P Pr r re e ef f fa a ac c ce e e v EN 55022 WARNING 42...

Page 7: ......

Page 8: ...ely if any items are missing appear damaged or if the unit does not work Caution 1 Avoid using the projector in dusty environments 2 Leave the power cable plugged in for 5 10 minutes until the project...

Page 9: ...29 Projection lamp cover Remove when changing lamp 4 10 IR receiver Receiver for IR signal from remote control 5 15 Lens focus Remove cover turn the lens to focus 6 Height adjuster Adjusters drop dow...

Page 10: ...stone Up cursor Correct image trapezoid narrower top effect Navigate and change settings in the OSD Orange Lamp ready you can safely turn on or off the projector 3 Ready LED Flashing Lamp not ready do...

Page 11: ...u ua a al ll 4 ITEM LABEL DESCRIPTION SEE PAGE 8 Auto Optimizes image size position and resolution 9 Menu Open exit the On Screen Display OSD 10 Enter Change settings in the OSD 17 11 Keystone Down cu...

Page 12: ...rmware upgrades 4 5 USB Connect the USB cable supplied from a computer 12 Audio in Connect the audio cable not supplied from the input de vice 6 Power connector Connect the supplied power cord 7 Main...

Page 13: ...Lock Secure to permanent object with a Kensington Lock system 32 16 Pr Cr 17 Pb Cb 18 Y Component videoin Connect a component video enabled device 12 Note If your video equipment has both S video RCA...

Page 14: ...t tto o or r r P P Pa a ar r rt tts s s Bottom view 2 3 3 3 1 1 2 7 ITEM LABEL DESCRIPTION SEE PAGE Height adjuster buttons Push to release height adjusters 1 14 Height adjusters Adjusters drop down w...

Page 15: ...Certain high frequency fluo rescent lights can disrupt remote control operation 2 Be sure nothing obstructs the path between the remote control and the projector If the path be tween remote and projec...

Page 16: ...n speaker 13 Zoom Zoom in 14 Zoom Zoom out 15 Freeze Freeze unfreezes the on screen picture 16 Blank Make the screen blank 17 Source Detect the input device 18 Auto Auto adjustment for phase tracking...

Page 17: ...de grees above or below the projector level If the projector does not respond to the remote control move a little closer Projector and Remote Control Buttons The projector can be operated using the r...

Page 18: ...ver in the direction of the arrow 2 Insert the supplied batteries taking note of the polarity as shown here 3 Replace the cover Caution 1 Only use AAA alkaline batteries 2 Dispose of used batteries ac...

Page 19: ...ct the supplied DVI cable from a computer B RGB in Connect a VGA cable not supplied from a computer C RGB out Connect a VGA cable not supplied to a monitor D RS 232 Reserved for installation control a...

Page 20: ...r button to turn on the projector The projector splash screen displays and connected devices are detected If the connected device is a PC press the appropriate Fn hot keys on the computer keyboard to...

Page 21: ...should be level and sturdy Position the projector so that it is perpendicular to the screen Be sure cables are not in the way or can not cause the projector to be knocked over 1 To raise the level of...

Page 22: ...e Zoom Focus and Keystone 1 Use the Image zoom con trol on the projector only to resize the projected im age and screen size A 2 Use the Image focus con trol on the projector only to sharpen the proje...

Page 23: ...usting the Volume 1 Press the Volume but tons on the projector or the remote control The volume control ap pears on the display 2 Use the Volume but tons to adjust the level 3 Press the Mute button on...

Page 24: ...D that lets you make image adjustments and change various settings Navigating the OSD You can use the remote control or the buttons on the top of the projector to navigate and make changes to the OSD...

Page 25: ...on your projector while reading this section Set the OSD lan guage to your preference before continuing The default language is English 1 Press the Menu button The Main menu appears until Language is...

Page 26: ...ightness Range 0 100 50 Contrast Press to adjust the contrast Range 0 100 50 Sharpness Press to adjust the display sharpness Range 1 5 3 Press to adjust the video temperature Range Cool Normal Warm Co...

Page 27: ...video source not all items in the OSD are available Items that are available for each input source are marked with X Items that are not available can not be selected in the OSD Function RGB DVI Compo...

Page 28: ...onfirm the new setting 21 ITEM DESCRIPTION DEFAULT Horizontal Position Press to move the image left or right Range 0 100 50 Vertical Position Press to move the image up or down Range 0 100 50 Keystone...

Page 29: ...color s setting heightens the intensity of that color on the screen while a lower setting makes the color less intense Press to select a color Press to adjust the selected color Range 50 50 White Pea...

Page 30: ...Enter to confirm the new setting 23 ITEM DESCRIPTION DEFAULT Red Press the cursor button to adjust the red color level Range 50 50 0 0 Green button to adjust the green color level Range 50 50 Press t...

Page 31: ...ted for Each Input Source Depending on the video source not all items in the OSD are available Items that are available for each input source are marked with X Items that are not available can not be...

Page 32: ...elect a background color for blank screen Range Black Red Green Blue White Blue On Auto Source Press to enable or disable automatic source detection Range On Off Auto Power Off Press to enable or disa...

Page 33: ...e Press to select the video standard Range Auto NTSC PAL SECAM Auto Video AGC Press to enable or disable automatic gain control for the video source Range On Off On Press to choose from four projectio...

Page 34: ...guage Menu Press the Menu button to open the OSD menu Press to move to the Language menu Press to move up and down in the Language menu 27 ITEM DESCRIPTION DEFAULT English French German Italian Spanis...

Page 35: ...and refresh rate of the connected video device Active Source Display the active source Software Version Information about the firmware version These items are display only Lamp Hours Number of hours...

Page 36: ...ation life Warning 1 Be sure to turn off and unplug the projector at least an hour before replacing the lamp Failure to do so could result in a severe burn 2 It is recommended that you do not attempt...

Page 37: ...Lamp After replacing the lamp reset the lamp hour counter to zero Refer to the following 1 Press the Menu button to open the Main menu 2 Press the cursor button to move to the Status menu 3 Press the...

Page 38: ...the ventilation openings on the projector 3 If a little water gets into the projector interior while cleaning leave unplugged in a well ventilated room for several hours before using 4 If a lot of wa...

Page 39: ...ild detergent such as used to wash dishes and wipe the case 3 Rinse all detergent from the cloth and wipe the projector again Caution To prevent discoloration or fading of the case do not use abrasive...

Page 40: ...tached Ensure the attached device is turned on Ensure a connected PC is not in suspend mode Ensure a connected notebook computer is configured for an external display This is usu ally done by pressing...

Page 41: ...ur dealer for assistance Image Problems Problem No image appears on the screen 1 Verify the settings on your notebook or desktop PC 2 Turn off all equipment and power up again in the correct order Pro...

Page 42: ...the lamp module 6 Put the old lamp back in the projector and have the projector serviced Problem The lamp goes off 1 Power surges can cause the lamp to turn off Press the power button twice to turn o...

Page 43: ...viced If you are unable to solve the problem you should have the projector serviced Pack the projector in the original carton Include a description of the problem and a checklist of the steps you took...

Page 44: ...Zoom ratio 1 22 1 Vertical keystone correction 15 Projection methods Desktop front rear ceiling front rear Data Compatibility IBM PC or compatibles VGA SVGA Mac HDTV Video 720p 1080i Video compatibili...

Page 45: ...r r M M Ma a an n nu u ua a al ll 38 Input output connectors DVI I RGB in RGB out PC USB Composite video RCAx1 S Video Mini DIN Video Component video Y Pb Cb Pr Cr RCAx3 Mini jack in Mini jack out Au...

Page 46: ...3m 1 71m 1 28m 1 75m 1 4m 1 05m 9 18 84 67 2 50 4 68 85 55 08 41 31 3 2m 2 44m 1 95m 1 46m 2m 1 6m 1 20m 10 5 96 76 8 57 6 78 69 62 95 47 21 3 6m 2 74m 2 19m 1 65m 2 25m 1 80m 1 35m 11 81 108 86 4 64...

Page 47: ...720 x 350 31 5 70 0 720 x 400 31 5 70 0 720 x 400 37 9 85 0 640 x 480 31 5 60 0 640 x 480 37 9 72 8 640 x 480 37 5 75 0 640 x 480 43 3 85 0 800 x 600 37 9 60 3 800 x 600 46 9 75 0 800 x 600 48 1 72 2...

Page 48: ...in n ng g g S S St tta a ar r rt tte e ed d d V V Vi iie e ew w ws s s o o of f f P P Pr r ro o oj jje e ec c ct tto o or r r P P Pa a ar r rt tts s s Dimensions 32 8 cm 12 9 inches 8 8 cm 3 5 inches...

Page 49: ...io communications Op eration of this equipment in a residential area is likely to cause harmful interference in which case the user will be required to correct the interference at his own expense Chan...

Reviews: