background image

37

6

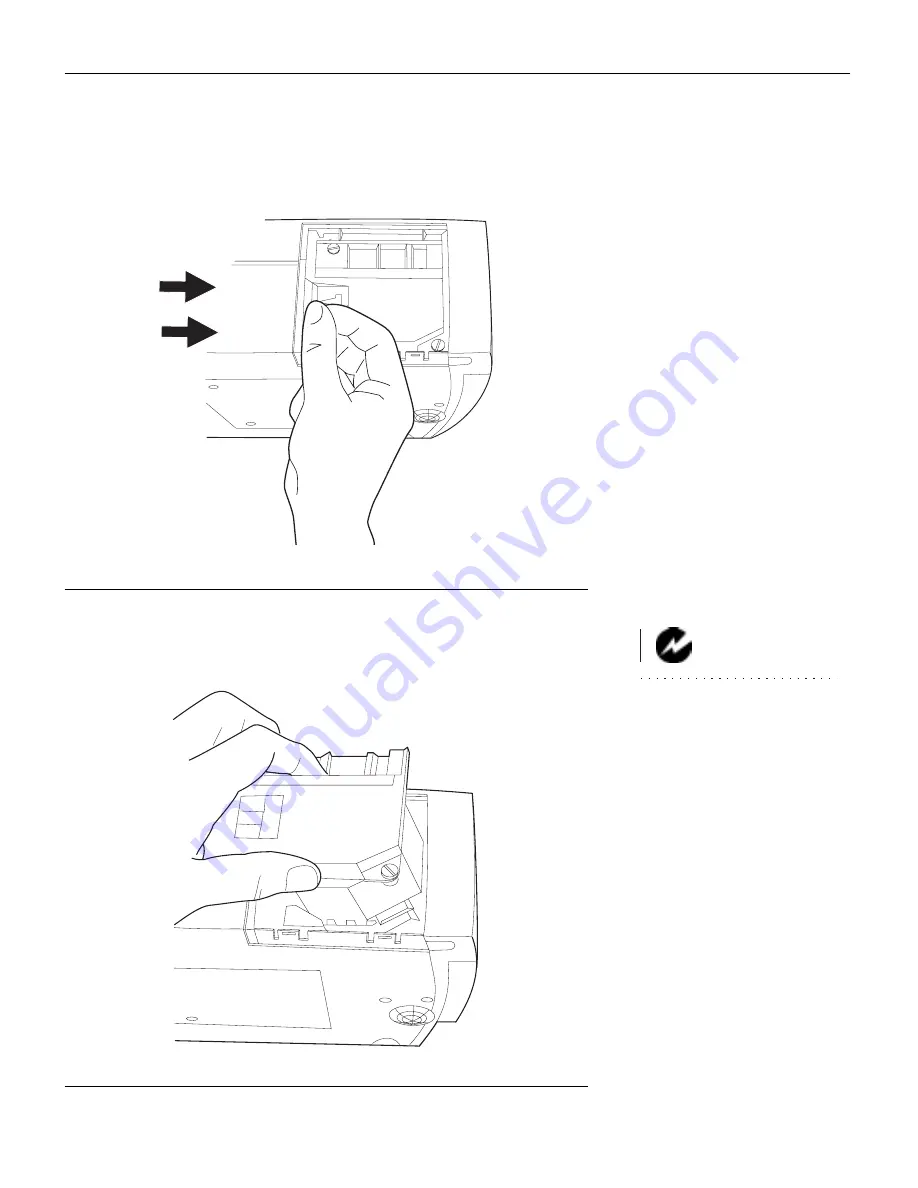
Slide the lamp connector to the right to disconnect it from the 
projector (Figure 26).

F

IGURE

 26

Sliding the lamp connector

7

Remove the module (Figure 27).

WARNING: Do not drop the 

lamp module or touch the glass 

bulb! The glass may shatter and 

cause injury.

F

IGURE

 27

Removing the lamp module

Summary of Contents for CD-450m

Page 1: ...hone within these areas United Kingdom 0800 762 575 Germany 0800 180 8381 France 0800 9132 88 USA and Canada 800 762 5757 Direct Phone USA 360 779 7901 Europe 44 0 1732 840 404 19332 Powder Hill Place...

Page 2: ...will be required to correct the interference at his own expense Canada This Class A digital apparatus complies with Canadian ICES 003 Cet appareil num rique de la classe A est conforme la norme NMB 0...

Page 3: ...afety EN 60950 1992 A1 A2 A3 1995 March 1999 Trademarks Apple Macintosh and PowerBook are trademarks or registered trademarks of Apple Computer Inc IBM and PS 2 are trademarks or registered trademarks...

Page 4: ......

Page 5: ...er 12 Connecting a Video Player 14 Powering up the Projector and Adjusting the Image 16 Turning Off the Projector 17 Using the Projector 19 Basic Image Adjustment 19 Using the Remote Control 19 Adjust...

Page 6: ...i T a b l e o f C o n t e n t s Appendix 43 Specifications 43 Accessories 45 Portable and Laptop Activation Chart 47 Using Video Mirroring with a PowerBook Computer 52 Projected Image Size 53 Index 57...

Page 7: ...out usage of a feature please refer to the User s Guide Warning Hot surface Do not touch An arrow pointing to the lamp door on the projector Safety Terms Warning Don t look directly into the lens when...

Page 8: ...e or in direct sunlight Caution Do not drop the projector Transport the projector in a Boxlight approved case see page 46 for a list of cases Caution For ceiling mount installations please use the cei...

Page 9: ...Auto Resize feature See Auto Resize on page 28 Image Resolution CD 450m The SVGA resolution of the 450m s projected image is 800x600 Screen resolutions between 800x600 and 1024x768 are com pressed to...

Page 10: ...amcorders and laser disc players Unpacking the Projector The projector comes with the items shown in Figure 1 Check to make sure all are included Contact Boxlight immediately if anything is missing If...

Page 11: ...9 10 1 CD 450m or CD 550m pro jector and lens cap 6 RCA audio video A V cable 2 Soft carry case 7 CablePro III 3 User s Guide and quick start card 8 CablePro USB mouse cable 4 Power cord 9 CablePro P...

Page 12: ...I n t r o d u c t i o n FIGURE 2 Side view of projector FIGURE 3 Front view of projector connector panel speaker focus ring elevator button power cord connector keypad power switch focus ring zoom rin...

Page 13: ...of time If this happens allow it to reach room temperature before use This projector is not intended for use in mainframe computer rooms as defined in the Standard for the Protection of Elec tronic Co...

Page 14: ...6 I n t r o d u c t i o n...

Page 15: ...formation To turn the image upside down see Ceiling Projection on page 30 The Ceiling Mount Kit is sold separately see page 46 2 Position the projector the desired distance from the screen The distanc...

Page 16: ...tioning properly A slowly blinking LED indicates CablePro is waiting to initialize with the projector a rapidly blinking LED indicates a problem with CablePro Connect the end of the CablePro cable to...

Page 17: ...puter audio in connector on the connector panel is only used with the optional CablePro Lite cable If you are using CablePro the audio cable should be connected to the CablePro not directly to the pro...

Page 18: ...f you don t want audio or mouse control you can use a simplified cable called CablePro Lite ordered separately 1 Plug either end of the CablePro audio cable into the audio connector on your computer 2...

Page 19: ...g the end of the CablePro mouse cable into the connector on the CablePro You must have the appropriate USB drivers installed on your computer to use the USB feature Windows 98 ships with the appropria...

Page 20: ...monitor con nector on your computer FIGURE 9 Connecting the CablePro cable to a desktop computer Do you want to display the image on your computer s monitor as well as on the projection screen NOTE T...

Page 21: ...Pro FIGURE 10 Connecting the CablePro monitor audio and mouse cables to a desktop computer If your computer has a USB connector and is running Windows 98 use the USB mouse cable NOTE The USB mouse is...

Page 22: ...ories on page 46 2 Plug the A V cable s yellow connector into the video out port on your video player Figure 11 This port may be labeled To Monitor If you re using an S video cable connect it to the s...

Page 23: ...t to the projector If you re using an S video cable the yellow connectors on the A V cable remain unused Figure 12 5 Plug the A V cable s other white and red connectors to the left and right audio in...

Page 24: ...play your video image You can select a default source to determine which source the projector examines first during power up for active video see Default Source on page 31 Use the volume buttons to a...

Page 25: ...ps running To exit standby mode press the standby button again It may take sev eral seconds for the projection lamp to reach full power and project the image again To completely power off the projecto...

Page 26: ......

Page 27: ...racking If that doesn t clear up the image turn Auto Image off and adjust the sync page 28 and or the tracking page 29 manually 5 If the colors don t look right adjust the brightness page 25 Using the...

Page 28: ...uter s mouse from the projector s remote or keypad you must connect the mouse cable to the CablePro See page 10 for details If you are creating presentations in Microsoft PowerPoint you can use the re...

Page 29: ...4 Focus ring zoom ring and elevator button The projector is equipped with a self locking quick release eleva tor foot and button Figure 14 To raise the projector 1 Press and hold the elevator button F...

Page 30: ...een Press menu again to close the menus When you close the menus the projector saves any changes you made For more information about the on screen menus see page 24 Mouse buttons Use the left and righ...

Page 31: ...s If you press standby again within 15 minutes the projector returns to normal operations immediately If you press standby again after 15 minutes there is about a 30 second delay before the lamp turns...

Page 32: ...minates the keypad green Press the corresponding buttons to move the cursor up down left or right or use the disk mouse on the remote To select a menu move the cursor left and right to highlight the m...

Page 33: ...PAL or SECAM video sources Press the left mouse button to increase the amount of green in the image Press the right mouse button to increase the amount of red in the image Contrast The contrast contro...

Page 34: ...f color in the image Blank Screen Blank Screen determines what color is displayed when there is no active source and when the projector is in standby Click either mouse button to toggle between blue a...

Page 35: ...ce Treble The treble setting controls the high frequencies of your audio source Press the left mouse button to decrease the treble Press the right mouse button to increase the treble Treble adjustment...

Page 36: ...to Resize automatically resizes the image by scaling it up or down It only affects computer images that are not the projector s native resolution When Auto Resize is on the projector makes the best fi...

Page 37: ...cking the press either mouse button repeatedly until the fuzzy vertical bars are gone Positioning adjustments are saved when you power off the pro jector Horizontal position Follow these steps to manu...

Page 38: ...s unable to detect the correct standard the colors might not look right or the image might appear torn If this happens manually select a standard by clicking either mouse button and cycling through th...

Page 39: ...jector automatically finds the active source checking the default source first Highlight Auto Source Select and click either mouse button to turn this feature on and off Plug and Play This setting tog...

Page 40: ...e is detected The startup screen con tains information on contacting Boxlight Click either mouse but ton to turn this feature off and display a plain black or blue screen instead of the startup screen...

Page 41: ...nts each hour the lamp is in use Change the bulb when the brightness is no longer accept able See Replacing the Projection Lamp on page 35 for details Computer resolution Shows your computer s resolut...

Page 42: ...he projector s software version This information is useful when contacting Technical Support CablePro version Indicates the CablePro s software version This information is useful when contacting Techn...

Page 43: ...tion Lamp WARNING To avoid burns allow the projector to cool for at least 30 minutes before you open the lamp module door Never extract the lamp module while the lamp is operating The lamp hour counte...

Page 44: ...it FIGURE 24 Removing the lamp door CAUTION Never operate the projector with the lamp door open or removed This disrupts the air flow and causes the projector to overheat 5 Loosen the two non removab...

Page 45: ...disconnect it from the projector Figure 26 FIGURE 26 Sliding the lamp connector 7 Remove the module Figure 27 WARNING Do not drop the lamp module or touch the glass bulb The glass may shatter and cau...

Page 46: ...still holding down the mouse button for 5 seconds Verify that the counter was reset by pressing the menu button and viewing the counter in the Status window Replacing the Batteries in the Remote Cont...

Page 47: ...e sure that the power cord is properly connected to a fully functional AC electrical outlet Make sure that the power cord is also properly connected to the projector If the projector is plugged into a...

Page 48: ...y See page 10 through page 14 for connection procedures Verify that the proper input source is connected See Source keypad only or Computer and Video remote only on page 22 You might need to turn ever...

Page 49: ...n of your video card if it s greater than 1024x768 Problem Image is out of focus Turn the projection lens to focus the image Make sure the projection screen is at least 5 feet 1 5 m from the projector...

Page 50: ...displays of different moni tors there are often differences between the computer image and the projected image Adjust the brightness tint and or contrast from the Display menu See Brightness on page 2...

Page 51: ...to 70 C Humidity Operating and non oper 5 to 95 relative humidity non condensing Dimensions 3 9 x 9 x 12 5 inches 9 9 x 22 9 x 31 8 cm Weight 7 4 lbs 3 4 kg unpacked Altitude Operating 0 to 10 000 fee...

Page 52: ...s for THD 0 3 Sensitivity 100 mV at 1 KHz for 88 dB SPL at 1 meter Connector Type RCA jack Computer Audio Input Input Impedance 10K ohm nominal AC coupled Maximum Input Voltage LIN RIN PEAK 4 5 V for...

Page 53: ...ries ship with the projector Quick Start card User s Guide Soft Case Shipping Box CablePro III and Cables CablePro Audio Cable 2 ft CablePro USB Cable 2 ft CablePro PS 2 Mouse Cable 1 5 ft Executive R...

Page 54: ...Cable plenum rated 60 7 ft 18 5m CablePro 2 CablePro 2 Installation Extension Cable 70 5 ft 21 5 m CablePro 2 only RF Remote 2 Button Executive Remote Remote Receiver Full Feature Laser Pro Remote Co...

Page 55: ...external and internal ports and pressing it a third time activates the internal port Refer to your computer s doc umentation for details on your spe cific model Computer Key command to activate port...

Page 56: ...option mode for setup option Compuadd automatic automatic Alt F for screen setup option Alt F for screen setup option Data General Ctrl Alt Command Ctrl Alt Command Data General Walkabout 2 CRT X at...

Page 57: ...2 FN F7 select choice from setup menu FN F1 select choice FN F5 select choice PS 2 SC select choice CRT LCD etc Infotel FN F12 FN F12 Kaypro boot up monitor plugged in unplug monitor Kris Tech FN F8 F...

Page 58: ...c FN F2 FN F2 Prostar Ctrl Alt S at bootup Ctrl Alt S at bootup Samsung setup screen option setup screen option Sanyo setup screen option setup screen option Sharp dip switch to CRT dip switch to LCD...

Page 59: ...ers offer more than one key command depend ing on the computer model Twinhead FN F7 FN F7 FN F5 FN F5 Automatic Automatic WinBook Ctrl Alt F10 Ctrl Alt F10 Wyse software driven software driven Zenith...

Page 60: ...Monitors control panel again When using video mirroring and high color graphics such as slide shows the projected image occasionally might turn black and white If this happens perform the following st...

Page 61: ...0m maximum image size Distance to Screen feet Diagonal feet Width feet Height feet 4 9 3 0 2 4 1 8 8 5 0 4 0 3 0 12 7 6 6 1 4 6 16 10 1 8 1 6 1 20 12 6 10 1 7 6 30 18 9 15 1 11 3 Table 2 Image Size Wi...

Page 62: ...idth feet Height feet 4 9 2 4 1 9 1 4 8 3 9 3 1 2 3 12 5 8 4 6 3 5 16 7 7 6 2 4 6 20 9 6 7 7 5 8 30 14 5 11 6 8 7 Table 4 Image Size Width and Height for CD 450m minimum image size metric Distance to...

Page 63: ...onal feet Width feet Height feet 4 9 3 6 2 9 2 2 8 6 5 5 2 3 9 12 9 7 7 8 5 8 16 12 9 10 3 7 7 20 16 0 12 8 9 6 30 24 5 19 6 14 7 Table 6 Image Size Width and Height for CD 550m minimum image size met...

Page 64: ...th feet Height feet 4 9 3 0 2 4 1 8 8 5 0 4 3 12 7 4 5 9 4 4 16 9 9 7 9 5 9 20 12 4 9 9 7 4 30 18 6 14 9 11 2 Table 8 Image Size Width and Height for CD 550m minimum image size metric Distance to Scre...

Page 65: ...23 Volume 23 C cables A V 14 45 CablePro 3 8 45 CablePro extension 46 composite video 14 extension 46 mouse 11 ordering 45 power 45 S video 14 46 CablePro cables 3 8 45 connecting to equipment 9 conn...

Page 66: ...All 26 Tint 25 Display Messages 31 Display Startup Screen 32 displaying startup screen 32 status messages 31 displaying on screen menus 22 E extension cable 46 F fuzzy lines 29 I IBM compatible compu...

Page 67: ...menu 25 displaying 24 Image menu 28 Language menu 32 making changes to menu functions 24 Status menu 33 P PAL video 25 30 Plug and Play 31 power cord connecting 16 ordering 45 power switch 16 17 powe...

Page 68: ...xt not visible 40 tint adjusting 25 treble adjusting 27 troubleshooting 39 turning off the projector 17 turning on the projector 16 U USB mouse 11 V vertical lines displayed 29 41 video 25 video mirro...

Page 69: ...pany pack the unit Please insure your shipment for its full value A return authorization number issued by the Boxlight customer service department must also be clearly displayed on the outside of the...

Page 70: ...Part Number 010 0198 00...

Reviews: