

D
W
H
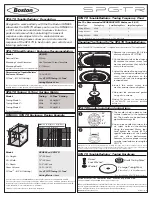
SPG555 / SPG-TR Enclosure Design Example
Model:
SPG555 w/ SPG-TR
H = Height:
13" (33.0cm)
W = Width:
13" (33.0cm)
D = Depth:
10.5" (26.7cm)
Gross Volume:
1.0 Ft
3
(28.3L)
Q-Tune
™
†: (HP & Q Setting)
Use SPG-TR Tuning / Q-Tune
™
Setting Matrix Above
Enclosure dimensions are internal and include displacement for both SPG555 & SPG-TR.
The enclosure shape is an example and these dimensions can be modified provided the exact
internal volume is retained and there is adequate clearance behind the SPG555 and the SPG-TR.
3
⁄
4
-inch thick M.D.F. is recommended as a minimum
†Q-Tune™ is a feature found on Boston GT Amplifiers
B
d
6
0
6
-
2
1
-
8
1
-
4
2
-
0
3
-
6
3
-
z
H
5
0
1
0
5
0
0
1
0
0
5
0
0
0
1
0
0
0
2
In-Car Response w/ Q-Tune
™
Enclosure Response
Boston Acoustics, Inc. 300 Jubilee Drive, Peabody, MA 01960 USA
T: 978.538.5000 F: 978.538.5100 W: bostonacoustics.com
Q-Tune and TunableRadiator are trademarks and Boston, Boston Acoustics, and the Boston Acoustics
logo are registered trademarks of Boston Acoustics, Inc. Specifications are subject to change without
notice. All rights reserved. Covered by patents issued and/or pending.
© 2008 Boston Acoustics, Inc.
SPG-TR TunableRadiator
™
Tuning Hardware
Small Tuning Mass*
2 x Large Tuning Mass
(1 installed* / 1 in hardware pack)
Screw*
Lock Washer*
Washer*
*Pre-installed on SPG-TR from factory
SPG-TR TunableRadiator
™
Tuning Frequency Chart
For The Recommended SPG555/SPG-TR Enclosure (1.0ft
3
)
Mode Type
Tuning Freq.
Small Tuning Mass
Large Tuning Mass
Tuning Mode 1:
45Hz
X
X
Tuning Mode 2:
35Hz
1
1
Tuning Mode 3:
30Hz
X
2
Key: X = No Mass Used, 1 = One Mass Used, 2 = Two Mass Used
Changing The Tuning On The SPG-TR TunableRadiator
™
Note: The SPG-TR TunableRadiator
™
is shipped from the factory in “Tuning Mode #2”.
1.Remove the six screws
u
. Lift the
dustcap off of the SPG-TR
v
.
2.On the bottom side of the dustcap
w
, remove the center screw, lock
washer, and washer that hold the
mass to the dustcap.
3.Select the desired tuning mode by
placing the correct combination of
mass, foam side down, on the
center shaft. (use the tuning guide
located above)
4.Install the center screw,
lock
washer, and washer and tighten.
5.Re-install the dustcap and gasket
using all six screws.
Warning: The dustcap is a structural part
of the SPG-TR and must be installed
before use.
142-003133-0
SPG-TR TunableRadiator
™
Description
Designed to work perfectly with the the Boston SPG555
subwoofer, the SPG-TR allows you to use the SPG555 in
a 1.0Ft
3
enclosure and delivers low bass similar to a
ported enclosure while maintaining the transient
response and compact size of a sealed enclosure.
Provided tuning masses allow you to customize the
response of the SPG-TR to best match your vehicle and
listening preference.
SPG-TR Specifications / Enclosure Recommendation
Model:
SPG-TR
Nominal Size:
555cm
2
Mounting Cutout Diameter:
Use Provided Cutout Template
Mounting Depth:
4" (102mm)
(includes required clearance behind SPG-TR)
Recommended TunableRadiator
™
Enclosure Volume*:
1.0 ft
3
(28.3L)
Q-Tune
™
: (HP & Q Setting)
Use SPG-TR Tuning / Q-Tune
™
Setting Matrix Below
*Enclosure requires SPG555 (2
Ω
or 4
Ω
) and volume includes basket displacement for both the
SPG555 subwoofer and the SPG-TR TunableRadiator.
SPG-TR Tuning / Q-Tune
™
Setting Matrix
Model:
Tuning
Q-Tune
™
Setting
Tuning Mode 1:
45Hz
Tuning Mode 2*:
35Hz
Tuning Mode 3:
30Hz
*Factory Tuning Mode
v
u
w
SPG-TR Handle Installation Instructions
Warning: Choose the position of the handle wisely. Installing the screws into the dustcap will mar the area around
where the screw is installed. Although not visible with the handle installed in the original position, if the handle is
moved, you will be able to see the enlarged screw holes from the previous install position.
1.The handle is held in place by two
screws (included in the hardware
kit). The handle can be positioned
eight different ways
u
.
2.Line up the handle with two of the
six screw holes on the dustcap.
Using the provided 2.5mm tool,
hand tighten the screws
v
. The
specific orientation of the handle
will not effect performance,
however, to ensure proper tuning,
must be installed prior to using the
SPG-TR.
0º
45º
90º
-45º
0º
45º
90º
-45º
v
u


