background image

1. HANDLING COMPACT DISCS

MOISTURE CONDENSATION

NOTES ON CDs

P. 2

P. 3

P. 4

P. 1

P. 5

P. 6

P. 7

1.

2.

3.

4.

5.

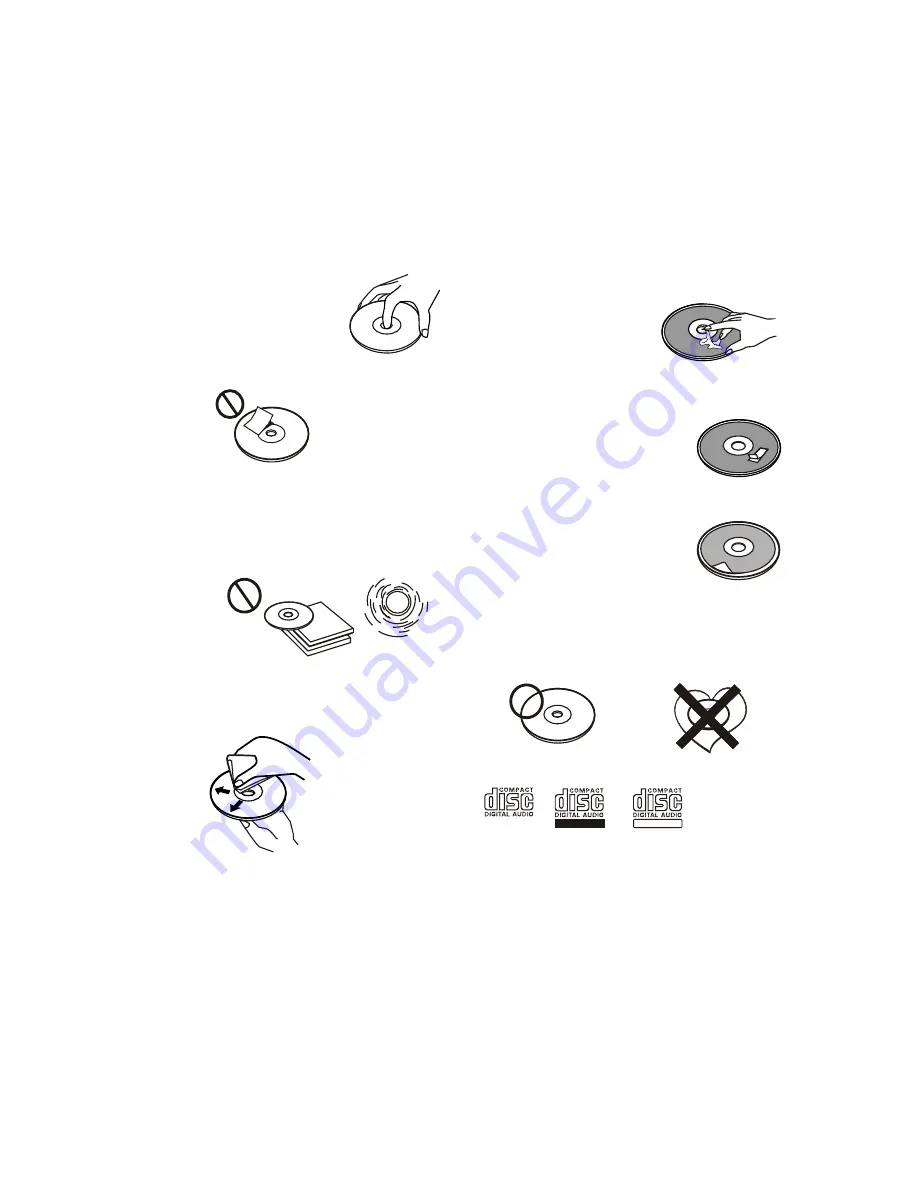
NOTES ON DISCS

There are paste residue.
Ink is sticky (P.5).

Stickers that are beginning 
to peel away, leaving a 
sticky residue (P.6).

Labels are attached (P.7).

On a rainy day or in a very damp area, moisture may condense on the lenses inside the unit. Should this 
occur, the unit will not operate properly. In such a case, remove the disc and wait for about an hour until 
the moisture has evaporated.

A dirty or defective disc may cause sound 
dropouts while playing. To enjoy optimum 
sound, handle the disc as follows.
Handle the disc by its edge. To keep the disc 
clean, do not touch the surface (P.1).

If you use the discs explained below, the sticky 

residue can cause the CD to stop spinning and 

may cause malfunction or ruin your discs.
Do not use second-hand or rental CDs that have a 

sticky residue on the surface (for example, from 

peeled-off stickers or from ink, or glue leaking 

from under the stickers).

Do not stick paper or tape on the disc (P.2).

Before playing, clean the discs with an 
optional cleaning cloth. Wipe each disc from 
the centre out (P.4).

Do not use solvents such as benzine, 
thinner, commercially available cleaners, or 
antistatic spray intended for analog discs.

Do not expose the discs to direct sunlight or 
heat sources such as hot air-ducts, or leave 
them in a car parked in direct sunlight where 
there can be a considerable rise in 
temperature inside the car (P.3).

Do not use rental CDs with old labels that are 
beginning to peel off.

Do not use your CDs with labels or stickers 
attached.

**************

*******

*******

*******

*******

*******

*******

*******

*******

****

*******

******* *******

*******

Do Not Use Special Shape CDs

Be sure to use round shape CDs only for this 
unit and do not use any special shape CDs. 
Use of special shape CDs may cause the unit 
to malfunction.(P.8).

Be sure to use CDs with disc mark                                       

Only for this unit.

RECORDABLE

REWRITABLE

P. 8

CD-Rs and CD-RWs which have not undergone 
finalization processing cannot be played. (For 
more information on finalization processing, 
refer to the manual for your CD-R/CD-RW 
writing software or CD-R/CD-RW recorder.) 
Additionally, depending on the recording status, 
it may prove impossible to play certain CDs 
record on CD-R or CD-RW.

E - 1

Summary of Contents for MP3-4100R

Page 1: ...Size 139 x 216mm ...

Page 2: ...s Do not stick paper or tape on the disc P 2 Before playing clean the discs with an optional cleaning cloth Wipe each disc from the centre out P 4 Do not use solvents such as benzine thinner commercially available cleaners or antistatic spray intended for analog discs Do not expose the discs to direct sunlight or heat sources such as hot air ducts or leave them in a car parked in direct sunlight w...

Page 3: ...ight or from hot air from heater or where it would be subject to dust dirt or excessive vibration Be sure to remove the front panel before installing the unit DIN FRONT REAR MOUNT This unit can be property installed either from Front conventional DIN Front mount or Rear DIN Rear mount installation utilizing threaded screw holes at the sides of the unit chassis For details refer to the following il...

Page 4: ...rim Plate Installation Removing the unit a b c PANEL OPEN CLOSE OPERATION 1 C D IN RE SET 2 1 Press Open button 2 The CD slot will be accessible 3 After CD is loaded or unloaded return the panel to its original position Before attaching the trim plate the side with a Bottom Label stuck should be at down side as shown on diagram Push the trim plate against the main panel until it is fitted E 3 1 Se...

Page 5: ... The rear connector that connects the main unit and the D C P is an extremely important part Be careful not to damage it by pressing on it with fingernails pens screwdrivers etc Note If the D C P is dirty wipe off the dirt with soft dry cloth only And use a cotton swab soaked in isopropyl alcohol to clean the socket on the back of the D C P Socket 1 Turn the Power off 2 Press the Panel Release But...

Page 6: ...WER HARNESS See Figure 1 RIGHT FRONT RIGHT REAR LEFT FRONT LEFT REAR RF RF GREY BLACK VIOLET BLACK WHITE BLACK GREEN BLACK GREY RR VIOLET RR LF WHITE LF LR LR GREEN 1 2 3 4 5 6 7 8 9 10 PIN WIRE COLOR GREY BLACK GREY VIOLET VIOLET BLACK GREEN GREEN BLACK RED BLACK RED FUNCTION LABEL RIGHT FRONT SPEAKER RIGHT FRONT SPEAKER RIGHT REAR SPEAKER RIGHT REAR SPEAKER LEFT REAR SPEAKER LEFT REAR SPEAKER IG...

Page 7: ...CALLY STORE PRESET SCAN BUTTON PRESET MEMORY BUTTONS M1 M6 BAND BUTTON SCAN BUTTON DISPLAY BUTTON ENCODER VOLUME BUTTON 2 3 4 MP3 ENTER BUTTON LOUD BUTTON 6 MONO BUTTON 7 8 MP3 SEARCH BUTTON 9 USB COVER FLIP OPEN TO ACCESS TO USB SOCKET 10 LOCAL DX BUTTON 11 12 PANEL OPEN BUTTON 13 14 15 DSP BUTTON 17 SUB WOOFER BUTTON REMOTE CONTROL RECEIVER 18 LCD DISPLAY 19 E 6 ...

Page 8: ...ion 2 RPT Track repeat play indication 3 INT Track intro play indication 4 RDM Track random play indication 6 ARTIST Artist name indication 7 ALBUM Album title indication 8 MUSIC Music song title indication 9 FOLDER MP3 folder directory indication 5 Preset radio station indication 1 to 6 10 LOUD Sound loudness indication 11 TRACK MP3 file indication 12 MP3 MP3 disc playing indication 1 2 3 4 5 6 7...

Page 9: ...rease the frequency by 1 step size Press and hold the Tuning Up Down button to seek the band in up or down direction and stop when a station is received SEEK2 Press the Tuning Up Down Button briefly to increase or decrease the frequency by 1 Step size Press and hold the Tuning Up Down button increase or decrease the frequency rapidly until the button is released the different between the same oper...

Page 10: ...SET AUTO MEMORY STORE press AMS button for more than 1 second to enter auto store mode The radio will automatically store 6 stations to the 6 preset memories of the current band To stop auto store press AMS button again PRESET SCAN press AMS button for less than 1 second to scan all preset stations in the memories of the current band and stay on each memory stations for about 5 seconds The memory ...

Page 11: ...unction the first 10 seconds of each track will be played sequentially until this button is pressed again then normal play will resume at the current track CD EJECT BUTTON Press this button to eject the CD Since this button is located behind the front panel fold down the panel before accessing this button Under normal play mode press the Track Up Button for less than 1 second to skip the playback ...

Page 12: ...ny other modes when they are in any mode 6 Please refer to section 7 CD operation section 11 MP3 operation on how to use possible function for USB files playback All the USB files playback function is same as normal CD or MP3 disc playback 7 Always close the USB plastic cover after unplugged the USB drive device in order to keep the USB socket in good condition P 3 1 2 P 1 P 2 PLAY PRIORITY Does n...

Page 13: ...force used will cause permanent serious damage to the unit the USB drive device P 6 4 Please never try to plug in any USB drive device with excessive weight or excessive size into the unit Please always use USB drive device with reasonable weight size which will not overload the unit which will not make performing normal operation on the front panel impossible Excessive weight or size USB drive de...

Page 14: ... to choose SD MMC mode only if SD or MMC is inserted in the unit or any other modes when they are in any mode 8 Please refer to section 7 CD operation section 11 MP3 operation on how to use possible function for SD MMC files playback All the SD MMC files playback function is same as normal CD or MP3 disc playback PLAY PRIORITY Does not matter the unit is in what mode TUNER CD USB etc once a SD or ...

Page 15: ...ress the Enter Button long to start playing the first track under selected folder or press the Enter Button short less than 1 seconds to display the tracks or folders under this folder Repeat this procedure to navigate through the folders up to 8 levels deep During folder search not only folders are shown but also the tracks but they can be easily identified because they have their own icon displa...

Page 16: ...me press Enter button more than 1 second to start the search If no such song NOT FND will be shown 4 Searching by character ID3 TAG Press BAND button repeatedly to Display ID3 TAG information If the MP3 file is available with ID3 TAG pressing the BAND button repeatedly will show information in the following sequence FILE NAME FOLDER NAME SONG TITLE ARTIST ALBUM TITLE If any of the ID3 TAG informat...

Page 17: ...ion Scan Menu operation Display Clock Track Play Time CD Player Mode Power On Off Adjust Vol Bas Tre Bal Fad Track Up Down No function Repeat No Function Mute Loundess No Function No Function Intro Scan Play Pause Random No function Menu operation MP3 Mode include USB SD MMC card Power On Off Adjust Vol Bas Tre Bal Fad Track Up Down Repeat MP3 Search Mute Loundess No Function No Function Top Play ...

Page 18: ... bits Frequency Number of channels S N Ratio Compact disc audio system Compact disc 44 1KHz 1bit 5 20 000Hz 2 stereo 70dB E 17 AM MW RADIO SECTION FM Frequency Range Intermediate Frequency Usable Sensitivity Stereo Separation S N Ratio 87 5 107 9MHz 87 5 108MHz 10 7 MHz Better than 15dB at S N 30 dB 25 dB at 1KHz 50 dB Frequency Range Intermediate Frequency Usable Sensitivity S N Ratio 530 1710KHz...

Page 19: ...ion Leave the player to off for an hour or so then try again Volume is in minimum Adjust volume to a desired level Wiring is not properly connected Check wiring connection The operation keys do not work No sound The built in microcomputer is not operating properly due to noise Press the RESET button Front panel is not properly fixed into its place Sound skips The installation angle is more than 30...

Reviews: