background image

INSTRUCTIONS

23. ANGLE Button

In DVD mode, press this button to change
play angle.

24. SETUP Button

In audio mode, press this button to choose
different set items.

25. OSD Display

Press this button to display the title chapter 
and the left time.

26. ZOOM Button

In DVD/VCD mode, press this button to 
ZOOM in.

27. MENU Button

Press button to back to the main menu.

28. DSP

Press this button to show the time.

BATTERY CHANGE

When control distance of remote control
becomes shorter or no function, please 
change battery. Please confirm polarity
before change.

14. 0-10+ Button

Press this button to choose desired song
section

preset stations.

Decimal numbers, for example the 19th 
song, press 10+ and 9 button.
  

15. AMS / RPT Button

In radio mode, press this button to browse
stored stations.
In audio mode, press this button to play 
repeatedly.

16. TITLE Button

In DVD mode, press this button to play 
back to the top menu of disc.

17. AUDIO Button

In DVD mode, press this button to switch 
language of dialogue. 
In VCD mode, press this button to choose 
left track

right track and stereo.

18. GO TO Button

In DVD mode, press this button, you can 
define playing time.

19. SUBTITLE Button

In DVD mode, press this button to switch 
language of subtitle.

20. PBC Button

In VCD mode, press this button to display 
all song menus, work with number button
to choose songs.

21. UP

DOWN

LEFT

 RIGHT

ENTER 

Button

When playing MP3

USB

SD returns to 

song menu, up

down selections can be 

up / "    " button or down / "    " key to 
select up and down, select and press "    " 
key to confirm. 
The selected tracks can be played. Press 
the left or right arrow keys to "    " or "    " 
key, can be on the next page function 
operation.

22. SLOW Button

In audio mode, press this button to slow 
backward and slow forward.

One hand press stopper, then pull out 

battery.

Put battery into controller.

Insert battery holder into controller.

14

05

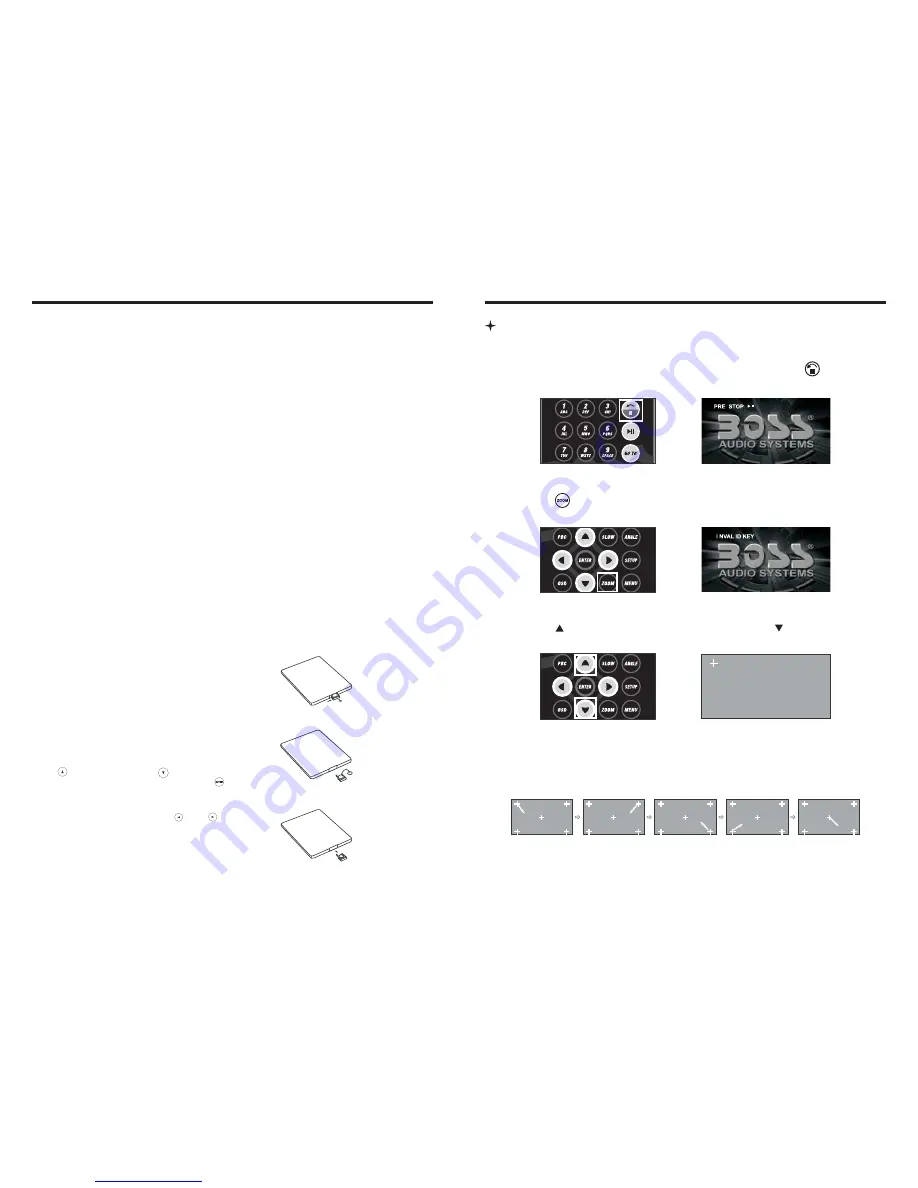
Touch screen Calibration

Step 1:

 Press the mode button in the unit to switch to DVD mode.

Please follow the below instructions to calibrate when there is no touch or 
touch is not accurate. 

Step 2:

 Insert a DVD disc, after DVD is loaded, press the stop button “       ” as show in 

picture (1). in the remote short, the unit will display as show in picture (2).

Picture ( 1 )

Picture ( 2 )

Step 3:

 Press “      ” in the remote as show in picture (3), the unit will display as show in 

picture (4).

Picture ( 3 )

Picture ( 4 )

Step 4:

 Press “    ” button in the remote and then quickly press “    ” button as show in 

picture (5) and you will enter the touch calibration interface as show in picture (6).

Picture ( 5 )

Picture ( 6 )

Step 5:

 Use the touch pen to touch top left corner, top right corner, down right corner, 

down left corner, when the cross cursor stop at each corner, touch the center of the 
cursor. Then the panel will display OK and leave the calibration interface and the unit 
regained touch as show in picture (7).

Picture ( 7 )


Summary of Contents for BV9356

Page 1: ...BV9356 BV9356 0114 6 2 157 ...

Page 2: ...DVD VCD Disc Playback 08 CD Disc Playback 08 MP3 WMA Format Disc Playback 08 Touch Menu 08 Turn on off Access main interface USB SD Card Operation ST Wheel setting 10 General setting 12 Language setting 12 Video setting 13 13 13 Touch calibration 13 Wiring Diagram 15 Trouble shooting 15 Accessory Specifications 17 16 17 Time setting 12 External input operation 10 Other Operation 11 Rear view funct...

Page 3: ...8 adult which means all grades of DVD can be read without entering password To change the default grade you need to follow the below procedure Press SETUP button on the remote display will show the system set up menu and the submenu select password and enter 0000 you will be able to choose the DVD grade as default DVD Parental control function ACCESSORY Accessory Quantity Wire Warranty card 1PC 2P...

Page 4: ...arning You can only use either front or rear AUX at a time Never connect both front and rear AUX at the same time 8 IR To receive infrared signal from the remote control PWR VOL button 9 Press this button can eject the disc 10 Disk load slot Opening for disks to enter or retreat BASIC FUNCTION 16 03 INSTRUCTIONS This unit is with switchable frequency You can switch from USA frequency to Europe fre...

Page 5: ...watch image during driving Park the car in a safe place put the car stall in P postion pull up the hand brake parking brake wire must be grounded Check fuse This player is equipped with ISO standard connector please follow below instruction Yellow 12 V Constant Black Ground wire Blue Power Antenna Remote Amp Turn On Orange Back Up Camera Trigger Red ACC ON 12V Parking Brake White White black Left ...

Page 6: ... number button to choose songs 21 UP DOWN LEFT RIGHT ENTER Button When playing MP3 USB SD returns to song menu up down selections can be up button or down key to select up and down select and press key to confirm The selected tracks can be played Press the left or right arrow keys to or key can be on the next page function operation 22 SLOW Button In audio mode press this button to slow backward a...

Page 7: ...e SD card playback interface During playback touch the top center area of the screen to pop up the touch menu operate touch menu to perform various playback controls Play After SD card USB removable device being read out the operation methods are similar to disk operation methods Turn on off 06 13 INSTRUCTIONS Audio setting Click icon on setup interface to access audio setting interface as shown i...

Page 8: ...3 Search Save radio stations Short press icon to browse the stored radio stations FM band can save 18 radio stations Six stations for FM1 FM2 FM3 AM band can save 12 radio stations Six stations for AM1 AM2 4 Sound setting Click icon to access sound setting interface 5 Turn on off the Long Short range Click icon the search pattern in the local search LOC and remote search DX switch between LOC feat...

Page 9: ...le lower area of the screen to pop up the touch menu operate the touch menu to perform various playback controls PIC 1 3 CD Disc Playback After a CD is inserted system shall access disk reading state immediately When there is a disk in the device click Disk at the main interface so as to access disk reading state After the disk being read out system shall automatically play in sequence 4 MP3 JPEG ...

Page 10: ...this button to zoom in zoom out the image 1 Click on the ST Wheel icon in the main interface into the ST Wheel settings interface 2 The original vehicle to the control line positive negative with the machine control line in the positive and negative connection 3 Click the ST Wheel buttons will appear corresponding operating tips and fundamental operation prompts the ST Wheel feature set 4 Set func...

Reviews: