background image

HANDLING COMPACT DISCS

MOISTURE CONDENSATION

NOTES ON CDs

P. 2

P. 3

P. 4

P. 1

P. 5

P. 6

P. 7

1.

2.

3.

4.

5.

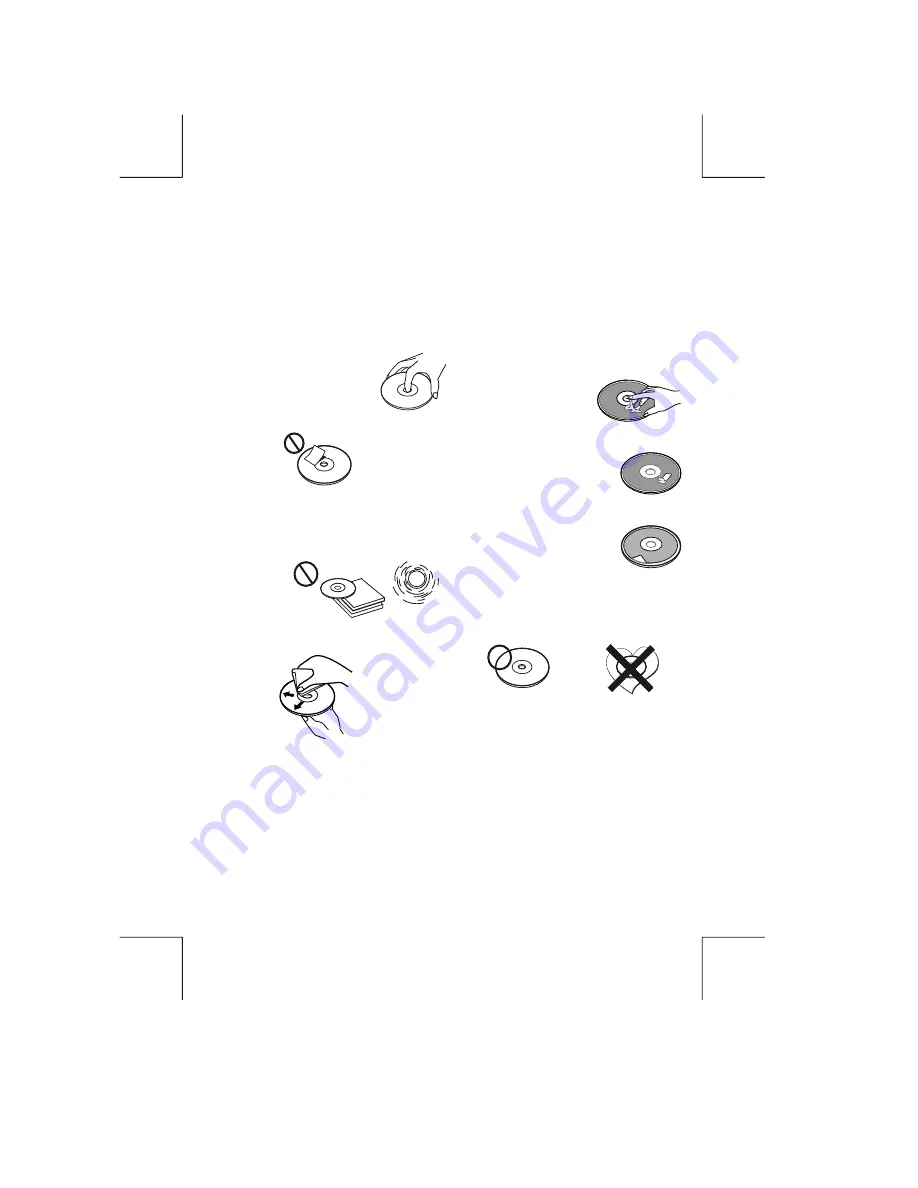
NOTES ON DISCS

There are paste residue.
Ink is sticky (P.5).

Stickers that are beginning 
to peel away, leaving a 
sticky residue (P.6).

Labels are attached (P.7).

On a rainy day or in a very damp area, moisture may condense on the lenses inside the unit. 
Should this occur, the unit will not operate properly. In such a case, remove the disc and wait 
for about an hour until the moisture has evaporated.

A dirty or defective disc may cause sound 
dropouts while playing. To enjoy optimum 
sound, handle the disc as follows.
Handle the disc by its edge. To keep the 
disc clean, do not touch the surface (P.1).

If you use the discs explained below, the 
sticky residue can cause the CD to stop 
spinning and may cause malfunction or 
ruin your discs.
Do not use second-hand or rental CDs 
that have a sticky residue on the surface 
(for example, from peeled-off stickers or 
from ink, or glue leaking from under the 
stickers).

Do not stick paper or tape on the disc (P.2).

Before playing, clean the discs with an 
optional cleaning cloth. Wipe each disc from 
the centre out (P.4).

Do not use solvents such as benzine, 
thinner,commercially available cleaners, or 
antistatic spray intended for analog discs.

Do not expose the discs to direct sunlight or 
heat sources such as hot air-ducts, or leave 
them in a car parked in direct sunlight where 
there can be a considerable rise in 
temperature inside the car (P.3).

Do not use rental CDs with old labels that 
are beginning to peel off.

Do not use your CDs with labels or 
stickers attached.

**************

*******

*******

*******

*******

*******

*******

*******

*******

****

*******

******* *******

*******

Do Not Use Special Shape CDs
Be sure to use round shape CDs only for 
this unit and do not use any special shape 
CDs. Use of special shape CDs may 
cause the unit to malfunction.(P.8).

Be sure to use CDs with disc mark                                       
Only for this unit.

P. 8

CD-Rs and CD-RWs which have not 
undergone finalization processing cannot 
be played. (For more information on 
finalization processing, refer to the manual 
for your CD-R/CD-RW writing software or 
CD-R/CD-RW recorder.) Additionally, 
depending on the recording status, it may 
prove impossible to play certain CDs 
record on CD-R or CD-RW.

E - 2

Summary of Contents for 822UA

Page 1: ......

Page 2: ......

Page 3: ...E UP DOWN BUTTONS MODE BUTTON FUNCTION SELECT BUTTON DISPLAY ID3 TAG INFORMATION BUTTON PRESET MEMORY BUTTONS DSP BUTTON SCAN BUTTON CD PAUSE BUTTON CD SHUFFLE BUTTON LOCAL DX BUTTON FM STEREO MONO BU...

Page 4: ...e stickers Do not stick paper or tape on the disc P 2 Before playing clean the discs with an optional cleaning cloth Wipe each disc from the centre out P 4 Do not use solvents such as benzine thinner...

Page 5: ...nt panel before installing the unit DIN FRONT MOUNT Method A Installation the unit DIN FRONT REAR MOUNT This unit can be property installed either from Front conventional DIN Front mount or Rear DIN R...

Page 6: ...e left side Doing so may damage it The D C P can easily be damaged by shocks After removing it place it in a protective case and be careful not to drop it or subject it to strong shocks When the relea...

Page 7: ...UNIT Fuse Replacement To replace the fuse pull out the blown fuse from the socket Insert a new one with same rating 15A DISPLAY BUTTON automatically switch to previous mode Press this button briefly...

Page 8: ...on the diagram To press it vertically with a ballpoint pen or metal object will activate it The reset button is to be activated for the following reasons Initial installation of the unit when all wir...

Page 9: ...n then normal play will resume at the current track CD REPEAT BUTTON Press this button the current track will be played repeatedly until this button is pressed again CD SHUFFLE BUTTON Press this butto...

Page 10: ...ode Or user can use mode button to switch to other mode 2 User can use the mode button to choose USB mode only if USB drive device is inserted in the unit or any other modes when they are in any mode...

Page 11: ...d of the SD or MMC card to eject the sd or MMC card Once the SD or MMC card is taken out the unit will automatically switch to previous mode 2 User can use the mode button to choose SD MMC mode only i...

Page 12: ...o select the tracks under the directory press AMS MENU button to confirm 4 To select directory first Under MP3 play mode press AMS MENU Button twice Then the first directory name is shown Turn the Enc...

Page 13: ...T TRACK TIME If any of the ID3 TAG information is not available pressing the DISPLAY button repeatedly will show information in the following sequence UNKNOWN SONGNAME UNKNOWN ARTIST NO ALBUM TITLE If...

Page 14: ...er than 15dB at S N 30 dB 25 dB at 1KHz 50 dB 87 5 108 0 MHz EURO 530 1710 KHz USA 522 1620 KHz EURO Better than 45dB 40 dB SPECIFICATIONS CD PLAYER REMARK Specifications subject to change without not...

Page 15: ...on Leave the player to off for an hour or so then try again Volume is in minimum Adjust volume to a desired level Wiring is not properly connected Check wiring connection The operation keys do not wor...

Reviews: