OPERATION
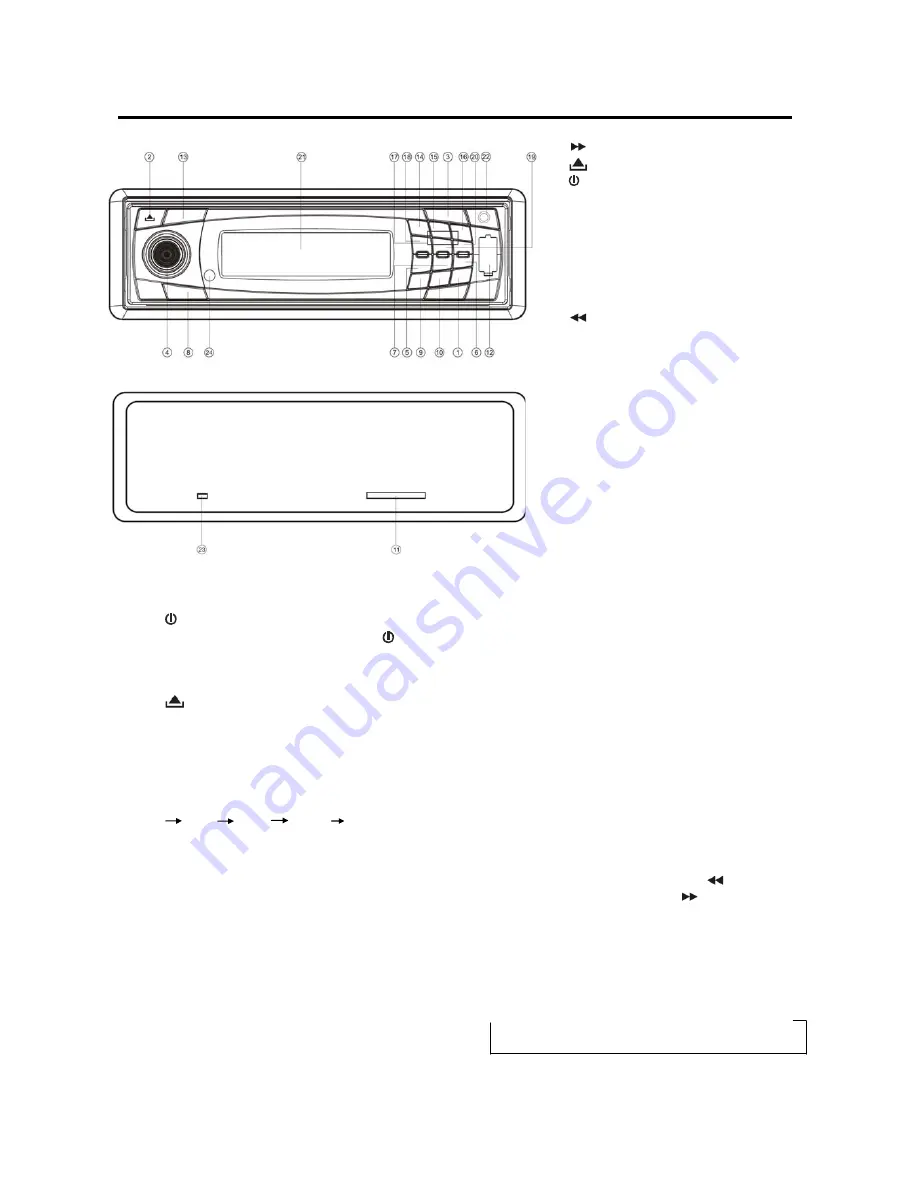
LOCATION OF KEYS
SWITCHING ON/OFF THE UNIT
Press
/MUT
button (3) to turn on the unit.
When the system is on, press and hold
/MUT
button (3) to turn off the unit.
FACEPLATE RELEASE
Press
button (2) to release the removable
faceplate.
SOUND ADJUSTMENT
Press
SEL
button (4) shortly to select the desired
adjustment mode. The adjustment mode will
change in the following order:
VOL BAS TRB BAL FAD
(Volume) (Bass) (Treble) (Balance) (Fader)
By rotating the volume knob (4) clockwise or
counter-clockwise, it is possible to adjust the
desired sound quality.
SYSTEM SETTING
Press and hold
SEL
button (4) on the control
panel to enter system setting mode. Then shortly
press
SEL
button (4) to select the item you want
to change and rotate the volume knob (4) to
change the corresponding setting.
1) BEEP ON/OFF
Use the volume knob (4) to set Beep sound
ON or OFF.
2) AREA USA/EUR
Use the volume knob (4) to set AREA USA,
AREA EUR frequency spacing.
Note the frequency range of the different
area are not the same.
3) P-VOL
Use the volume knob (4) to select the volume
level when the unit turns on.
DISPLAY INFORMATION
Press
DSP
button (6) to operate as the
conversion of each display mode.
SET THE CLOCK
Shortly press the
DISP
button (6) until the clock is
shown on the display. Then hold the
DSP
button
until the clock flashes. Then press
button (10)
to change the minutes and
button (1) to
change the hours.
EQUALIZATION
Press
EQ
button (5) to turn on equalization
function and to select desired audio mode. There
are five kinds of mode as below:
→
FLAT
→
CLASS
→
POP
→
ROCK
→
OFF
1.
Tune/seek/track up button
2.
Release button
3. /MUT button
4. Volume knob (when rotated)
SEL button (when pressed)
5. EQ button
6. DISP button
7. MON button
8. MODE button
9. AS/PS/Navi-SCH button
10.
Tune/seek/track down button
11. Memory card interface
12. USB interface
13. BAND/LOU/ENT button
14. 1 PAU button
15. 2 SCN
16. 3 RPT
17. 1-6 preset buttons
18. 4 SHF
19. 5 DIR-
20. 6 DIR+
21. Liquid crystal display
22. AUX IN
23. Reset button
24. Remote sensor
6
Summary of Contents for 620UA
Page 1: ......
Page 6: ...WIRING CONNECTION 5...


