background image

S

YSTEM

 C

ON

T

R

OLS

11

! !

S

YSTEM

 C

ONTROLS

Dansk

Italiano

Svenska

Deutsch

Nederlands

English

Français

Español

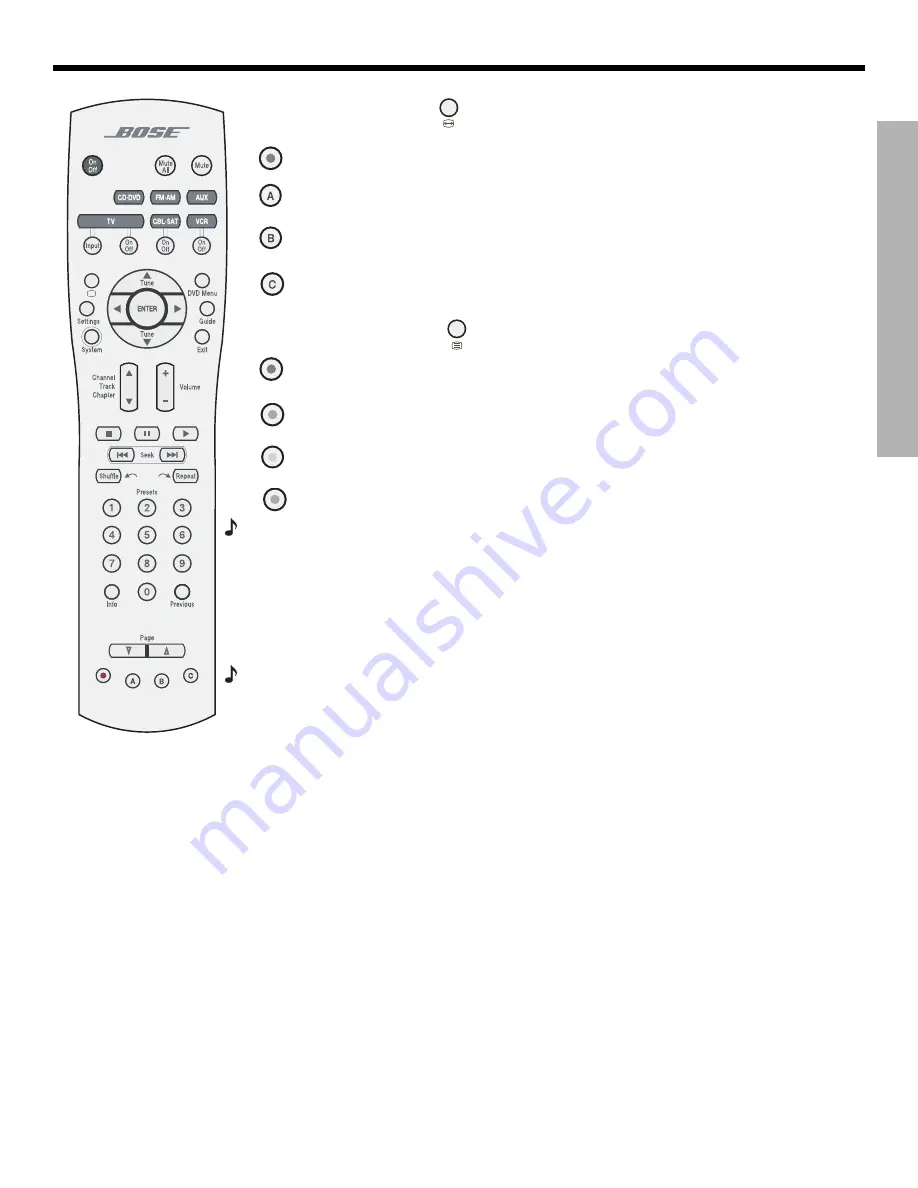
a. If your remote features the

 button, the four buttons at the bottom function as follows:

In VCR source

(or AUX, if a recorder-type device is connected to that input), 

!

activates the record function. Not available on remotes set to control Teletext.

In Cable source

, makes the A selection from a list of options.

!

In Cable source

, makes the B selection from a list of options.

!

In Cable source

, makes the C selection from a list of options.

!

b. If your remote features the 

button, the four colored buttons at the bottom function 

as follows:

In Teletext mode

, selects the content labeled red.

!

*

In Teletext mode

, selects the screen content labeled green.

!

In Teletext mode

, selects the screen content labeled yellow.

!

In Teletext mode

, selects the screen content labeled blue.

Note:

To switch your remote from a. functionality to b. (described above), refer to “Remote 

control options” on page 31 and locate the “Selecting a Remote Control version” option.

Getting strong remote control range and response

The cord that connects the power supply to the media center contains an antenna for your 
RF remote. For good range, it is VERY important that you extend this cord to its full length 
and keep it away from other system cables. P

!"#$%&'()*'+,-*.'/0++!1',%'()*'2!,,.3'-*!!'4*!,-'

()*'5*6$"'#*%(*.3'+0(/'()*'#,.6'$%'"'7*.($#"!',.$*%("($,%3'-)$#)'$/',+($5058

Note:

Also, when using a plasma screen TV, keeping the media center power supply as far from 

the TV as is practical improves remote range.

If your system does not respond when you press a button on the remote, it could be time to 
change the batteries. For information on the type of batteries to use and how to change them, 
refer to “Replacing the remote control batteries” on page 40.

In some buildings, there may be “dead spots” where remote control signals are not effective. 
If this happens, move the remote a foot or two and try again. Also make sure the cord that 
connects the power supply to the media center (and contains the remote antenna) is 
stretched to its full length and is separated from other power cords. If this does not help, 
move the media center a few feet to see if a new location provides better response.

If the batteries are not dead and your efforts to avoid dead spots are in vain, you may need an 
antenna extender. To contact Bose for more information, or to order the extender, refer to the 
address list included with the system.

Summary of Contents for Lifestyle 35

Page 1: ...HOME ENTERTAINMENT SYSTEMS 2SHUDWLQJ XLGH LIFESTYLE DVD...

Page 2: ...e Important Safety Information sheet enclosed in the shipping carton 2005 Bose Corporation No part of this work may be reproduced modified distributed or otherwise used without prior written permissio...

Page 3: ...To watch a DVD 14 To adjust what you hear or see 15 Enjoying multiple system sources 15 Playing a DVD 15 Using DVD parental controls 16 Playing a CD 17 Using the radio 18 Setting removing or reassign...

Page 4: ...u watch or listen 35 Where to find the list of options 35 How to change the settings 36 CD settings options 37 DVD settings options 37 Tuner settings options FM or AM radio 38 TV settings options for...

Page 5: ...recording device used Check DVDs for region number compatibility For a DVD disc to be compatible with a player their respective region numbers must match These numbers are assigned by the geographic...

Page 6: ...of televisions and other video compo nents and requires a simple video cable connection to RCA jacks Dolby Digital D A perceptual coding system for audio developed by Dolby Laboratories and accepted...

Page 7: ...systems only SACD S An abbreviation for Super Audio Compact Disc used for high resolution digital audio storage on CD sized discs New Bose LIFESTYLE systems play the CD compatible portion of such dis...

Page 8: ...nter Turns the system on if it was off TV Selects the TV connected to the media center as source Turns the system on if it was off Input Selects different video inputs on the TV when the remote has be...

Page 9: ...capabilities or the reverse refer to Remote control options on page 31 Enters or exits the Settings menu for the current source Enters or exits the System menu Enters or exits the menu of the DVD dis...

Page 10: ...rward through the current CD or MP3 disc Randomly plays music from a CD Pressing again cancels this style of play Moves back a few seconds in your DVR or other digital video recorder if the LIFESTYLE...

Page 11: ...at connects the power supply to the media center contains an antenna for your RF remote For good range it is VERY important that you extend this cord to its full length and keep it away from other sys...

Page 12: ...jack IR emitter Controls On Off Source Volume Enter Erase Store All Off Open Close Four of the media center control panel buttons provide similar control to buttons on the remote control The other fi...

Page 13: ...gain Disc Shows when a selected action applies to the tracks on a disc Track Shows when a selected action applies to one track only Lights briefly when a remote control command is received Light indic...

Page 14: ...elow Getting an image to appear on the TV screen Be sure to select the proper video input on your TV consistent with the video input that the media center connects to on the back of the TV Use the LIF...

Page 15: ...s set to control other components connected to the system your LIFESTYLE remote serves as a universal control for those components as well as for system sources Note For information on how to set the...

Page 16: ...gs options on page 37 Instructions on how to enter the menu to make those changes are available in Where to find the list of options on page 35 Using DVD parental controls The parental control feature...

Page 17: ...usly scrolling track information for an MP3 CD only from the media center display and hold until the display changes Repeat to resume display of the scrolling text Go to the next track up Go to the be...

Page 18: ...tablish presets for up to 20 AM and 20 FM stations This enables you to tune in a favorite station quickly There are two ways you can assign presets To set a preset use method A or B below A To assign...

Page 19: ...ng you can connect headphones to the jack which is located on the right side of the media center Figure 4 Figure 4 Location of the headphone jack on the media center Headphone jack Media center views...

Page 20: ...hown Figure 5 Sleep timer symbol in the source Settings menu 3 Move right into the options list and up to the delay time you want from 10 to 90 min utes Note Pressing the up arrow when you reach the 9...

Page 21: ...ate other features using the remote you may want to continue testing device codes until you find one that provides greater control After trying a few codes if your component still does not respond sli...

Page 22: ...ss the TV On Off button on your LIFESTYLE remote Press that button again If the TV turns off and on you have chosen the right code If the TV does not turn off select another code and press TVOn Off tw...

Page 23: ...and and code Note For general guidelines on using the LIFESTYLE System menu refer to Using System Menus on page 27 Follow the cable or satellite process below Turn on the cable or satellite box or oth...

Page 24: ...the instructions below you can set the remote to control one or the other but not both If you have both a VCR and a DVR set up one as VCR and the other as AUX Follow the VCR process below Turn on you...

Page 25: ...or the media center Then using the LIFESTYLE remote control press AUX and continue 1 Identify the device From the Remote Control options in the System menu select AUX Device Move to the right and up o...

Page 26: ...selector Then press System or Exit to leave the menu Figure 9 Designating the TV as channel selector TV tuner This gives you the cable sound to go with the cable program without changing to CBL SAT a...

Page 27: ...e sure your TV is turned on Make sure to select the TV Video Input used to connect to the media center Note If you recorded the TV Video Input information on the form in your Installation Guide refer...

Page 28: ...these steps for each change you want to make Press Exit to leave the System menu Audio options Press System on the LIFESTYLE remote control When you see a preview of audio features you can press the E...

Page 29: ...r control panel Expansion Protocol Change this only if instructed in the owner s guide supplied with your Bose link remote control Bose link Legacy Communicates only with Bose link compatible products...

Page 30: ...connection System works with component TV connection Video Black Level Normal Extended Screen black level generally appropriate for TVs Reduces screen black level appropriate for certain TVs TV Video...

Page 31: ...No processing applied for signals sent to rear panel digital audio jacks Increases digital audio compatibility with other devices Tuner Spacing U S European Channel spacing for AM FM radio stations s...

Page 32: ...er DVR DVD DVD Recorder DVD DVR HDTV TV TV DVD VCR Cable DVR Cable Satellite DVR Satellite TV Identifies which type of device is connected to the AUX input AUX Brand Brand name Identifies the device b...

Page 33: ...password is created _ _ _ _ Establishes a four number code to restrict access to movies with certain ratings Confirm Password appears only when a password is created or changed _ _ _ _ Verifies the f...

Page 34: ...e by choosing a Parental Control Setting of 4 you restrict access to videos rated above PG 13 Videos with ratings above that may be viewed only after entering the password Your password also prevents...

Page 35: ...e The menu appears on the media center display and will appear on your TV screen as well if the TV is turned on and the proper Video Input for the media center is selected As the settings appear on th...

Page 36: ...rs on the TV screen with 5 speakers as the default setting B Arrow buttons move right and up or down to change the number of speakers playing C Enter or the left arrow confirms the new setting and mov...

Page 37: ...time elapses DVD settings options To see the DVD Settings menu you must insert a DVD into the disc tray before you select the source Three features shown in italic type below appear in the DVD menu on...

Page 38: ...h Other Determines the language used for DVD subtitles of the languages available on that disc Camera Angle 1 of __ Determines the angle used for a movie scene of the camera angles available on the di...

Page 39: ...5 Speakers 5 2 3 Determines the number of speakers playing Surround 0 5 to 5 Establishes relative surround sound volume Center Channel 0 5 to 5 Establishes relative center speaker volume Movie EQ On O...

Page 40: ...ch the and symbols on the batteries with the and markings inside the compartment 3 Slide the battery compartment cover back into place Figure 19 Installing the remote control batteries Changing remote...

Page 41: ...to repeat steps 4 5 Note To verify your system s house code press Enter while the system is off The display confirms the settings of switches 1 4 Figure 20 Miniature switches on the Primary remote ar...

Page 42: ...her rooms These include the Bose link AL8 homewide wireless audio link You can use it with the Wave music system 3 2 1 Series II or 3 2 1 GS Series II systems the LIFESTYLE RoomMate powered speakers a...

Page 43: ...t use any solvents chemicals or cleaning solutions containing alcohol ammonia or abrasives Do not use any sprays near the system Cleaning the media center Use only a soft dry cloth to clean the outsid...

Page 44: ...the source you want to hear For CD or DVD play be sure the disc is placed correctly label side up in the disc tray Connect the FM and AM antennas Make sure that the power switch on the Acoustimass mo...

Page 45: ...a few feet to avoid an area of dead spots Make sure the remote control and media center house codes match Contact Bose Customer Service for assistance With a plasma screen TV turned on the LIFESTYLE r...

Page 46: ...video input selection Make sure it is correct for the video source LIFESTYLE remote does not control your TV VCR cable satellite box or other external component Make sure correct codes are set See Us...

Page 47: ...W Media center inputs AUX 2Vrms maximum CBL SAT 2Vrms maximum VCR 2Vrms maximum TV 2Vrms maximum DIGITAL SPDIF 1 each for TV VCR TAPE and AUX COMPOSITE VIDEO NTSC or PAL format 1Vp p with sync 75 S VI...

Page 48: ...6 RVH RUSRUDWLRQ 7KH 0RXQWDLQ UDPLQJKDP 0 86 0 5HY 1 0...

Reviews: