background image

en

    Installation and connection

30

6.

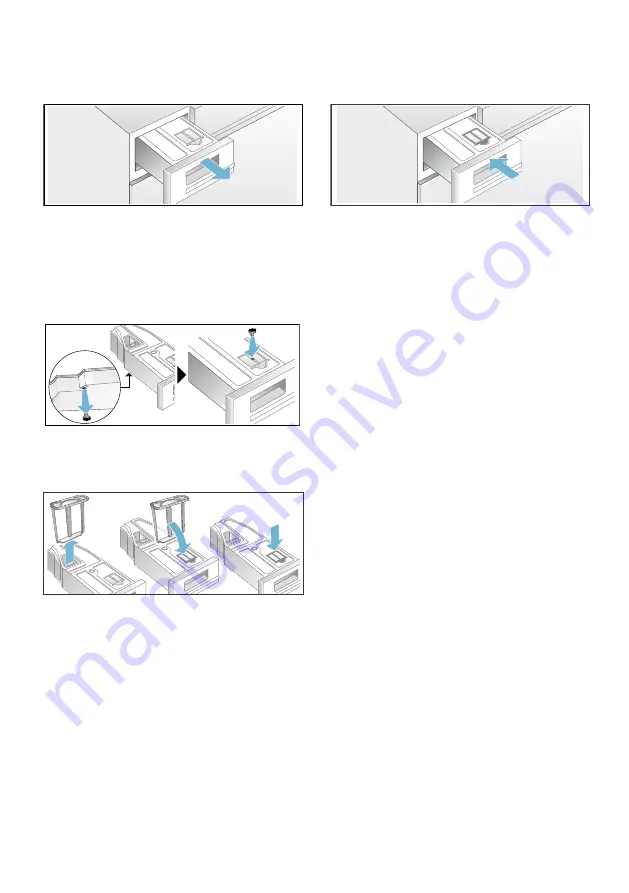
Pull out the condensate container 

fully.

7.

Turn the condensate container by 

180° onto its underside and release 

the stopper which is fitted there. Turn 

the container back by 180° and 

press the stopper into the opening 

on the upper side of the condensate 

container.

8.

Pull the filter out of the notch and 

place it into the recess on the 

condensate container.

9.

Push in the condensate container 

until it locks into place.

The condensation is now discharged via 

the drain hose into the waste-water 

system or into a wash basin

Note:  

If you want to change the 

condensation drain back to the 

condensate container, carry out these 

steps in reverse order.

Summary of Contents for WTW87569SN

Page 1: ...en Installation and operating instructions Tumble dryer WTW87569SN ...

Page 2: ...the operating and installation instructions describe different models any differences will be pointed out at the relevant points in the text Read these operating and installation instructions before operating the tumble dryer Display rules Warning This combination of symbol and signal word indicates a possibly dangerous situation Not heeding the warning can cause death or injuries Caution This sig...

Page 3: ...e programme 17 Programme sequence 17 Changing the programme or adding laundry 17 Cancelling the programme 17 Programme end 17 Removing laundry and switching off the dryer 17 Clean the fluff filter 17 Emptying the condensate container 19 M Signal setting 20 Noises 21 D Cleaning 22 Cleaning the dryer and the control panel 22 Cleaning the moisture sensor 22 Cleaning the filter in the condensate conta...

Page 4: ...n its use by a responsible adult Keep children under three years of age away from the dryer Do not allow children to clean or carry out maintenance work on the dryer unsupervised Keep pets away from the dryer Safety instructions Safetyinstructions Electrical safety Warning Risk of death There is a risk of electric shock as the dryer is operated with electricity You should therefore observe the fol...

Page 5: ...n Children may lock themselves in the dryer Therefore when an appliance has reached the end of its service life unplug it from the mains cut through the mains cable and destroy the lock on the dryer door Appliance safety Warning Danger of death Do not use the dryer if industrial chemicals have been used to clean it Laundry that has come into contact with solvents oil wax wax remover paint grease o...

Page 6: ...m rubber may become deformed or melt during drying Do not dry any laundry that contains foamed material or foam rubber Do not lean or sit on the dryer door as the dryer may tip over Loose cables or hoses may cause you to trip Avoid tripping hazards Light things such as hair may be sucked into the air inlet while drying is in progress keep these away from the dryer Heat is not added during the last...

Page 7: ...thus consuming less energy Load the dryer with the maximum load Note Do not exceed the maximum load for the programs as this prolongs the drying time and increases energy consumption Ventilate the room and keep the air inlet on the dryer free to ensure air exchange Clean the fluff filter after each drying cycle If the fluff filter is dirty the drying time is prolonged and energy consumption is inc...

Page 8: ...tsinbrief 1 Load the laundry and close the door Switch the dryer on Select a programme and if necessary adjust the programme default settings 2 Select the start button A Dry Remove the laundry 3 Switch the dryer off Empty the condensate container Clean the fluff filter ...

Page 9: ...your appliance en 9 Getting to know your appliance Gettingtoknowyourappliance Dryer Depending on the model 3 condensate container 0 Control and display panel 8 Drum interior light Dryer door H Air inlet P Fluff filter ...

Page 10: ... panel Note All buttons are sensitive and only need to be touched briefly Programmes 0 Programme selector and On Off button 8 Display panel with buttons Page 13 Start button for starting interrupting or cancelling the programme H Buttons Page 15 ...

Page 11: ...ays the start of the pro gramme For a detailed description of all buttons see Page 15 onwards 3 C Display panel ö e e Dryness levels ˆˆˆ Fine adjustment for the degree of dryness Timed programme selected 1 47 Expected programme duration in hours and minutes 3 h Programme delay in hours when Ready in time is selected ð Empties the condensate container Page 19 é Cleans the fluff filter Page 17 The h...

Page 12: ...programme Do not over dry easy care laundry This increases creasing of the laundry When washing laundry that is to be tumble dried afterwards use the correct amount of fabric softener as specified in the manufacturer s instructions Sorting washing according to c Suitable for tumble drying a Dry at normal temperature Dry at low temperature b Do not tumble dry If you dry thin or thick layered fabric...

Page 13: ...program cold All types of fabric For freshening up or airing items of laundry that have not been worn for long 3 kg You can alter the drying time using the button for the Ready in time 5 Time program warm Timed programme for all types of fabric except for wool and silk Dry laundry that is still slightly damp or has already been pre dried Also suitable for the subsequent drying of multi layered thi...

Page 14: ...ividually 1 5 kg w Sport Weatherproof and outdoor clothing with a membrane coating and water repellent fabrics 1 5 kg Towels Hard wearing towels made of cotton 6 kg Super Quick 40 Synthetics and light cottons 2 kg AllergyPlus Hard wearing fabrics Note Particularly suitable for the highest hygiene requirements 4 kg ...

Page 15: ... laundry to be dried If you have selected a dryness level this is stored for all programmes except for Cot tons even after the dryer has been switched off Ò Cupboard Dry Plus Multi layered thick laundry that does not dry readily Cupboard Dry Normal single layered laundry ö Iron Dry Normal single layered laundry that still needs to be damp after drying and is suitable for ironing or hanging up ó De...

Page 16: ... drum interior light goes out on its own Setting a programme Note If you have activated the childproof lock you must deactivate it before you can set a programme see Page 15 1 Select the required programme detailed information on the programmes can be found on Page 13 2 Use the programme selector to set the required programme The programme default settings for the selected programme appear in the ...

Page 17: ...isplayed may change after the programme is changed or the load is adapted Cancelling the programme The programme can be interrupted at any time to pause open the dryer door or press the Start button Caution Risk of fire Laundry may catch fire If you cancel the programme you must remove the laundry items and spread them out so that the heat can disperse Programme end appears on the display panel Re...

Page 18: ...pen shaft 4 Pull apart the two part fluff filter 5 Open both filters and remove all the fluff 6 Rinse away the fluff under warm running water 7 Dry the fluff filter close it and reinsert the two part fluff filter Caution The dryer may be damaged Do not operate the dryer without a fluff filter or if the fluff filter is defective ...

Page 19: ...ontainer being full 1 Pull out the condensate container horizontally 2 Pour out the condensation water Caution Dirty condensation water may be harmful to your health and cause material damage Condensation water is not suitable for drinking and may be contaminated with fluff Do not drink the condensation water or reuse it 3 Push in the condensate container until you feel it lock back into place in ...

Page 20: ...r the audible signal at the end of the programme appears on the display panel Changing the volume or automatic switch off Leave the programme selector or turn it to Position 2 Press the button for the Ready in time to change the volume of the audible signal at the end of the programme and or Position 3 Press the button for the Ready in time to change the volume of the audible button signals Positi...

Page 21: ...onally generate a humming noise The volume of this noise varies depending on the programme and the progress of the drying The compressor is ventilated from time to time which creates a whirring sound The automatic cleaning process causes a clicking noise The condensation is pumped into the condensate container using a pump This generates pumping noises ...

Page 22: ...r long periods of use a fine layer of limescale can form on the moisture sensors This must be removed regularly Open the door and clean the moisture sensor with a rough sponge Caution The moisture sensor may be damaged Do not clean the moisture sensor with steel wool and abrasive materials Cleaning the filter in the condensate container Note The filter in the condensate container cleans the conden...

Page 23: ...ired information can be found in the programme table Page 13 Remove clothes immediately after drying creasing may occur if they are left in the drum Water is leaking out Not a fault the dryer may be positioned on an incline Level the dryer Laundry is not dried cor rectly or is still too damp After the end of the programme warm laundry feels damper than it actually is Spread the laundry out and all...

Page 24: ...es off and Start button flashes Not a fault Energy saving mode is active Page 7 Residual water in the condensate container despite the dryer being connected to the con densation drain Not a fault If the condensation drain is installed residual water remains in the condensate container due to the dryer s self cleaning function Humidity in the room increases Not a fault Make sure the room is suffici...

Page 25: ...ontact details of your local after sales service can be found in the enclosed after sales service directory When contacting the after sales service please quote the dryer s product number E no and production number FD This information can be found on the inside of the dryer door and on the back of the dryer Trust the expertise of the manufacturer Contact us for assistance In this way you can rest ...

Page 26: ... 1000 rpm 123 min 76 min 1 62 kWh 0 92 kWh 800 rpm 147 min 91 min 2 00 kWh 1 14 kWh Easy Care 3 5 kg 3 5 kg Cupboard Dry 800 rpm 50 min 0 55 kWh 600 rpm 64 min 0 69 kWh For testing in accordance with applicable standard EN61121 the dryer shall be used with external drain set Programme setting for testing in accordance with the applicable EN 61121 standard The values may differ from those specified...

Page 27: ...h Weight Approx 57 kg Maximum load 9 kg Condensate container 4 6 l Connection voltage 220 240 V Connected load Max 1000 W Fuse 10 A Drum interior light Ambient temperature 5 35 C Power consumption when switched off 0 10 W Power consumption when ready for use left on mode 0 10 W depending on the model ...

Page 28: ...p the dryer behind a door or sliding door as this may obstruct the dryer door or prevent it from opening Caution Risk of injury Due to the heavy weight of the dryer you may injure yourself if you lift it Do not lift the dryer on your own You could cut your hands on the sharp edges of the dryer Do not hold the dryer by the sharp edges Protruding parts on the dryer may break off when it is lifted or...

Page 29: ...into the condensate container is secured to the connecting piece 3 Disconnect the hose from the connecting piece and move it into the parked position 4 Remove the drain hose from the accessory and secure it to the empty connecting piece 5 Depending on how you connect the hose A B or C secure the drain hose with the remaining accessories on the other side Caution Blocked water can be drawn back int...

Page 30: ...o the opening on the upper side of the condensate container 8 Pull the filter out of the notch and place it into the recess on the condensate container 9 Push in the condensate container until it locks into place The condensation is now discharged via the drain hose into the waste water system or into a wash basin Note If you want to change the condensation drain back to the condensate container c...

Page 31: ...integrated into the platform drawer Order number WMZ20500 Basket for woollens Dry individual woollen items sports shoes and soft toys in the basket for woollens Order number WMZ20600 depending on the model Transport and frost protection 1 Entleeren Sie den Kondenswasser Behälter 2 Programmwähler auf ein beliebiges Programm stellen 3 Starttaste wählen 4 5 Minuten warten Note Kondenswasser wird abge...

Page 32: ... 9001008135 9409 You can find the contact information for all countries in the attached after sales service directory 7 Advice and repair order in the event of faults GB 0344 892 8979 Calls charged at local or mobile rate IE 01450 2655 0 03 per minute at peak Off peak 0 0088 per minute ...

Reviews: