


7
P
ro
g
ra
m
m
e
o
v
e
rv
ie
w
a
ls
o
s
e
e
P
a
g
e
5
A
ft
er
d
ry
in
g
:
la
u
n
d
ry
i
s
to
b
e
...
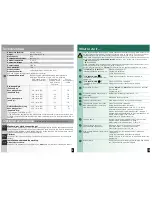
T-s
hir
t
Sh
irts
Tro
use
rs
Ski
rts
/dr
ess
es
Sp
orts
wea
r
Wor
k c
loth
in
g
An
ora
ks
Ter
ry/
bath
rob
e
Und
erw
ear
Soc
ks
Bed
lin
en
Tab
le li
ne
n
Ter
ry
to
wel
s
Tea
to
wel
s/
tow
els
c
ir
on
ed
lig
htl
y
ir
on
ed
d
ry
@
c
no
t
ir
o
ne
d
c
p
as
se
d
th
ro
u
gh
a
m
an
g
le
C
al
ie
n
te
/q
u
en
te
(R
es
is
te
n
te
s/
A
lg
o
d
.)
(C
o
tt
o
n
s)
m
ax
. 6
k
g
Fo
r
w
h
ite
s
an
d
c
ol
ou
re
d
s/
co
tt
on
o
r
lin
en
.
se
co
p
ar
a
en
g
om
ar
(5
0
-
1
0
0
m
in
.)
c
(I
ro
n
D
ry
)
c
ø
@
c
è*
è*
è*
è*
è*
è*
è*
è*
se
co
p
ar
a
gu
ar
d
ar
(6
0
-
1
2
0
m
in
.)
(C
up
bo
ar
d
D
ry
)
cc
cc
cc
cc
c@
è*
è*
è*
è*
è*
è*
A
lis
ar
(
S
in
té
ti
co
s)
(E
as
y-
C
ar
e)
m
ax
. 3
k
g
Fo
r
n
on
-ir
on
la
un
dr
y
m
ad
e
o
f s
yn
th
eti
c
fib
re
s
an
d
b
le
n
de
d
fa
b
ri
c,
c
ott
on
.
se
co
p
ar
a
en
g
om
ar
(2
0
-
3
0
m
in
.)
c
(I
ro
n
D
ry
)
c
ø
@
c
è*
è*
è*
è*
è*
è*
se
co
p
ar
a
gu
ar
d
ar
(2
0
-
4
0
m
in
.)
(C
up
bo
ar
d
D
ry
)
cc
cc
cc
cc
c@
è*
è*
*
F
ri
o
2
0
m
in
(c
o
ld
2
0
m
in
)
m
ax
. 3
k
g
Fo
r
all
ty
p
es
o
f f
ab
ri
cs
. F
or
fr
es
h
en
in
g
u
p
or
a
ir
in
g
ite
m
s
of
la
u
nd
ry
th
at
ha
ve
b
ee
n
w
o
rn
fo
r
a
sh
or
t p
er
io
d
o
f ti
m
e.
1
0
1
0
/
9
0
0
0
4
0
0
6
1
9
*
4
0
0
6
1
9
*
R
ob
er
t B
o
sc
h
H
au
sg
er
äte
G
m
bH
C
ar
l-W
er
y-
S
tr
. 3
4
8
1
7
3
9
M
ü
nc
h
en
, D
eu
ts
ch
la
n
d
W
T
C
8
4
0
0
0
E
E
8
Installation
– Delivery specification: dryer, instructions for installation and use.
– Check dryer for transport damage.
– The dryer is very heavy. Do not attempt to lift it on your own.
– Be careful to avoid sharp edges.
– Do not lift the dryer by protruding parts (e.g. the door) - risk of breakage.
– Do not set up in a room that is susceptible to frost.
Freezing water may cause damage.
– If in doubt, have the appliance connected by an expert.
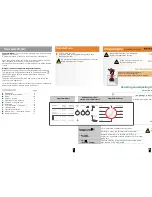
Setting up the dryer
– The appliance plug must always be accessible.
– Ensure that the appliance is installed on a clean, level
and firm surface.
– Keep the air inlet on the front of the dryer clear.
– Keep the area around the dryer clean.
– Adjust the height of the dryer using the threaded
feet at the front.
Do not remove the threaded feet under any
circumstances.
Mains connection
safety information
a
page 11.
– Connect to an AC earthed socket. If in doubt have the socket checked by an expert.
– The mains voltage and the voltage shown on the rating plate (
a
Page 9
) must correspond.
– The connected load and necessary fuse protection are specified on the rating plate.
Frost protection / Transport
Preparation
Empty the condensation container
a
page 4
.
The dryer contains residual water;
this can flow out if the dryer is tilted.
1.
Take all accessory parts out
of the drum. The drum must
be empty.
Make sure that the air inlet
remains unobstructed
Clean and level
2.
Do not operate the dryer if there
is a danger of frost.
Do not install the dryer behind a door or sliding
door, as these may prevent the dryer door from
opening.
Observing this instruction may stop a child from
becoming shut inside the dryer and having its life
put in danger.
a
ʠ
c
ʠ
ʠ
o p
a
ʠ
o p
a
a
ʠ
ʠ
ʠ
ʠ
ʠ
a
a
a
a
a
ʠ
a
ʠ
a
ʠ
a
a
ʠ
a
a
a
a
a
a
a
a
a


