background image

Maintenance / Care / Cleaning 

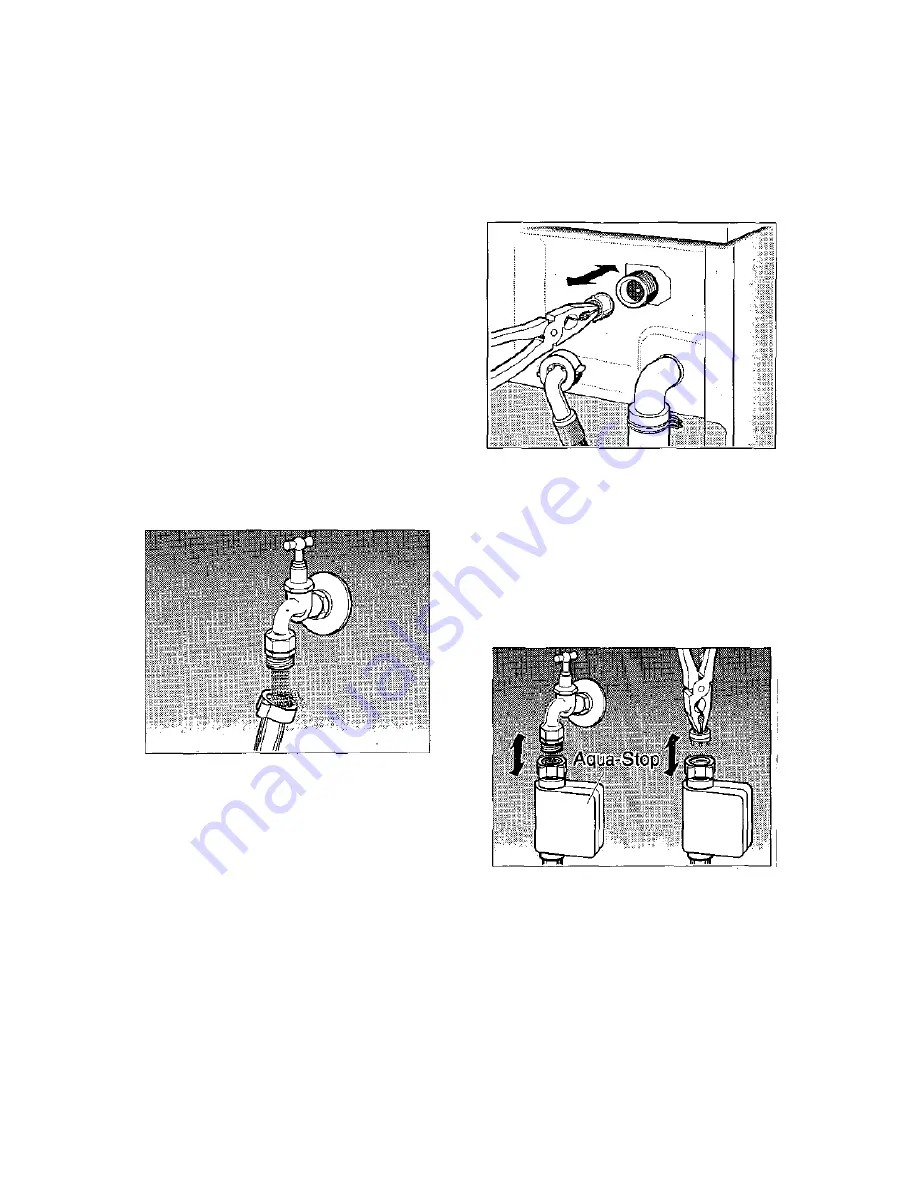
To clean the filter in the water inlet 

 
The filters in the water inlet must be cleaned 
when  the  water  tap  is  open  but  no  or 
insufficient  water  enters  the  unit.  The 
“Prewash” indicator light flashes. 
 
The  filters  are  located  in  the  hose  fitting  at 
the  water  tap  and  for  appliances  without 
Aqua-Stop at the back of the unit. 
 

Cleaning process: 

 
1. Close the water tap. 
 
2. Switch on the device, Set program selector 
to 

Easy  Care  30

,  launch  and  after  about  40 

seconds,  press  the  "On  /  Off"  button  (water 
pressure in the inlet hose is removed). 
 

For devices without Aqua-Stop: 

3.  Unscrew  the  hose  to  the  water  tap,  and 
rinse strainer under running water. 


4. Connect the hose again. 
5. Unscrew the hose on the rear side. 


6.  Pull  out,  clean  and  replace  screen  with  a 
pair of pliers. 


7. Connect the hose again. 
8.  Turn  on  the  water  tap  and  ensure  that  no 
water leaks out. 
9. Turn off the tap. 
 

For 

appliances 

with 

Aqua-Stop:


3. Unscrew hose only at the tap. 
 
4.  Pull  out,  clean  and  replace  screen  with  a 
pair of pliers. 


5. Connect the hose again. 
6.  Turn  on  the  water  tap  and  ensure  that  no 
water leaks out. 


Summary of Contents for WFF 16 series

Page 1: ......

Page 2: ... and laundry Laundry Detergent 11 Sorting laundry 12 Preserve and laundry equipment from damage 12 Stain removal 12 First commissioning The first wash cycle 13 Water hardness memory aid 13 So is washed Switch on loading laundry 14 Setting the wash programme start programme 15 End programmes with rinse hold 16 End of the programme 17 Special programmes Soaking 18 Strengthen 18 Dyeing 18 Decolourise...

Page 3: ...the disposal of this product find out about your local government Safety and Warnings Note before commissioning Read the enclosed documents carefully They contain important information about installation use and safety of the device The documents if required for a subsequent owner keep it safely Install the machine according to the installation instructions Remove and keep transit bolts Do not con...

Page 4: ... salts and powder bleach is allowed The eco ball closure of the tub reliably brings the full detergent usage The foam detection decide on the number of rinses The washing rinsing and spin times are reduced automatically depending on the program selection and loading where you can decide the speed selector if the laundry is spun at high or low speeds or with a special longer interval spin Environme...

Page 5: ...me for lightly soiled laundry additional function page 9 8 Higher Water Level button for a higher water level during washing and rinsing additional function page 9 9 Indicator lamps LED for the buttons 10 Spin speed selector for different spin speeds interval spin or rinse hold additional function page 7 11 Program selector to set the program and temperature Page 6 12 Display for selected program ...

Page 6: ... Stained Cottons Spinning To spin individual items of laundry or for continuing the program if Rinse hold has been selected see page 17 Easy care For easy care fabrics made of cotton synthetic or blended fabrics outerwear Program 2 Easy care spinning To spin individual items of laundry or for continuing the program if Rinse hold has been selected see page 17 Delicates cold For delicate easy care f...

Page 7: ...s woollens and delicates are automatically limited see table and not exceeded even at higher positions of adjustment For delicate fabrics you should select a lower spin speed for gentle fabric care The lowest spin speed is 400 revolutions per minute rev min Saving Note If the laundry is to be dried in a tumble dryer select a high spin speed as well dewatered laundry to tumble drying requires much ...

Page 8: ...rogram sequence displays but then does not rotate with it Always turn clockwise to adjust Program Flow The knob for start also displays the current program status After starting the display of the start time voters running in overdrive on the top of your location program During the wash program the individual program sections are displayed on the display screen Symbols on the indicator disc Prewas...

Page 9: ...use them refer to the following Prewash button In particularly start soiled laundry with strong stains or Professional wash 1 3 of the detergent in chamber Fill Please note When wool program is selected prewash is not running in order to protect the fiber Short wash button For low to lightly soiled laundry The washing time is shortened Higher Water Level button The water levels are increased in th...

Page 10: ...nts the insert in Chamber II can be moved When small amounts of washing powder eg compact detergents pull the tray forward The arrow on the divider points to the symbol If you are using large amounts of washing powder slide the insert all the way back default setting The arrow on the divider points to the symbol If you are using liquid detergent pull the insert forward and push it down The arrow o...

Page 11: ...uid detergents and start time delay Start time delay see page 8 In Start time delay a dispensing container for liquid detergents eg Ball use otherwise the liquid detergent slowly runs out of the detergent drawer and thickened If this happens repeatedly it can lead to blockages caused by detergent deposits Wait until the end of the program before removing laundry Softeners In the water hardness ran...

Page 12: ... 5 kg Easy care delicates wool 2 kg Preserve laundering and equipment from damage Allow items that have been with solvent based cleaning agents eg Stain removers benzine pretreated to air dry before washing Risk of explosion Remove foreign bodies and metal parts eg Safety pins paper clips out of the laundry Brush sand out of pockets and collars Close zippers studs you to remuneration Remove curtai...

Page 13: ...ne order wool detergent because the foaming is too high 5 Press the On Off button 6 Set the program selector to Cottons 60 C 7 Set the knob to start on the start position The program runs 8 After the end of program press the On Off button Reminder for water hardness Insufficient amounts of detergent will depend on the water hardness Your local water company can give you information about the water...

Page 14: ... Make sure before loading the washing that there are no foreign bodies or even trapped pets in the drum 2 Place the garments separately and loosely in the drum with a mixture of large and small pieces 3 Make sure that no items of laundry are clamped between the washing machine door and rubber gasket 4 Close the loading door by compressing it until the lock audibly engages ...

Page 15: ...ion on the additional functions see page 9 Tip A brief overview of the program and additional buttons is located in the detergent drawer Starting the program Make sure that the loading door is completely closed In the washing machine door is not closed a safety switch prevents the operation of the unit Turn the program start knob clockwise to the start position End of program If you did not select...

Page 16: ...r can be opened only after spinning the laundry or after pumping of the rinse water You have two ways to exit the program The laundry will be spun Set the spin speed selector to the desired numbers of revolution eg 600 or IVS The water is pumped out the washing is spun Or The laundry is to be removed dripping wet Set the program selector to 7 The rinsing water is pumped out ...

Page 17: ...s eg paper clips from the drum and rubber seal Otherwise there is a risk of rusting Leave the machine door open slightly so that it can dry out Turning off the device 1 Press the On Off button The light goes out For a device without Aqua Stop 2 Close the tap For a device with Aqua Stop see figure this is not necessary because the safety device automatically locks the water supply directly behind t...

Page 18: ... the knob to start on the start position 5 When adding the water pull the detergent drawer out slightly and place starching agent in Chamber II 6 Close the detergent drawer The strength program lasts about 25 minutes and ends with a short gentle spin To dye Dyeing is possible in your washing machine with limitations Please use only environmentally friendly dyeing agents Observe the manufacturer s ...

Page 19: ...wn metal parts with chlorine free cleaning agents Never use steel wool Water supply hose Only for models without Aqua stop To avoid water damage have it checked by a specialist after about 5 years of operation Frost protection If the unit is in a room that is susceptible to frost any remaining water must be removed immediately from the drain pump and the water inlet hose Emptying the drain pump Se...

Page 20: ... drawer until it stops 2 Press and hold the back of the fabric softener compartment cover pressed and pull out the detergent drawer 3 Take out the insert 4 Clean chambers under running water 5 Put the insert back into the detergent drawer 6 Put the detergent drawer into the machine ...

Page 21: ...Allow hot detergent solution to cool 2 Pull breech plug from evacuation tube Allow water to leak into the plinth If necessary repeat the process several times 3 Replace plug seal and insert drainage hose 4 Remove the pump cover 5 Remove foreign bodies and deposits of fluff Clean the pump interior Pump impeller must be able to rotate 6 Close pump tightly 7 Re attach and close plinth 8 Pour about 2 ...

Page 22: ...re 30 launch and after about 40 seconds press the On Off button water pressure in the inlet hose is removed For devices without Aqua Stop 3 Unscrew the hose to the water tap and rinse strainer under running water 4 Connect the hose again 5 Unscrew the hose on the rear side 6 Pull out clean and replace screen with a pair of pliers 7 Connect the hose again 8 Turn on the water tap and ensure that no ...

Page 23: ... was not washed away Tap not turned on Filter blocked in water connection For cleaning see page 22 Detergent residues in the detergent drawer Damp or lumpy detergent Liquid dispensing aid and use compact detergents Dry the detergent dispenser before filling For cleaning see page 20 The Insert for liquid detergent is depressed Move to the position for powder detergent see page 10 Water not visible ...

Page 24: ...rinse foam can be seen Washing items individually may lead to excessive foaming however this has no effect on the rinsing result Motor noise No mistake In the running in phase the drive motor can cause noise during operation Repeated spinning The fuzzy controlled imbalance control system has detected an imbalance This is removed by washing several times The IVS spin spin interval was set at the sp...

Page 25: ...s the water inlet blocked For cleaning see page 22 Is the drain hose the drain pipe or the drain pump clogged See Cleaning the drain pump page 21 If everything has been checked Set program selector to X and wait until the display of the rotary knob for the start is in the final position see illustration on page 18 Switch off the machine and wait for 5 seconds Set and start the desired program If t...

Page 26: ...stomer service The nearest customer service centre to you can be found in the enclosed address list Please enter the customer service the product number E number and production number FD of the appliance You can find this information on the label as part of the open door and thick line of an instrument guard on the rear panel Note the two numbers here for future reference Product number Production...

Reviews: