background image

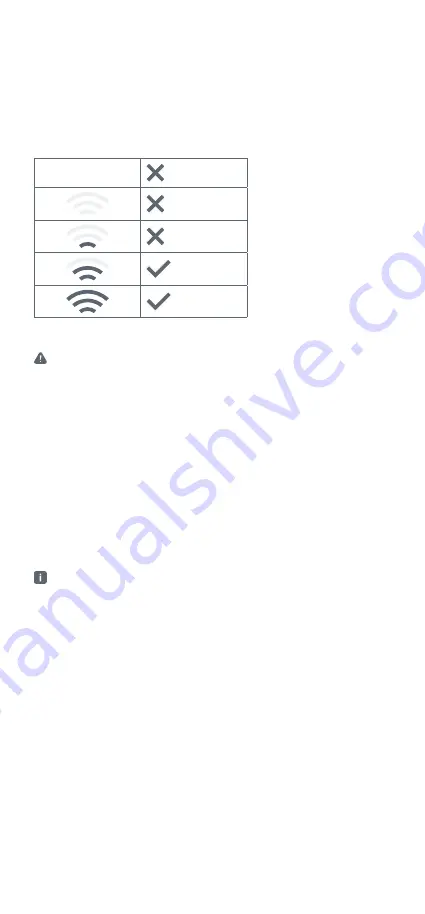
Checking for Wi-Fi availability 

The camera requires a stable and sufficiently strong Wi-Fi connection.
Select the location where you wish to set up your camera and use your mobile device 

to check the strength of your Wi-Fi signal. The table will tell you whether the receiving 

strength is sufficient.

3G/4G

 ok

 ok

Installation and mounting


Before you start: Be sure to shut off the power circuit breaker!

Mount the wall bracket

–  Place the wall bracket in your desired location, pull the three wires of the power cable 

through the cable entry opening (9) and mark the 4 drill holes (11).

– Drill the 4 marked holes and insert the dowels provided into each one. 

–  Then, screw the wall bracket to the wall using the screws provided.
Connect the power cable wires to the relevant connections in the terminal block (8) of 

the wall bracket.
Place the camera on the wall bracket. Then, fasten the camera into position using the 

locking screw (10). Do this using the screwdriver provided.
Switch the mains power back on. 
The camera starts up. Once it is ready for the next stage of installation, the front light 

flashes green.

Start-up

   Ensure that you have a Wi-Fi router with an internet connection and that you have 

your Wi-Fi password handy.  

To start up the camera, your mobile device must be connected to the Wi-Fi that you 

would also like to use for your camera. If your router supports both frequency bands 

(2.4 GHz and 5 GHz), use your smartphone to select 2.4 GHz Wi-Fi. 

Please do not switch or close the app during the start-up process.

Download the app “Bosch Smart Camera” from your app store.  You require this for the 

entire installation and configuration process. 
Start the app and sign up or register if you do not have a Bosch account yet.
In the Bosch Smart Camera app, select “Add camera” and follow the instructions in the 

app.
Once you have completed all the required entries, the app generates a QR code. Now, 

hold this at a distance of approx. 10-20 cm in front of the camera lens (5). Once the cam-

era has recognised the QR code, a signal tone sounds. The camera now starts its initiali-

sation process, during which the top half of the front lamp runs through various colours. 

At the end, it lights up in blue for approx. 1 minute and the camera is displayed in the 

app. It is now ready to use.

Summary of Contents for SVO-1601-220

Page 1: ...use of external circumstances This may lead to material damage and or personal injury Therefore you must ensure to the greatest extent possible that no person is endangered at the time of remote operation or automated control Please take special care when setting up or adjusting the remote control or when using the automated control and check the desired functionality at regular intervals Do not o...

Page 2: ...ponsibility for the lawful use of the camera and services and compli ance with the applicable legal provisions at the place of use Laws in your country may stipulate permitted purposes setup locations selections of image sections and stor age duration of the video sequences in particular If necessary you must inform the per sons employees or third parties living in or frequenting the monitored pre...

Page 3: ...movement capture 4 Speaker cover Protects the speaker and microphone underneath 5 Lens Covers a viewing angle of 120 horizontal ly can be adjusted by hand to guarantee an optimal viewing angle 6 LED spotlights top bottom Top and bottom LED spotlight can be used for mood lighting 7 Reset button opening Resets the camera to factory settings removes it from the network erases all recordings 8 Termina...

Page 4: ...min 6 kA breaking capacity energy limitation class 3 Installation guidelines in accordance with VDE 0100 or HD384 or IEC 60364 must be observed The circuit breaker must be easily accessible for the user and labelled as a disconnector for the device The device is part of the building installation During planning and setup the stan dards and directives applicable in your country must be observed Ope...

Page 5: ...for the next stage of installation the front light flashes green Start up Ensure that you have a Wi Fi router with an internet connection and that you have your Wi Fi password handy To start up the camera your mobile device must be connected to the Wi Fi that you would also like to use for your camera If your router supports both frequency bands 2 4 GHz and 5 GHz use your smartphone to select 2 4 ...

Page 6: ...r Please carry out the following steps Check the internet connection of the router Check the bandwidth of your internet connection min upload 768 kbits s Switch off the power and switch it back on again after 30 seconds so that the camera restarts You can find more information at www bosch smarthome com Maintenance cleaning The device does not require maintenance Leave any repairs to a specialist ...

Page 7: ...x 70 mm x 115 mm Weight 750 g Technical modifications reserved Open source software This Bosch Smart Home product uses open source software The licence information about the open source software used depends on the software version of your device or your smartphone app New software versions become available for your product at reg ular intervals You can find information about the current software ...

Page 8: ...Service information Robert Bosch Smart Home GmbH Schockenriedstraße 17 70565 Stuttgart Vaihingen service bosch smarthome com www bosch smarthome com service 03 2021 F 01U 326 436 V004 ...

Reviews: