background image

-9-

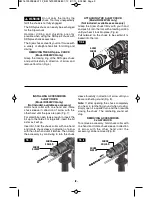
INSTALLING ACCESSORIES

3-JAW CHUCK

(Model RH328VCQ only)

(Not included, available as accessory)

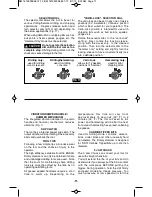
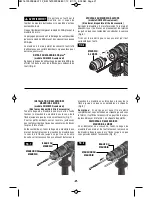
Hold  chuck  collar  with  one  hand  and  rotate
chuck  sleeve  in  direction  of  arrow  with  the
other hand until the jaws are open (Fig. 7).

For  small  bits,  open  jaws  enough  to  insert  the
bit up to the flutes. For large bits, insert the bit
as far as it will go.

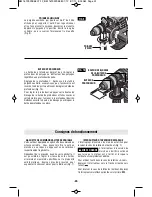
Insert bit, hold the chuck collar with one hand
and  rotate  chuck  sleeve  in  direction  of  arrow
with the other hand until it latches. Then clamp
the accessory by continuing to turn the chuck

sleeve forcefully in direction of arrow until you
hear a ratcheting sound (Fig. 8). 

Note: 

If after  opening  the  chuck  completely

you  hear  a  ratcheting  sound  when  closing,
simply open it a quarter turn and then resume
closing  the  chuck.  The  ratcheting  sound  will
stop.

REMOVING ACCESSORIES

3-JAW CHUCK

To remove a accessory, hold chuck collar with
one hand and rotate chuck sleeve in direction
of  arrow  with  the  other  hand  until  the
accessory can be removed (Fig. 8).

I

FIG. 7

FIG. 8

CHUCK

COLLAR

CHUCK

SLEEVE

CHUCK

COLLAR

CHUCK

SLEEVE

Do  not  carry  the  tool  by  the
chuck. Tool may unexpectedly

fall if the chuck is not fully engaged.

The SDS-plus chuck can easily be exchanged
for the 3-jaw chuck. 

Hammer  drilling  and  chiseling  are  only
possible  when  using  the  SDS-plus  chuck  with
SDS-plus shank accessories.

The 3-jaw chuck converts your tool for use with
a  variety  of  straight  shank  bits  for  drilling  and
driving.

REMOVING THE SDS-plus

®

CHUCK

(Model RH328VCQ only)

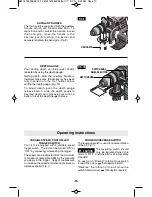
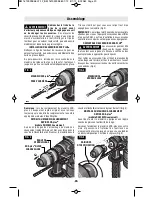
Grasp  the  locking  ring  of  the  SDS-plus  chuck
and  pull  forcefully  in  direction  of  arrow  and
remove from tool (Fig. 4).

ATTACHING THE 3-JAW CHUCK

(Model RH328VCQ only)

(Not included, available as accessory)

Grasp  the  3-jaw  chuck  firmly  with  your  hand
and push it onto the tool with a twisting motion
until you hear it lock into place (Fig. 6).

Pull  outward  on  the  chuck  to  be  certain  it  is
locked into the tool.

!

WARNING

FIG. 6

3-JAW

CHUCK

BM 1619929E58 07-12_BM 1619929E58 07-12  8/1/12  8:02 AM  Page 9

Summary of Contents for RH328VC

Page 1: ...ement sécurité Instrucciones de funcionamiento y seguridad 1 877 BOSCH99 1 877 267 2499 www boschtools com Call Toll Free for Consumer Information Service Locations Pour obtenir des informations et les adresses de nos centres de service après vente appelez ce numéro gratuit Llame gratis para obtener información para el consumidor y ubicaciones de servicio RH328VC RH328VCQ BM 1619929E58 07 12_BM 16...

Page 2: ...ersonal protective equipment Always wear eye protection Protective equipment such as dust mask non skid safety shoes hard hat or hearing protection used for appropriate conditions will reduce personal injuries Prevent unintentional starting Ensure the switch is in the off position before connecting to power source and or battery pack picking up or carrying the tool Carrying power tools with your f...

Page 3: ...cord Cutting accessory contacting a live wire may make exposed metal parts of the power tool live and could give the operator an electric shock Use clamps or another practical way to secure and support the workpiece to a stable platform Holding the work by hand or against your body leaves it unstable and may lead to loss of control Use a metal detector to determine if there are gas or water pipes ...

Page 4: ...ivities contains chemicals known to cause cancer birth defects or other reproductive harm Some examples of these chemicals are Lead from lead based paints Crystalline silica from bricks and cement and other masonry products and Arsenic and chromium from chemically treated lumber Your risk from these exposures varies depending on how often you do this type of work To reduce your exposure to these c...

Page 5: ...torque 1 2 3 Selector settings Speed torque or position settings I II III Higher number means greater speed Infinitely variable selector with off Speed is increasing from 0 setting Arrow Action in the direction of arrow Alternating current Type or a characteristic of current Direct current Type or a characteristic of current Alternating or direct current Type or a characteristic of current Class I...

Page 6: ...United States and Canadian Standards Symbols continued IMPORTANT Some of the following symbols may be used on your tool Please study them and learn their meaning Proper interpretation of these symbols will allow you to operate the tool better and safer This symbol designates that this tool is recognized by Underwriters Laboratories This symbol designates that this tool is listed by Underwriters La...

Page 7: ...bits 3 1 4 Rotary Hammer NOTE For tool specifications refer to the nameplate on your tool DEPTH GAUGE RELEASE BUTTON LOCKING RING LOCKING SLEEVE SDS plus CHUCK AUXILIARY HANDLE HAND GRIP VIBRATION DAMPER HANDLE HAMMER MECHANISM VARIABLE SPEED TRIGGER SWITCH FORWARD REVERSE SWITCH DRILL HAMMER DRILL SELECTION DIAL FIG 1 DEPTH GAUGE DUST SHIELD 3 JAW CHUCK Not included available as accessory VENTILA...

Page 8: ...d contact with skin and use proper protective gloves or cloth to remove To remove an accessory pull locking sleeve backward and pull bit forward All accessories should be wiped clean after removing Fig 3 Note when replacing original SDS plus quick change chuck always make sure the replace ment chuck has the proper number of identification grooves REMOVING THE SDS plus QUICK CHANGE CHUCK Model RH32...

Page 9: ...d rotate chuck sleeve in direction of arrow with the other hand until the accessory can be removed Fig 8 I FIG 7 FIG 8 CHUCK COLLAR CHUCK SLEEVE CHUCK COLLAR CHUCK SLEEVE Do not carry the tool by the chuck Tool may unexpectedly fall if the chuck is not fully engaged The SDS plus chuck can easily be exchanged for the 3 jaw chuck Hammer drilling and chiseling are only possible when using the SDS plu...

Page 10: ...IG 9 X DEPTH GAUGE RELEASE BUTTON DEPTH GAUGE FIG 10 VARIABLE SPEED CONTROLLED TRIGGER SWITCH Your tool is equipped with a variable speed trigger switch The tool can be turned ON or OFF by squeezing or releasing the trigger The speed can be adjusted from the minimum to maximum nameplate RPM by the pressure you apply to the trigger Apply more pressure to increase the speed and release pressure to d...

Page 11: ...egrated vibration damper in the main handle and hammer mechanism reduces vibrations Fig 1 SLIP CLUTCH The tool has a internal pre set slip clutch The output spindle will stop rotating if the accessory binds and overloads the tool TOOL TIPS Following a few simple tips will reduce wear on the tool and the chance of injury to the operator The high efficiency available from the BOSCH Rotary Hammer can...

Page 12: ...reaks through the wood to avoid splintering Complete the hole from the opposite side immediately after the point breaks through If bit binds reverse the drilling operation to help remove the bit from the work DRILLING METAL Make a center punch in the material for easier starting Use enough pressure to keep the bit cutting If the bit is allowed to merely spin in the hole it will become dull within ...

Page 13: ...nths the brushes be examined Only genuine Bosch replacement brushes specially designed for your tool should be used BEARINGS Every second brush change the bearings should be replaced at Bosch Factory Service Center or Authorized Bosch Service Station Bearings which become noisy due to heavy load or very abrasive material cutting should be replaced at once to avoid overheating or motor failure Clea...

Page 14: ... rallonges sont faites pour l extérieur et réduisent le risque de choc électrique S il est absolument nécessaire d utiliser l outil électroportatif dans un endroit humide utilisez une alimentation protégée par un disjoncteur de fuite de terre GFCI L utilisation d un disjoncteur GFCI réduit les risques de choc électrique Sécurité personnelle Restez concentré faites attention à ce que vous faites et...

Page 15: ...troportatif est préservée Portez des protecteurs d oreilles quand vous utilisez des perceuses à percussion L exposition au bruit peut causer une perte d acuité auditive Utilisez la ou les poignée s auxiliaire s si elle est elles sont fournie s avec l outil Une perte de contrôle pourrait causer des blessures physiques Tenez l outil électroportatif par ses surfaces de préhension isolées lorsque vous...

Page 16: ...onner les composants électriques d un outil prévu pour le C A tomberont probablement en panne et risquent de créer un danger pour l utilisateur Maintenez les poignées sèches et exemptes d huile et de graisse On ne pas maîtriser un outil électroportatif en toute sécurité quand on a les mains glissantes Créez un agenda d entretien périodique pour votre outil Quand vous nettoyez un outil faites atten...

Page 17: ... de vitesse de couple ou de position Un l ll lll nombre plus élevé signifie une vitesse plus grande Sélecteur variable à l infini avec arrêt La vitesse augmente depuis le réglage 0 Flèche Action dans la direction de la flèche Courant alternatif Type ou caractéristique du courant Courant continu Type ou caractéristique du courant Courant alternatif ou continu Type ou caractéristique du courant Cons...

Page 18: ...des États Unis et du Canada Symboles suite IMPORTANT Certains des symboles suivants peuvent être utilisés sur votre outil Veuillez les étudier et apprendre leur signification Une interprétation appropriée de ces symboles vous permettra d utiliser l outil de façon plus efficace et plus sûre Ce symbole indique que cet outil est reconnu par Underwriters Laboratories Ce symbole signifie que cet outil ...

Page 19: ...s de l outil reportez vous à la plaque signalétique de votre outil BOUTON DE BLOCAGE DE LA BUTÉE DE PROFONDEUR BAGUE DE VERROUILLAGE MANCHON DE VERROUILLAGE MANDRIN SDS plus POIGNEE AUXILIAIRE POIGNEE PRISE POIGNÉE D AMORTISSEMENT DES VIBRATIONS MÉCANISME D ACTIONNEMENT DU MARTEAU GÂCHETTE DE COMMANDE À VITESSE VARIABLE INTERRUPTEUR D INVERSION DE MARCHE CADRAN DE SÉLECTION DE PERCEUSE PERCEUSE À ...

Page 20: ...rotecteurs appropriés pour déposer Pour retirer un accessoire tirez et tenez le manchon de verrouillage vers l arrière et tirez le embout vers l avant Essuyez tous les accessoires pour les nettoyer après les avoir enlevés Fig 3 AVERTISSEMENT Remarque lors du remplacement du mandrin SDS plus à changement rapide original assurez vous toujours que le mandrin de remplacement a le nombre approprié de r...

Page 21: ...S modèle RH328VCQ seulement Non fourni disponible à titre d accessoire Tenez la bague du mandrin d une main et de l autre tournez le manchon du mandrin dans le sens de la flèche jusqu à ce que les mors soient ouverts Fig 7 Pour les petits embouts ouvrez les mors juste assez pour enfoncer l embout jusqu aux cannelures Enfoncez les gros forets à fond Enfoncez l embout tenez la bague du mandrin d une...

Page 22: ... PROFONDEUR BUTÉE DE PROFONDEUR FIG 10 Consignes de fonctionnement GACHETTE DE COMMANDE A VITESSE VARIABLE Votre outil est équipée d une gâchette de commande à vitesse variable Vous pouvez mettre la outil en marche ou au repos en appuyant ou en relâchant respectivement la gâchette Dépendant de la pression exercée sur la gâchette il est possible de régler la vitesse dans les limites minimale et max...

Page 23: ...GLISSEMENT L outil renferme un accouplement à glissement préréglé L arbre arrêtera de tourner si l accessoire grippe et surcharge l outil CONSEILS PRATIQUES Le fait d observer quelques simples conseils réduira l usure de l outil et le risque de blessures Vous ne bénéficierez du rendement maximal du marteau rotatif Bosch que si vous utilisez l équipement de forage bien affûté et en bon état Sachez ...

Page 24: ...nversez l opération de perçage pour aider à retirer le foret de la pièce PERÇAGE DANS LE MÉTAL Pratiquez un trou central au poinçon dans le matériau pour faciliter l approche Utilisez suffisamment de pression pour que le foret continue à couper Si on laisse le foret tourner tout simplement dans le trou il s émoussera rapidement Pour percer un trou de dimensions plus grandes il est plus rapide et p...

Page 25: ...s tous les deux à six mois Il ne faut utiliser que des balais de rechange Bosch d origine et conçus pour votre outil PALIERS Après environ 300 à 400 heures de fonctionnement ou tous les deux changements de balais il est conseillé de faire remplacer les paliers par un centre de service d usine Bosch ou une station service agréée Bosch Si les paliers commencent à faire du bruit à cause de surcharges...

Page 26: ... cordón de extensión adecuado para uso a la intemperie La utilización de un cordón adecuado para uso a la intemperie reduce el riesgo de que se produzcan sacudidas eléctricas Si es inevitable utilizar una herramienta mecánica en un lugar húmedo utilice una fuente de energía protegida por un interruptor de circuito accionado por corriente de pérdida a tierra GFCI El uso de un GFCI reduce el riesgo ...

Page 27: ...scanso La vibración causada por la acción de percusión y taladrado puede ser perjudicial para las manos y los brazos Uso y cuidado de las herramientas mecánicas No fuerce la herramienta mecánica Use la herramienta mecánica correcta para la aplicación que desee realizar La herramienta mecánica correcta hará el trabajo mejor y con más seguridad a la capacidad nominal para la que fue diseñada No use ...

Page 28: ...ladrillos y cemento y otros productos de mampostería y Arsénico y cromo de madera tratada químicamente Su riesgo por causa de estas exposiciones varía dependiendo de con cuánta frecuencia realice este tipo de trabajo Para reducir su exposición a estos agentes químicos trabaje en un área bien ventilada y trabaje con equipo de seguridad aprobado como por ejemplo máscaras antipolvo que estén diseñada...

Page 29: ...nes de velocidad par motor o posición I II III Un número más alto significa mayor velocidad Selector infinitamente variable La velocidad aumenta desde la graduación de 0 con apagado Flecha Acción en la dirección de la flecha Corriente alterna Tipo o una característica de corriente Corriente continua Tipo o una característica de corriente Corriente alterna o continua Tipo o una característica de co...

Page 30: ...anadienses Símbolos continuación IMPORTANTE Es posible que algunos de los símbolos siguientes se usen en su herramienta Por favor estúdielos y aprenda su significado La interpretación adecuada de estos símbolos le permitirá utilizar la herramienta mejor y con más seguridad Este símbolo indica que esta herramienta está reconocida por Underwriters Laboratories Este símbolo indica que Underwriters La...

Page 31: ...herramienta consulte la placa del fabricante colocada en la herramienta BOTÓN DE LIBERACION DEL CALIBRE DE PROFUNDIDAD ANILLO DE FIJACIÓN MANGUITO DE FIJACIÓN MANDRIL SDS plus MANGO AUXILIAR EMPUNADURA MANGO CON AMORTIGUADOR DE LAS VIBRACIONES MECANISMO DE PERCUSIÓN INTERRUPTOR GATILLO DE VELOCIDAD VARIABLE INTERRUPTOR DE AVANCE INVERSIÓN DIAL DE SELECCION DE TALADRO TALADRO DE PERCUSION FIG 1 CAL...

Page 32: ...to con la piel y utilice guantes de protección o un paño protector adecuados para quitar dichos accesorios Para quitar un accesorio tire hacia atrás del mango de fijación sujételo y tire de la broca hacia adelante Todos los accesorios deben limpiarse después de quitarlos Fig 3 ADVERTENCIA ADVERTENCIA Ensamblaje FIG 2 FIG 3 PROTECTOR ANTIPOLVO MANGUITO DE FIJACIÓN MANDRIL SDS plus A B FIG 4 FIG 5 A...

Page 33: ...tido de la flecha con la otra mano hasta que se pueda quitar el accesorio Fig 8 CAMBIO DEL MANDRIL No transporte la herramienta agarrándola por el mandril La herramienta podría caerse inesperadamente si el mandril no está completamente acoplado El mandril SDS plus se puede intercambiar fácilmente por el mandril de 3 mordazas El taladrado de percusión y el cincelado son posibles solamente cuando se...

Page 34: ...RE DE PROFUNDIDAD FIG 10 INTERRUPTOR GATILLO DE VELOCIDAD VARIABLE CONTROLADA La herramienta se controla con un interruptor gatillo de velocidad variable La herramienta se puede encender posición ON o apagar posición OFF apretando o soltando el gatillo La velocidad se puede ajustar desde las RPM mínimas hasta las RPM máximas indicadas en la placa del fabricante por medio de la presión que usted ej...

Page 35: ...LIZANTE Esta herramienta está dotada con un embrague deslizante interno preajustado El husillo de salida dejará de girar si el accesorio se atasca y sobrecarga la herramienta CONSEJOS PARA LA HERRAMIENTA El seguir unos cuantos consejos simples reducirá el desgaste de la herramienta y las posibilidades de lesiones del operador La alta eficacia que proporciona el martillo giratorio BOSCH sólo se pue...

Page 36: ...invierta la operación de taladrado para ayudar a sacar la broca de la pieza de trabajo TALADRADO DE METAL Realice una punzonadura para marcar en el material a fin de comenzar más fácilmente Ejerza suficiente presión para hacer que la broca siga cortando Si se permite que la broca se limite a girar en el agujero sin avanzar ésta se desafilará en poco tiempo Al taladrar un agujero más grande es más ...

Page 37: ... las herramientas con engranajes se vuelvan a engrasar con un lubricante especial para engranajes en cada cambio de escobillas ESCOBILLAS DE CARBÓN Las escobillas y el conmutador de la herramienta han sido diseñados para muchas horas de servicio fiable Para mantener un rendimiento óptimo del motor recomendamos que cada dos a seis meses se examinen las escobillas Sólo se deben usar escobillas de re...

Page 38: ...Notes 38 BM 1619929E58 07 12_BM 1619929E58 07 12 8 1 12 8 02 AM Page 38 ...

Page 39: ... 39 Remarques Notas BM 1619929E58 07 12_BM 1619929E58 07 12 8 1 12 8 02 AM Page 39 ...

Page 40: ...AIT ÊTRE TENU POUR RESPONSABLE DES INCIDENTS OU DOMMAGES INDIRECTS INCLUANT MAIS NE SE LIMITANT PAS AUX PERTES DE PROFITS CONSÉCUTIFS À LA VENTE OU L USAGE DE CE PRODUIT CERTAINS ÉTATS AMÉRICAINS ET CERTAINES PROVINCES CANADIENNES N ADMETTANT PAS LE PRINCIPE DE LA LIMITATION NI L EXCLUSION DES DOMMAGES INDIRECTS ET CONSÉQUENTIELS IL EST POSSIBLE QUE LES LIMITATIONS OU EXCLUSIONS CI DESSUS NE S APP...

Reviews: