background image

Bosch Security Systems | 2007-11 | PLE-1MA030-EU,  PLE-1MA060-EU, PLE-1MA120-EU en

Plena Mixer Amplifier

 | Installation and User Instructions | Connections and settings

 en

 | 15

4

Connections and settings

4.1 Connecting 

inputs

4.1.1

Priority microphone (input 1)

The priority microphone (or a generic call station) that 
can be used with push to talk (PTT) should be 
connected to “microphone/line 1 input”. The PTT 
mode can be activated by setting the DIP switch (12) at 
the rear of the unit. Microphone/line 1 input has 
priority over all other microphone/line inputs.

If, however, the “Tel. emergency/100V input” receives a 
signal, all inputs including microphone/line 1 input will 
be overruled.

The microphone/line 1 input has two connectors wired 
in parallel: 

an XLR connector (for a 3 pole microphone), and

a Euro style pluggable screw terminal connector.

The Euro style pluggable screw terminal connector has 
a trigger input, which can be used in combination with 
the Euro and XLR connector.

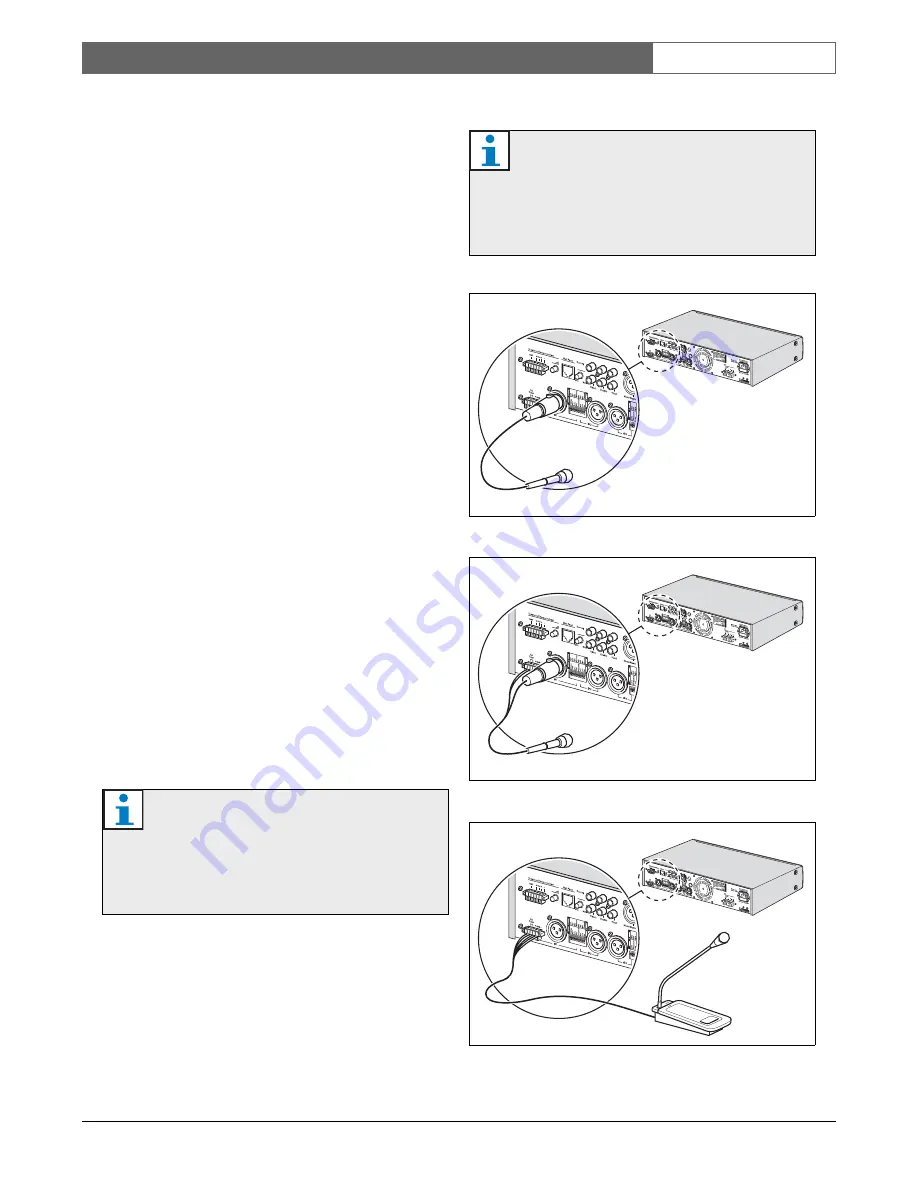
The priority microphone can be connected to the 
microphone/line 1 input as follows:

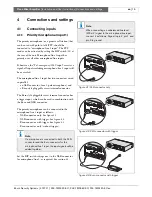
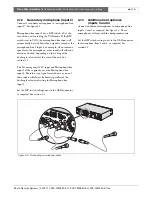
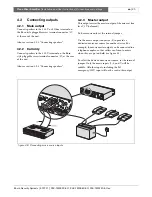
XLR connector only. See figure 4.1.

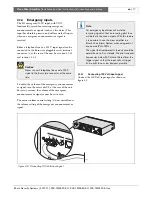
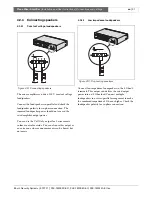
XLR connector with trigger. See figure 4.2.

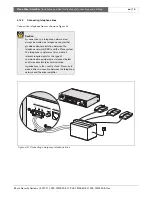
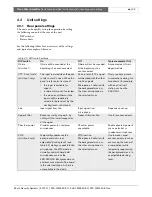
Euro connector with trigger. See figure 4.3.

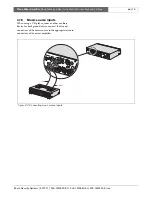
Euro connector only (without trigger).


Set the DIP switch settings next to the XLR connector 
for microphone/line 1, as required. See section 4.3.

Note

If a microphone is connected to both the XLR 

connector and the Euro connector for the 

microphone/line 1 input, the input signals will be 

added together.

Note

When connecting an unbalanced line level 

(200 mV) signal to the microphone/line input, 

connect it as follows: Signal to pin 2, pin 1 and 

pin 3 to ground.

figure 4.1: XLR connector only

figure 4.2: XLR connector with trigger

figure 4.3: Euro connector with trigger

Summary of Contents for PLE-1MA030-EU

Page 1: ...Installation and User Instructions PLE 1MA030 EU PLE 1MA060 EU PLE 1MA120 EU en Plena Mixer Amplifier ...

Page 2: ...tructions en 2 Important safeguards Before installing or operating this product always read the Safety Instructions which are available as a separate document 9922 141 7014x These instructions are supplied together with all equipment that can be connected to the mains Thank you for choosing a Bosch Security Systems product ...

Page 3: ...ena Mixer Amplifier 7 2 4 Controls connectors and indicators 9 2 4 1 Front panel 9 2 4 2 Plena PLE WP2Z3S wall panel 9 2 4 3 Rear panel 10 3 Installation 13 3 1 Unpack unit 13 3 2 Install unit in rack optional 13 3 3 Check settings connections 13 3 4 Connect unit to mains 13 4 Connections and settings 15 4 1 Connecting inputs 15 4 1 1 Priority microphone input 1 15 4 1 2 Secondary microphone input...

Page 4: ...5 3 1 Source selection 26 5 3 2 Volume control 26 5 4 Tone control 26 5 5 Output controls 26 5 5 1 Master volume control 26 6 Technical data 27 6 1 Electrical 27 6 1 1 Mains power supply 27 6 1 2 Power consumption 27 6 1 3 Performance 27 6 1 4 RJ 45 input 1 x 27 6 1 5 Mic line input 4 x 27 6 1 6 Music inputs 3x 28 6 1 7 Emergency telephone 1 x 28 6 1 8 Master music output 1 x 28 6 1 9 Loudspeaker ...

Page 5: ... These alerts from least severe effect to most severe effect are Note Alert containing additional information Usually not observing a note alert does not result in damage to the equipment or personal injuries Caution The equipment can be damaged if the alert is not observed Warning Persons can be severely injured or the equipment can be seriously damaged if the alert is not observed Danger Not obs...

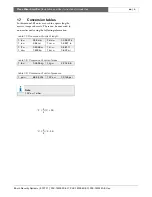
Page 6: ...ses temperatures etc These can be converted to non metric units using the following information table 1 1 Conversion of units of length 1 in 25 4 mm 1 mm 0 03937 in 1 in 2 54 cm 1 cm 0 3937 in 1 ft 0 3048 m 1 m 3 281 ft 1 mi 1 609 km 1 km 0 622 mi table 1 2 Conversion of units of mass 1 lb 0 4536 kg 1 kg 2 2046 lb table 1 3 Conversion of units of pressure 1 psi 68 95 hPa 1 hPa 0 0145 psi Note 1 hP...

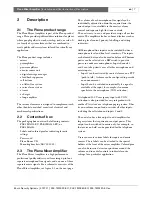
Page 7: ...e required mix the mixed output is controlled via the master volume control and separate high low tone controls The unit is easy to use and provides a crisp call or clear music The amplifier also has enhanced features such as ducking level control priority labelling and setting indicators All Microphone line inputs can be switched between microphone level and line level sensitivity The inputs are ...

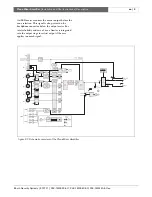
Page 8: ...dphone connector below the output meter For total reliability and ease of use a limiter is integrated into the output stage to restrict output if the user applies too much signal figure 2 1 Schematic overview of the Plena Mixer Amplifier LINE MIC LINE MIC LINE PTT ducking 100V 0 MIC LINE MIC Click suppression Phantom XLR P h Power 201 8 Ohm 8 Ohm 100V Call 100V Only 0 DIP DIP drive 115V 230V 1 dis...

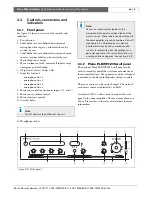
Page 9: ... holes 12 Headphone socket 2 4 2 Plena PLE WP2Z3S wall panel The optional Plena PLE WP2Z3S wall panel can be used to remotely control the unit from a maximum of four remote locations The appearance of the wall panel is matched to the Bosch loudspeaker volume controls The music source can be easily changed The status of each music source is indicated by an LED A standard CAT 5 cable is used to conn...

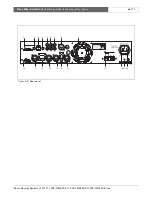
Page 10: ... trigger Euro style pluggable screw terminal connector DIP switch settings for chime PTT push to talk mic line speech filter and phantom power see number 12 Input is wired in parallel with microphone line 1 XLR connector see number 11 11 Microphone line 1 input XLR connector DIP switch settings for chime PTT push to talk mic line speech filter and phantom power see number 12 Input is wired in para...

Page 11: ...ity Systems 2007 11 PLE 1MA030 EU PLE 1MA060 EU PLE 1MA120 EU en Plena Mixer Amplifier Installation and User Instructions Description en 11 figure 2 3 Rear panel 9 8 4 3 5 6 7 2 1 20 19 18 17 16 14 13 11 12 15 10 ...

Page 12: ...Bosch Security Systems 2007 11 PLE 1MA030 EU PLE 1MA060 EU PLE 1MA120 EU en Plena Mixer Amplifier Installation and User Instructions Description en 12 Intentionally left blank ...

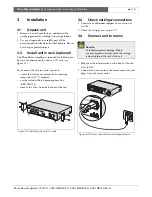
Page 13: ...see figure 3 1 If you mount the unit in a rack you must ensure that it does not exceed the overheating temperature 45 C ambient use the included Bosch mounting brackets LBC 1901 00 remove the 4 feet from the bottom of the unit 3 3 Check settings connections 1 Connect any additional equipment see section 4 1 and 4 2 2 Check the settings see section 4 3 3 4 Connect unit to mains 1 Make sure the powe...

Page 14: ...Bosch Security Systems 2007 11 PLE 1MA030 EU PLE 1MA060 EU PLE 1MA120 EU en Plena Mixer Amplifier Installation and User Instructions Installation en 14 Intentionally left blank ...

Page 15: ...e microphone and a Euro style pluggable screw terminal connector The Euro style pluggable screw terminal connector has a trigger input which can be used in combination with the Euro and XLR connector The priority microphone can be connected to the microphone line 1 input as follows XLR connector only See figure 4 1 XLR connector with trigger See figure 4 2 Euro connector with trigger See figure 4 ...

Page 16: ...ted or ducked depending on the setting of the ducking level control at the rear of the unit See section 4 3 The Tel emergency 100V input and Microphone line input 1 all have priority over the Microphone line input 2 Therefore any signal received on any one of these inputs will always be heard regardless of the ducking level control setting for Microphone line input 2 Set the DIP switch settings ne...

Page 17: ...ety reasons the volume of the emergency announcement or signal cannot be set to zero The master volume control setting 5 does not influence the volume setting of the emergency announcement or signal 4 1 4 1 Connecting 100 Volt input signal Connect the 100 Volt input signal as shown in figure 4 5 Caution Never connect telephone lines and a 100 V signal to the Euro style connector at the same time N...

Page 18: ...ephone network must always be made via a telephone coupler that provides adequate isolation between the telephone network PBX and the Plena system The telephone coupler must also meet all relevant requirements for this type of communication equipment as imposed by law and or responsible telecommunication organizations in the country of use Never try to make a direct connection between the telephon...

Page 19: ...n and User Instructions Connections and settings en 19 4 1 5 Music source inputs When using a CD player tuner or other auxiliary device for background music connect the line out connectors of the music source to the appropriate line in connectors of the mixer amplifier figure 4 7 Connecting music source inputs ...

Page 20: ...the rear of the unit Also see section 4 2 4 Connecting speakers 4 2 3 Master output This output carries the master output of the mixer at line level 1 V balanced To hear music only set the internal jumper Use the music output connector 8 to provide a dedicated music out source for another device For example the music master output can be connected to a telephone coupler so that callers can listen ...

Page 21: ... power should not exceed the rated amplifier output power You can use the Call Only output for 3 wire remote volume control override You can also use this output as an extra zone where announcements can be heard but not music 4 2 4 2 Low impedance loudspeakers Connect low impedance loudspeakers to the 8 Ohm 0 terminals This output can deliver the rated output power into an 8 Ohm load Connect multi...

Page 22: ...mixed with the other mic line signals Microphone 1 will mix with the background music or the other microphones in the selected zones Users can have private conversations during live broadcasts for example with an all call call station such as the PLE 1CS Line Input signal from line Input signal from microphone Depends on set up Speech filter Enhances clarity of speech by cutting off the lower freq...

Page 23: ... ducked attenuated the microphone line inputs are always muted when a call is made Set the ducking level control to mute if you want the announcement to be heard without background music Telephone emergency 100V volume control Attenuates the emergency announcement or signal Control range from 25 dB to 0 dB For safety reasons the volume of the emergency announcement or signal cannot be fully set to...

Page 24: ...ndicate the preferred settings of the unit The red pins can optionally be used to indicate the maximum setting of a knob If these settings have to be changed use a pair of soft tipped pliers to carefully remove the pins If you do not have a pair of soft tipped pliers you can use ordinary pliers instead but first place some plastic tape on the tips of the pliers to prevent damaging the front of the...

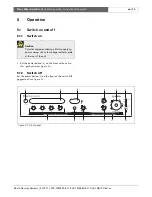
Page 25: ...and off 5 1 1 Switch on 1 Set the power button 1 on the front of the unit to On pushed in see figure 5 1 5 1 2 Switch off Set the power button 1 on the front of the unit to Off popped out see figure 5 1 Caution Potential equipment damage Before applying power always check the voltage indicator plate at the rear of the unit figure 5 1 Front panel B 7 8 9 10 12 11 1 2 3 4 5 6 ...

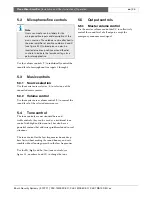
Page 26: ...ontrol but also have a powerful contour that addresses problems found in real situations The tone control for the low frequencies boosts deep bass first without making the sound boomy and cuts rumble without loosing warmth in the low frequencies Use the Hi high and Lo low tone controls see figure 5 1 numbers 4 and 10 to change the tone 5 5 Output controls 5 5 1 Master volume control Use the master...

Page 27: ... power 1 kHz Bass Control Max 12 12 dB frequency is level dependent Treble Control Max 12 12 dB frequency is level dependent Wall panel input For PLE WP3S2Z Input 1 Push to talk contact with ducking functionality 5 pin Euro style balanced phantom 3 pin XLR balanced phantom Input 2 4 VOX with ducking functionality on input 2 3 pin XLR balanced phantom Sensitivity 1 mV mic 200 mV line Vox sensitivit...

Page 28: ...ity 100V 10 V 100 V adjustable Impedance 10 kohm S N flat at max volume 65 dB VOX threshold 50 mV attack time 150 ms release time 2 s Connector 3 pin XLR balanced Nominal level 1 V Impedance 100 ohm Connector Screw connector floating Max rated PLE 1MA030 EU 45 W 30 W Max rated PLE 1MA060 EU 90 W 60 W Max rated PLE 1MA120 EU 180 W 120 W Connector Screw terminal floating PLE 1MA030 EU 16 V 30 W PLE ...

Page 29: ......
Page 30: ...For more information visit www boschsecuritysystems com Bosch Security Systems B V Data subject to change without notice 2007 11 PLE 1MA030 EU PLE 1MA060 EU PLE 1MA120 EU en ...

Reviews: