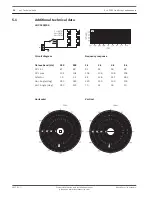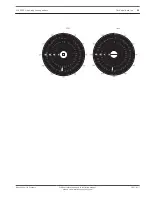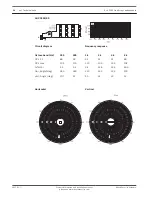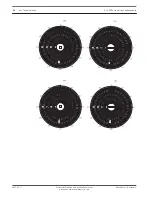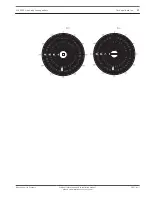
Listening area and related mounting height for
XLA3210/00
How to use this mounting method:
1.
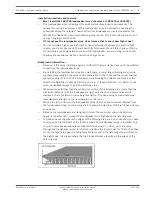
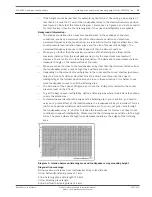
Determine the dimensions of the desired ‘listening area’ (a horizontal plane at the level of
the listeners’ ears – refer to the dashed line in figure 1).
2.
Measure the maximum distance from loudspeaker array to the last listener in the listening
area (corresponding to ‘B’ in figures 1, 2 and 3).
3.
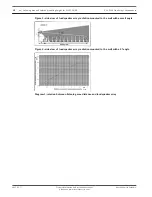
Refer to diagram 1, and trace upwards from the maximum distance on the horizontal axis.
From the vertical intersection with diagonal B-line, you go horizontal to the vertical axis.
The X-value (height of loudspeaker array mounting bracket above the listening plane, ‘X’
in figure 1) is standing on this axis. The horizontal intersections with other diagonal lines
provide information about the dimensions of the listening area. These numbers are
related to figures 2 and 3 (see also example below).
4.
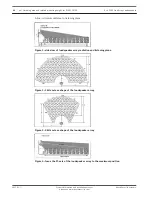
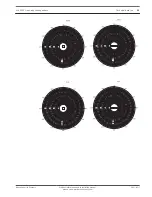
Figure 2 shows the 1 kHz octave shape radiated by the loudspeaker array and figure 3
shows the 4 kHz octave shape radiation. The listening area with the optimal acoustic
performance is in these shapes. Ensure the 4 kHz shape with the dimensions obtained
using diagram 1 adequately covers the desired listening area.
5.
If the desired listening area is covered by the 4 kHz shape, the X-value on the vertical axis
shows at what height the loudspeaker array must be mounted above the listening plane.
Note that the loudspeaker array must be mounted at an angle of 8”at the chosen height!
Now you can mount the loudspeaker array for optimal acoustic performance.
Diagram example:
The maximum distance from loudspeaker array to last listener is 15 m. Tracing upwards from
the 15 m point on the horizontal axis of diagram 1 to the diagonal B-line and then sideways to
the vertical axis, the intersections with the other diagonal lines provide dimensions of the
listening planes. In this example:
F-line (listening plane side length of 4 kHz) = 11.1 m
C-line (listening plane length) = 11 m
E-line (half width listening plane of 4 kHz) = 9.3 m
A-line (minimum distance to listening plane) = 3.9 m
On the vertical axis, the X-value (the height between the listening plane and loudspeaker array
mounting bracket) is 1.8 m.
Installation questions and answers:
–
The desired listening area is too large and does not fit in the 4 kHz shape.
–
Try a different loudspeaker array mounting height or use more loudspeaker arrays to get a
larger listening area.
–
Why use an angle of 8º for the loudspeaker array?
–
The radiated shapes shown in figures 2 and 3 with the dimensions in diagram 1 are only
valid when the loudspeaker array is mounted at an angle of 8º. Only this situation
provides constant sound pressure level and frequency response (constant directivity) in
the listening area.
–
Can I use the loudspeaker array with another angle?
–
You can use the loudspeaker arrays with another angle but you will not get the optimum
acoustic performance. For example, greater sound pressure level variation will be audible
in the listening area. The values in diagram 1 are not valid for other angles. It is
recommended never to use an angle greater than 8º.
–
The loudspeaker array cannot be mounted as high as desired.
4
14
en | Listening area and related mounting height for XLA3210/00
XLA 3200 Line Array Loudspeakers
2017.01 | |
Product information and installation manual,
please see www.boschsecurity.com
Bosch Security Systems


