Bosch Security Systems | 2003-09 | 3922 988 92883en
Plena Mixer Amplifier
| Installation and Operating Manual |
en
| 19
5
Operation of mixer amplifier
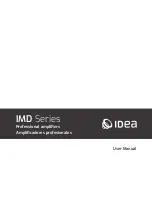
Figure 4.6
Use the supplied mains cord to connect the system to the mains supply.
Figure 5.1
5.1 Source selection
•
Use the music source selector (8) to select one of the connected music sources.
•
Use the input volume controls (3, 4, 5, 6 and 7) to balance the sound level of the microphone inputs and the
background music.
5.2 Volume and tone control
•
Use the master volume control (11) to control the volume of the music/microphone mix.
•
The treble and bass tone controls (9 and 10) affect the microphones as well as the music.
5.3 Zone selection (LBB1914/10 only)
•
Use the zone selection buttons (12 and 13) to route the music/microphone mix from the amplifier output to
loudspeaker zone 1 and/or loudspeaker zone 2. Priority announcements, however, are always routed to both
zones, irrespective of the position of the zone selection buttons.
Operation of mixer amplifier
3
0 dB
-6 dB
-20 dB
Power
1
4
2
Line
CD
AUX
Master
Zone 1
Zone 2
Select
Plena
Mixer Amplifier
2
1
5
6
7
10
11
12
13
3
4
8
9
Only for LBB1914/10