background image

en

    Trouble shooting

20

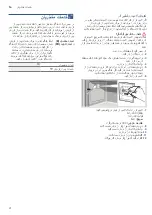
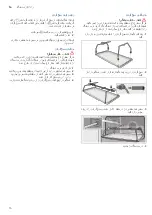
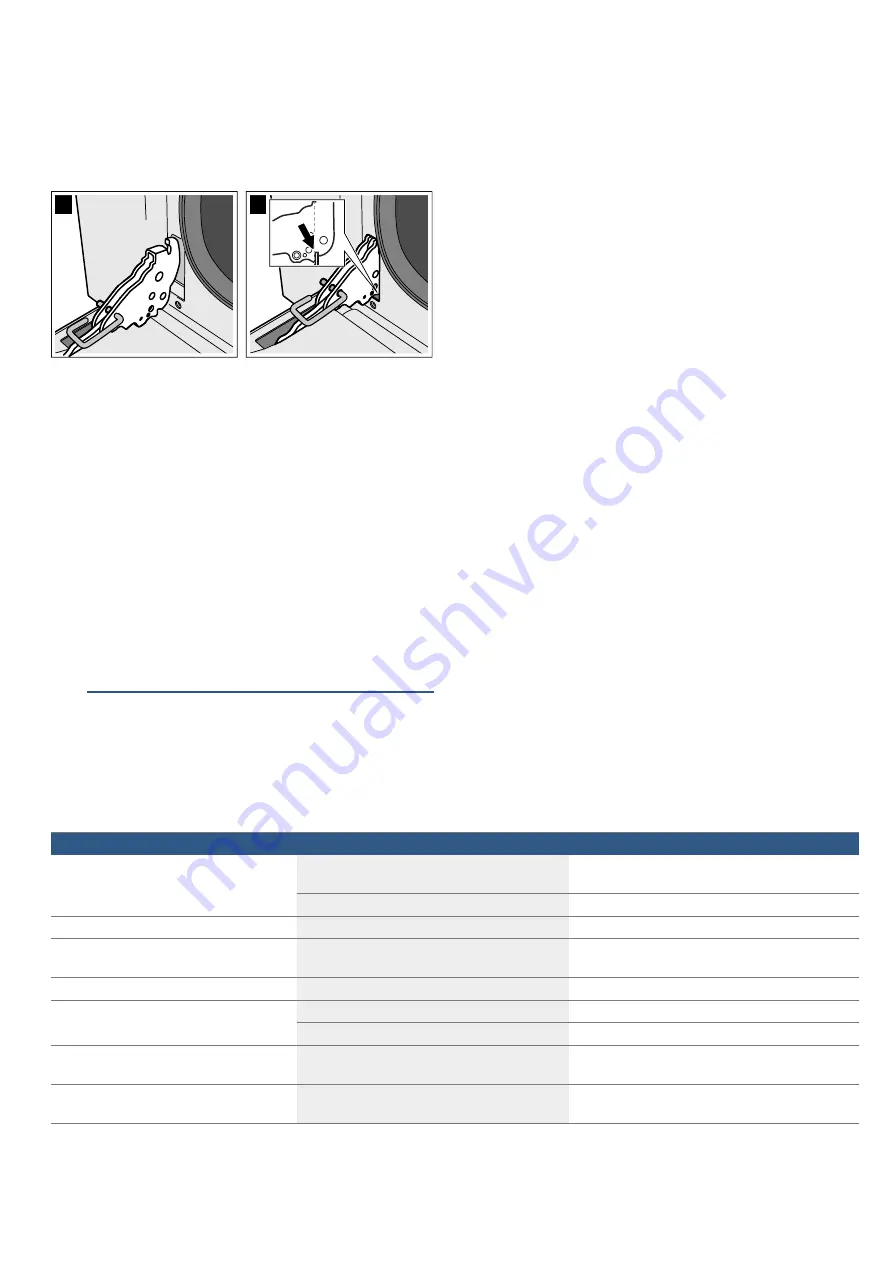
Fitting the appliance door

1.

Grip the oven door on either side with both hands.

2.

Slide the hinges into the slots in the oven 

(a).

Note: . 

The notch below the hinges must engage 

into the frame of the oven 

(b)

.

3.

Lower the door downwards.

4.

Remove the locking pins.

:

Warning. Risk of injury! 

Do not reach into the hinge if the oven door falls out 

unintentionally or a hinge snaps closed. Call after-sales 

service.

:

Warning. Risk of injury! 

The door may not close properly if the door hinges have 

not engaged correctly. This will allow heat to escape 

and the parts of the appliance may become very hot. To 

prevent this from happening, remove the door again. 

Then refit the door as shown in the drawing, making 

sure that the groove on the underside of the hinges 

engages in the oven frame.

3

Trouble shooting

Trouble s

hooting

:

Warning – Risk of injury! 

Incorrect repairs may cause serious hazards. Repairs to the appliance must only be carried out by a qualified 

technician. If repairs are required, contact the after-sales service.

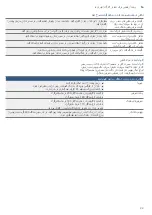
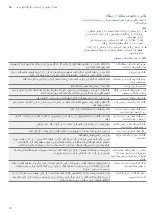
Fault table

E

D

Fault

Possible cause

Remedy/information

The appliance does not work.

The circuit breaker is faulty

Look in the fuse box and check that the circuit 

breaker is in working order.

Power cut

Check whether the kitchen light works.

Zeros flash in the display.

Power cut

Reset the time.

The oven light has failed. 

Faulty oven light

Change the oven light bulb. (See section "Replacing 

the oven light")

The gas burner does not ignite.

Power cut or damp ignition plugs

Light the gas burner with a gas lighter or a match.

The oven does not heat up.

Faulty fuse.

Check and, if required, replace the circuit breaker.

The function selector has not been set.

Set the function selector.

All dishes that are prepared in the oven burn 

within an extremely short period of time.

Faulty thermostat

Call the after-sales service.

The door panel steams up when the oven is 

hot.

Normal occurrence; caused by the difference in 

temperature

Not possible; this has no effect on oven perfor-

mance.

Summary of Contents for HSB738257I

Page 1: ...en Instruction manual Free standing cooker HSB738257I fa اﺳﺗﻔﺎده راھﻧﻣﺎی 3 3 ﻣﺑﻠﻪ ﺍﺟﺎﻕ ...

Page 2: ......

Page 3: ...threaded bushes for the rotary spit 13 Fitting the telescopic shelf set 13 1 Operating the appliance 14 Hob 14 Oven 14 Rotary spit 14 O Time setting options 16 D Cleaning agent 16 Suitable cleaning agents 16 Surfaces in the cooking compartment 17 Keeping the appliance clean 18 Cleaning the cooking compartment 18 p Rails 18 Removing the hook in racks 18 Inserting the hook in rack 18 q Appliance doo...

Page 4: ...he appliance Children must not clean the appliance or carry out general maintenance unless they are at least 15 years old and are being supervised Keep children below the age of 8 years old at a safe distance from the appliance and power cable Always slide accessories into the cooking compartment the right way round Accessories on page 11 Close the safety valve on the gas supply line if the cooker...

Page 5: ...damaged or be set on fire Grease residue in the filter of the extractor hood may ignite Only operate the gas burners with cookware on them Risk of fire The rear of the appliance becomes very hot This may cause damage to the power cables Electricity and gas lines must not come into contact with the rear of the appliance Warning Risk of burns The appliance becomes very hot Never touch the interior s...

Page 6: ...to prevent tipping of the appliance this stabilizing means must be installed Refer to the instructions for installation Warning Risk of electric shock Incorrect repairs are dangerous Repairs may only be carried out and damaged power cables replaced by one of our trained after sales technicians If the appliance is defective unplug the appliance from the mains or switch off the circuit breaker in th...

Page 7: ...ance model accessories can scratch the door panel when closing the appliance door Always insert the accessories into the cooking compartment as far as they will go Water in a hot cooking compartment do not pour water into the cooking compartment when it is hot This will cause steam The temperature change can cause damage to the enamel Moist food do not store moist food in the cooking compartment w...

Page 8: ...h cooking Saving energy with the hob Always use a saucepan which is the correct size for your food A larger less full saucepan requires a lot of energy Always place a suitable lid on the saucepan Switch to a lower heat setting in good time The gas flame must always be in contact with the base of the saucepan Environmentally friendly disposal Dispose of packaging in an environmentally friendly mann...

Page 9: ...ust also only be switched on if the hob cover is open Types of gas burner Explanation 1 Electronic clock 2 Control knob for oven temperature 3 Oven indicator light 4 Control knob for oven functions 5 Control knob for hotplates Symbol Meaning Use 0 Electronic clock Sets the cooking time or the time Minus Reduces the cooking time or the time Plus Increases the cooking time or the time Explanation 1 ...

Page 10: ...weight on it Never use two burners or heat sources to heat one single pan Do not use grill pans earthenware casserole dishes etc for a long period of time on maximum power Setting Meaning Û Off Large flame highest power Economy flame lowest power Type of heating Use Hot air For baking and cooking on one or more levels The fan distributes the heat from the ring heating element in the back panel eve...

Page 11: ...ge of accessories Here you can find an overview of the accessories included and information on how to use them correctly The baking tray and the baking and roasting shelf can be moved into five different heights within the cooking compartment Always insert them as far as they will go so that the accessories do not touch the door panel Ensure that you always insert the accessories into the cooking ...

Page 12: ...ug is at the rear and is facing downwards The open side must be facing the appliance door and the outer rail must be facing downwards When inserting baking trays ensure that lug is at the rear and is facing downwards The sloping edge of the accessory ƒ must be facing towards the appliance door Example in the picture Universal pan Special accessories You can buy accessories from the after sales ser...

Page 13: ...outside of the appliance with a soft damp cloth 5 Clean the cooking compartment with hot soapy water Heating up the oven To remove the new cooker smell heat up the oven when it is empty and closed 1 Turn the temperature selector to the maximum temperature 2 Switch off the oven after 45 minutes Recleaning the oven 1 Clean the cooking compartment with hot soapy water 2 Fit the hook in racks Cleaning...

Page 14: ...e Never leave the gas burner unattended during operation Ensure that there are no draughts If the gas burner does not ignite In the event of a power cut or damp ignition plugs light the gas burner with a gas lighter or a match Switching off the gas burner Turn the control knob for the required hotplate to position Û Oven Operating the oven Switching on the oven Note Always keep the appliance door ...

Page 15: ...eheat the oven using the type of heating Only set the G type of heating once the rotary spit has been inserted 1 Turn the control knob for the oven to the G position 2 Set the temperature Note Add some water to the universal pan in order to catch any fat that drips out Removing the rotary spit Warning Risk of burns Never touch the hot surfaces of the cooking compartment or the heating elements Chi...

Page 16: ...care for and clean your appliance Warning Risk of electric shock Do not use any high pressure cleaners or steam cleaners which can result in an electric shock Warning Risk of burns The appliance becomes very hot Never touch the interior surfaces of the cooking compartment or the heating elements Always allow the appliance to cool down Keep children at a safe distance Suitable cleaning agents Obser...

Page 17: ...er and a sponge cloth Do not rub the surface and do not use abrasive cleaning aids Aluminium and plastic Glass cleaner Clean with a soft cloth Gas hob and pan supports Hot soapy water Use very little water Water must not be allowed to enter the appliance through the base of the burn ers Clean boiled over liquids and spilt food immedi ately You can remove the pan supports Do not clean the pan suppo...

Page 18: ...t with a cloth Warning Risk of burns The appliance becomes very hot Never touch the interior surfaces of the cooking compartment or the heating elements Always allow the appliance to cool down Keep children at a safe distance pRails Rails Removing the hook in racks The hook in racks are each fixed to the side panels of the cooking compartment at three points 1 Grip the front of the hook in rack an...

Page 19: ...nel does not fall 5 Remove the inner panel Clean the panels with glass cleaner and a soft cloth Warning Risk of injury Scratched glass in the appliance door may develop into a crack Do not use a glass scraper sharp or abrasive cleaning aids or detergents Fitting the door panels 1 Reinsert the inner panel Note All four fastening pins must engage in the holders provided for them 2 Remove the locking...

Page 20: ...epairs to the appliance must only be carried out by a qualified technician If repairs are required contact the after sales service Fault table E D Fault Possible cause Remedy information The appliance does not work The circuit breaker is faulty Look in the fuse box and check that the circuit breaker is in working order Power cut Check whether the kitchen light works Zeros flash in the display Powe...

Page 21: ...t bulb 7 Replace the oven light bulb with a bulb of the same type Voltage 230 V Power 40 W Fitting G9 Temperature resistance 300 C 8 Refit the glass cover for the oven light bulb 9 Refit the hook in racks 10 Remove the tea towel 11 Switch the circuit breaker back on 12 Check that the oven lighting is working again 4Customer service Customerservice Our after sales service is there for you if your a...

Page 22: ...lf position Temperature in C Cooking time in mins Lasagne 3 4 1 220 230 45 50 Pasta bake 3 4 1 220 230 45 50 Roast veal 2 N 2 180 190 90 100 Pork 2 N 2 180 190 70 80 Sausages 1 5 7 4 Max 15 Roast beef 1 N 2 200 40 45 Roast rabbit 1 5 2 180 190 70 80 Turkey breast 2 N 2 180 190 110 120 Pork neck joint 2 3 N 2 180 190 170 180 Roast chicken 1 2 N 2 180 190 65 70 Pork cutlet 1 5 7 4 Max 1st side 15 2n...

Page 23: ...light on top and too dark underneath Bake the cake one level higher in the oven the next time The cake is too dark on top and too light underneath Bake the cake one level lower in the oven the next time Select a lower temperature and extend the baking time Cakes baked in a tray or tin are too brown at the back Place the baking tray in the middle of the accessories not directly against the back wal...

Page 24: ...a smaller roasting dish and add more liquid if necessary The roast looks good but the juices are too clear and watery Next time use a larger roasting dish and add less liquid if necessary The meat gets burned during brais ing The roasting dish and lid must fit together well and close properly Reduce the temperature and add more liquid when braising if necessary Tips for keeping acrylamide to a min...

Page 25: ...ﺑﺮﻳﺎﻥ ﻇﺮﻑ ﺩﺭﺏ ﮐﻨﻴﺪ ﺍﺿﺎﻓﻪ ﺑﻴﺸﺘﺮی ﻣﺎﻳﻊ ﻧﻴﺎﺯ ﺻﻮﺭﺕ ﺩﺭ ﺩﺍﺩﻥ ﺗﻔﺖ ﻫﻨﮕﺎﻡ ﺩﺭ ﻭ ﮐﻨﻴﺪ ﮐﻢ ﺭﺍ ﺣﺮﺍﺭﺕ ﻏﺫﺍﻳﯽ ﻣﻭﺍﺩ ﺩﺭ ﺁﻣﻳﺩ ﺁﮐﺭﻳﻝ ﺯﻣﻴﻨﯽ ﺳﻴﺐ ﻭ ﻏﻼﺕ ﺣﺎﻭی ﻣﺤﺼﻮﻻﺕ ﺩﺭ ﮐﻠﯽ ﺻﻮﺭﺕ ﺑﻪ ﺁﻣﻴﺪ ﺁﮐﺮﻳﻞ ﺯﻣﻴﻨﯽ ﺳﻴﺐ ﭼﻴﭙﺲ ﻣﺜﻞ ﻳﺪ ﺁ ﻣﯽ ﻭﺟﻮﺩ ﺑﻪ ﺷﻮﻧﺪ ﻣﯽ ﺗﻬﻴﻪ ﺑﺎﻻ ﺩﻣﺎی ﺩﺭ ﮐﻪ ﭘﺨﺘﻪ ﻣﺤﺼﻮﻻﺕ ﻳﺎ ﻣﻌﻤﻮﻟﯽ ﻧﺎﻥ ﺑﺎﮔﺖ ﻧﺎﻥ ﺗﺴﺖ ﻧﺎﻥ ﭼﻴﭙﺲ ﺩﻳﮕﺮ ﺍﻧﻮﺍﻉ ﺧﺸﮏ ﺷﻴﺮﻳﻨﯽ ﺯﻧﺠﺒﻴﻠﯽ ﻧﺎﻥ ﺑﻴﺴﮑﻮﺋﻴﺖ ﺁﻣﺎﺩﻩ ﺷﺪﻩ ﺁﻣﻳﺩ ﺁﮐﺭﻳﻝ ﺭﺳﺎﻧﺩﻥ ﺣﺩﺍﻗﻝ ﺑﻪ ﺭﻭﺵ ﺑﺎﺭﻩ ﺩﺭ ﻧﮑﺎﺗﯽ ً ﻋﻤﻮﻣﺎ ﮐﻨﻴﺪ ﮐﻮﺗﺎﻩ ﺍﻣﮑﺎﻥ ...

Page 26: ...ﺎﺏ ﺻﺤﻴﺢ ﭘﺨﺖ ﻇﺮﻑ ﻭ ﻃﺒﻘﻪ ﺍﮔﺮ ﮐﻨﻴﺪ ﺑﻴﺸﺘﺮ ﺭﺍ ﭘﺨﺖ ﺍﻣﺎ ﺍﺳﺖ ﺭﻭﺷﻦ ﺑﺴﻴﺎﺭ ﮐﻴﮏ ﺭﻭی ﺍﺳﺖ ﺷﺪﻩ ﺗﻴﺮﻩ ﺑﺴﻴﺎﺭ ﺁﻥ ﺯﻳﺮ ﺩﻫﻴﺪ ﻗﺮﺍﺭ ﺑﺎﻻﺗﺮ ﻃﺒﻘﻪ ﻳﮏ ﺭﺍ ﮐﻴﮏ ﺑﻌﺪ ﺩﻓﻌﻪ ﺯﻳﺮ ﺍﻣﺎ ﺍﺳﺖ ﺗﻴﺮﻩ ﺑﺴﻴﺎﺭ ﮐﻴﮏ ﺭﻭی ﺍﺳﺖ ﺷﺪﻩ ﺭﻭﺷﻦ ﺑﺴﻴﺎﺭ ﺁﻥ ﺍﻓﺰﺍﻳﺶ ﺭﺍ ﭘﺨﺖ ﺯﻣﺎﻥ ﻭ ﮐﻨﻴﺪ ﺍﻧﺘﺨﺎﺏ ﺭﺍ ﺗﺮی ﭘﺎﻳﻴﻦ ﺣﺮﺍﺭﺕ ﺩﻫﻴﺪ ﻗﺮﺍﺭ ﺗﺮ ﭘﺎﻳﻴﻦ ﻃﺒﻘﻪ ﻳﮏ ﺭﺍ ﮐﻴﮏ ﺑﻌﺪ ﺩﻓﻌﻪ ﺩﻫﻴﺪ ﻗﺎﻟﺐ ﻳﺎ ﺳﻴﻨﯽ ﺩﺭ ﺷﺪﻩ ﭘﺨﺘﻪ ﻫﺎی ﮐﻴﮏ ﺍﻧﺪ ﺷﺪﻩ ﺑﺮﺷﺘﻪ ﺑﺴﻴﺎﺭ ﭘﺸﺖ ﺍﺯ ﭘﺸﺘﯽ ﺩﻳﻮﺍﺭﻩ ﮐﻨﺎﺭ ﻭ ﺍﻧﺘﻬﺎ ﺩﺭ ﻧﻪ ﻭ ﺩﻫﻴﺪ ﻗﺮﺍﺭ ﺟﺎﻧﺒﯽ ...

Page 27: ...ﻠﻭﮔﺭﻡ ﻭﺯﻥ ﮔﺭﻣﺎﺩﻫﯽ ﺣﺎﻟﺕ ﻁﺑﻘﻪ ﻣﻭﻗﻌﻳﺕ ﺩﺭﺟﻪ ﺣﺳﺏ ﺑﺭ ﺩﻣﺎ ﮔﺭﺍﺩ ﺳﺎﻧﺗﯽ ﺩﻗﻳﻘﻪ ﺑﻪ ﭘﺧﺕ ﺯﻣﺎﻥ ﻻﺯﺍﻧﻴﺎ 4 3 1 230 220 50 45 ﭘﺎﺳﺘﺎ ﮔﺮﺍﺗﻴﻨﻪ 4 3 1 230 220 50 45 ﮔﻮﺳﺎﻟﻪ ﺗﯽ ُ ﺭ 2 N 2 190 180 100 90 ﺳﻮﺳﻴﺲ 1 5 7 4 ﺣﺪﺍﮐﺜﺮ 15 ﺑﻴﻒ ﺭﺳﺖ 1 N 2 200 45 40 ﺑﺮﻳﺎﻥ ﺧﺮﮔﻮﺵ 1 5 2 190 180 80 70 ﺑﻮﻗﻠﻤﻮﻥ ﺳﻴﻨﻪ 2 N 2 190 180 120 110 ﺑﺮﻳﺎﻥ ﻣﺮﻍ 1 2 N 2 190 180 70 65 ﺍﺳﺘﺨﻮﺍﻥ ﺑﺎ ﺩﻧﺪﻩ ﮔﻮﺷﺖ 1 5 7 4 ﺣﺪﺍﮐﺜﺮ 10 ﺍﻭﻝ ﻃﺮﻑ 10 ﺩﻭﻡ ﻃﺮﻑ ﺑﻴﮑﻦ 0 7 5 ﺣﺪﺍﮐﺜﺮ 7...

Page 28: ... ﺩﭼﺎﺭ ﺍی ﺷﻴﺸﻪ 6 ﮐﻨﻴﺪ ﺑﺎﺯ ﺭﺍ ﻓﺮ ﻻﻣﭗ 7 ﮐﻨﻴﺪ ﺗﻌﻮﻳﺾ ﻧﻮﻉ ﻫﻤﺎﻥ ﺍﺯ ﻻﻣﭗ ﻳﮏ ﺑﺎ ﺭﺍ ﻓﺮ ﻻﻣﭗ ﻭﻟﺖ 230 ﻭﻟﺗﺎژ ﻭﺍﺕ 40 ﺗﻭﺍﻥ G9 ﺳﺭﭘﻳﭻ ﮔﺮﺍﺩ ﺳﺎﻧﺘﯽ ﺩﺭﺟﻪ 300 ﺣﺭﺍﺭﺗﯽ ﻣﻘﺎﻭﻣﺕ 8 ﮐﻨﻴﺪ ﻧﺼﺐ ﺩﻭﺑﺎﺭﻩ ﺭﺍ ﻓﺮ ﭼﺮﺍﻍ ﺍی ﺷﻴﺸﻪ ﺩﺭﭘﻮﺵ 9 ﮐﻨﻴﺪ ﻧﺼﺐ ﺩﻭﺑﺎﺭﻩ ﺭﺍ ﺩﺍﺭ ﻗﻼﺏ ﻫﺎی ﺭﻳﻞ 10 ﺑﺮﺩﺍﺭﻳﺪ ﺭﺍ ﺁﺷﭙﺰﺧﺎﻧﻪ ﺣﻮﻟﻪ 11 ﮐﻨﻴﺪ ﻭﺻﻞ ﺩﻭﺑﺎﺭﻩ ﺭﺍ ﺟﺮﻳﺎﻥ ﻗﻄﻊ ﮐﻠﻴﺪ 12 ﮐﻨﺪ ﻣﯽ ﮐﺎﺭ ﺩﻭﺑﺎﺭﻩ ﻓﺮ ﭼﺮﺍﻍ ﮐﻪ ﮐﻨﻴﺪ ﮐﻨﺘﺮﻝ ﻣﺷﺗﺭﻳﺎﻥ ﺧﺩﻣﺎﺕ 4 ﺍﺯ ﭘﺲ ﺧﺪﻣﺎﺕ ﺑﺎﺷﺪ ﺩﺍﺷﺘﻪ ﺗﻌﻤﻴﺮ ﺑﻪ ﻧﻴﺎﺯ ﺷﻤﺎ ﺩﺳﺘﮕﺎﻩ...

Page 29: ... ﻧﻴﺎﺯ ﺻﻮﺭﺕ ﺩﺭ ﺷﻮﺩ ﺍﻧﺠﺎﻡ ﻣﺠﺎﺯ ﺗﮑﻨﻴﺴﻴﻦ ﺗﻮﺳﻂ ﺑﺎﻳﺪ ﺑﮕﻴﺮﻳﺪ ﺗﻤﺎﺱ ﻓﺮﻭﺵ ﺍﺯ ﭘﺲ ﺧﺪﻣﺎﺕ ﻣﺮﮐﺰ ﺍﻳﺭﺍﺩﻫﺎ ﺟﺩﻭﻝ ﺍﻳﺭﺍﺩ ﺍﺣﺗﻣﺎﻟﯽ ﻋﻠﺕ ﺍﻁﻼﻋﺎﺕ ﺣﻝ ﺭﺍﻩ ﮐﻨﺪ ﻧﻤﯽ ﮐﺎﺭ ﺩﺳﺘﮕﺎﻩ ﺍﺳﺖ ﻣﻌﻴﻮﺏ ﺑﺮﻕ ﺟﺮﻳﺎﻥ ﻗﻄﻊ ﮐﻠﻴﺪ ﺟﻌﺒﻪ ﺩﺍﺧﻞ ﺩﺭ ﺭﺍ ﺟﺮﻳﺎﻥ ﻗﻄﻊ ﮐﻠﻴﺪ ﺻﺤﻴﺢ ﻋﻤﻠﮑﺮﺩ ﮐﻨﻴﺪ ﺑﺮﺭﺳﯽ ﻓﻴﻮﺯ ﺑﺮﻕ ﻗﻄﻌﯽ ﺧﻴﺮ ﻳﺎ ﺷﻮﺩ ﻣﯽ ﺭﻭﺷﻦ ﺁﺷﭙﺰﺧﺎﻧﻪ ﻻﻣﭗ ﮐﻨﻴﺪ ﺑﺮﺭﺳﯽ ﭼﺸﻤﮏ ﻧﻤﺎﻳﺶ ﺻﻔﺤﻪ ﺭﻭی ﺑﺮ ﺻﻔﺮﻫﺎ ﺯﻧﻨﺪ ﻣﯽ ﺑﺮﻕ ﻗﻄﻌﯽ ﮐﻨﻴﺪ ﺗﻨﻈﻴﻢ ً ﻣﺠﺪﺩﺍ ﺭﺍ ﺳﺎﻋﺖ ﺷﻮﺩ ﻧﻤﯽ ﺭﻭﺷﻦ ﻓﺮ ﭼﺮﺍﻍ ﺩﺍﺭﺩ ﺍﻳﺮﺍﺩ ﻓﺮ ﭼﺮﺍﻍ ﻻﻣ...

Page 30: ...ﺑﻴﺮﻭﻥ ﺭﺍ ﺩﺍﺧﻠﯽ ﺷﻴﺸﻪ ﮐﻨﻴﺪ ﺗﻤﻴﺰ ﻧﺮﻡ ﺩﺳﺘﻤﺎﻝ ﻭ ﺷﻮی ﺷﻴﺸﻪ ﺍﺯ ﺍﺳﺘﻔﺎﺩﻩ ﺑﺎ ﺭﺍ ﻫﺎ ﺷﻴﺸﻪ ﺟﺭﺍﺣﺕ ﺑﺭﻭﺯ ﺧﻁﺭ ﻫﺷﺩﺍﺭ ﺍﺯ ﺷﻮﺩ ﺗﺮک ﺑﻪ ﺗﺒﺪﻳﻞ ﺍﺳﺖ ﻣﻤﮑﻦ ﺩﺳﺘﮕﺎﻩ ﺩﺭﺏ ﺭﻭی ﺧﺮﺍﺷﻴﺪﻩ ﺷﻴﺸﻪ ﺍﺳﺘﻔﺎﺩﻩ ﻫﺎ ﮐﻨﻨﺪﻩ ﭘﺎک ﻳﺎ ﺳﺎﻳﻨﺪﻩ ﻳﺎ ﺗﻨﺪ ﺷﻮﻳﻨﺪﻩ ﻣﻮﺍﺩ ﮐﻦ ﭘﺎک ﺷﻴﺸﻪ ﺗﻴﻐﻪ ﻧﮑﻨﻴﺪ ﺩﺭﺏ ﻫﺎی ﺷﻳﺷﻪ ﮔﺫﺍﺷﺗﻥ ﺟﺎ 1 ﮐﻨﻴﺪ ﺩﺍﺧﻞ ﺩﻭﺑﺎﺭﻩ ﺭﺍ ﺩﺍﺧﻠﯽ ﺷﻴﺸﻪ ﻣﺨﺼﻮﺹ ﻫﺎی ﻧﮕﻬﺪﺍﺭﻧﺪﻩ ﺩﺭ ﺑﺎﻳﺪ ﮐﻨﻨﺪﻩ ﻣﺤﮑﻢ ﮔﻴﺮﻩ ﭼﻬﺎﺭ ﻫﺮ ﺗﻭﺟﻪ ﺑﻴﺎﻓﺘﻨﺪ ﺟﺎ ﺧﻮﺩ 2 ﺑﺒﻨﺪﻳﺪ ﺭﺍ ﻓﺮ ﺩﺭﺏ ﻭ ﺑﺮﺩﺍﺭﻳﺪ ﺭﺍ ﮐﻨﻨﺪﻩ ﻗﻔﻞ ﻫﺎ...

Page 31: ...ﭘﺲ ﺭﺍ ﺩﺳﺘﮕﺎﻩ 5 ﺷﻮﺩ ﺧﻨﮏ ﺩﺳﺘﮕﺎﻩ ﺗﺎ ﮐﻨﻴﺪ ﺻﺒﺮ 6 ﮐﻨﻴﺪ ﺗﻤﻴﺰ ﻧﺮﻡ ﭘﺎﺭﭼﻪ ﻳﮏ ﺑﺎ ﺭﺍ ﭘﺨﺖ ﻣﺤﻔﻈﻪ ﺳﻭﺧﺗﮕﯽ ﺧﻁﺭ ﻫﺷﺩﺍﺭ ﻫﺎی ﺍﻟﻤﻨﺖ ﻳﺎ ﭘﺨﺖ ﻣﺤﻔﻈﻪ ﺩﺍﻍ ﺳﻄﻮﺡ ﻫﺮﮔﺰ ﺷﻮﺩ ﻣﯽ ﺩﺍﻍ ﺑﺴﻴﺎﺭ ﺩﺳﺘﮕﺎﻩ ﺍﺟﺎﺯﻩ ﺷﻮﺩ ﺧﻨﮏ ﺩﺳﺘﮕﺎﻩ ﮐﻪ ﺩﻫﻴﺪ ﺍﺟﺎﺯﻩ ﻫﻤﻴﺸﻪ ﻧﮑﻨﻴﺪ ﻟﻤﺲ ﺭﺍ ﺣﺮﺍﺭﺗﯽ ﺷﻮﻧﺪ ﻧﺰﺩﻳﮏ ﺩﺳﺘﮕﺎﻩ ﺑﻪ ﺣﺪ ﺍﺯ ﺑﻴﺶ ﮐﻮﺩﮐﺎﻥ ﻧﺪﻫﻴﺪ ﻫﺎ ﺭﻳﻝ p ﺩﺍﺭ ﻗﻼﺏ ﻫﺎی ﺭﻳﻝ ﺑﺭﺩﺍﺷﺗﻥ ﻓﺮ ﻣﺤﻔﻈﻪ ﮐﻨﺎﺭی ﻫﺎی ﺩﻳﻮﺍﺭﻩ ﺑﻪ ﻧﻘﻄﻪ ﺳﻪ ﺩﺭ ﺩﺍﺭ ﻗﻼﺏ ﺭﻳﻞ ﺍﺯ ﮐﺪﺍﻡ ﻫﺮ ﺍﻧﺪ ﺷﺪﻩ ﻣﺤﮑﻢ 1 ﺑﮑﺸﻴﺪ ﺑﻴﺮﻭﻥ ﻓﺮ ﻣﺤﻔﻈﻪ ﻭﺳ...

Page 32: ...ﺟﺎﻧﺒﯽ ﻟﻮﺍﺯﻡ ﺩﺍﻍ ﺻﺎﺑﻮﻥ ﺁﺏ ﮐﻨﻴﺪ ﺗﻤﻴﺰ ﺑﺮﺱ ﻳﺎ ﺁﺷﭙﺰﺧﺎﻧﻪ ﺩﺳﺘﻤﺎﻝ ﺑﺎ ﻭ ﮐﻨﻴﺪ ﺧﻴﺲ ﭘﺪ ﺍﺯ ﺳﻨﮕﻴﻦ ﻫﺎی ﺟﺮﻡ ﻭﺟﻮﺩ ﺻﻮﺭﺕ ﺩﺭ ﮐﻨﻴﺪ ﺍﺳﺘﻔﺎﺩﻩ ﺯﻧﮓ ﺿﺪ ﺍﺳﺘﻴﻞ ﺗﻤﻴﺰﮐﺎﺭی ﺗﻭﺟﻪ ﺍﺳﺘﻔﺎﺩﻩ ﺩﻟﻴﻞ ﺑﻪ ﺩﺳﺘﮕﺎﻩ ﺟﻠﻮی ﻗﺴﻤﺖ ﺩﺭ ﺭﻧﮓ ﺟﺰﺋﯽ ﺍﺧﺘﻼﻓﺎﺕ ﻭﺟﻮﺩ ﺩﺳﺘﮕﺎﻩ ﺳﺎﺧﺖ ﺩﺭ ﻓﻠﺰ ﻭ ﭘﻼﺳﺘﻴﮏ ﺷﻴﺸﻪ ﻫﻤﺎﻧﻨﺪ ﻣﺨﺘﻠﻒ ﻣﻮﺍﺩ ﺍﺯ ﺑﺎﺷﺪ ﻣﯽ ﺁﻥ ﺩﺍﺧﻞ ﻻﻣﭗ ﻧﻮﺭ ﺍﻧﻌﮑﺎﺱ ﻓﺮ ﺩﺭﺏ ﺷﻴﺸﻪ ﺭﻭی ﺭﺍﻩ ﺭﺍﻩ ﻫﺎی ﺳﺎﻳﻪ ﺍﺳﺖ ﺑﺎﻋﺚ ﺗﻮﺍﻧﺪ ﻣﯽ ﻣﻮﺿﻮﻉ ﺍﻳﻦ ﺍﺳﺖ ﺷﺪﻩ ﭘﺨﺘﻪ ﺑﺎﻻ ﺑﺴﻴﺎﺭ ﺩﻣﺎی ﺩﺭ ﻟﻌﺎﺏ ﺑﺮ ﺗﺄﺛﻴﺮی ﻭ ﺍﺳﺖ...

Page 33: ... ﺧﻁﺭ ﻫﺷﺩﺍﺭ ﺯﻳﺮﺍ ﻧﮑﻨﻴﺪ ﺍﺳﺘﻔﺎﺩﻩ ﺑﺨﺎﺭﺷﻮی ﻳﺎ ﻓﺸﺎﺭ ﭘﺮ ﺷﺴﺘﺸﻮی ﻫﺎی ﺩﺳﺘﮕﺎﻩ ﺍﺯ ﮔﺮﺩﺩ ﮔﺮﻓﺘﮕﯽ ﺑﺮﻕ ﺍﻳﺠﺎﺩ ﺑﺎﻋﺚ ﺗﻮﺍﻧﺪ ﻣﯽ ﺳﻭﺧﺗﮕﯽ ﺧﻁﺭ ﻫﺷﺩﺍﺭ ﻫﺎی ﺍﻟﻤﻨﺖ ﻳﺎ ﭘﺨﺖ ﻣﺤﻔﻈﻪ ﺩﺍﻍ ﺳﻄﻮﺡ ﻫﺮﮔﺰ ﺷﻮﺩ ﻣﯽ ﺩﺍﻍ ﺑﺴﻴﺎﺭ ﺩﺳﺘﮕﺎﻩ ﺍﺟﺎﺯﻩ ﺷﻮﺩ ﺧﻨﮏ ﺩﺳﺘﮕﺎﻩ ﮐﻪ ﺩﻫﻴﺪ ﺍﺟﺎﺯﻩ ﻫﻤﻴﺸﻪ ﻧﮑﻨﻴﺪ ﻟﻤﺲ ﺭﺍ ﺣﺮﺍﺭﺗﯽ ﺷﻮﻧﺪ ﻧﺰﺩﻳﮏ ﺩﺳﺘﮕﺎﻩ ﺑﻪ ﺣﺪ ﺍﺯ ﺑﻴﺶ ﮐﻮﺩﮐﺎﻥ ﻧﺪﻫﻴﺪ ﻣﻧﺎﺳﺏ ﮐﻧﻧﺩﻩ ﺗﻣﻳﺯ ﻣﻭﺍﺩ ﮐﻨﻨﺪﻩ ﭘﺎک ﻣﺎﺩﻩ ﺍﺯ ﺍﺳﺘﻔﺎﺩﻩ ﺩﻟﻴﻞ ﺑﻪ ﻣﺨﺘﻠﻒ ﺳﻄﻮﺡ ﺍﻳﻨﮑﻪ ﺍﺯ ﺍﻃﻤﻴﻨﺎﻥ ﺑﺮﺍی ﮐﻨﻴﺪ ﻣﻄﺎﻟﻌﻪ ﺭﺍ ﺯﻳﺮ ﺍﻃﻼ...

Page 34: ...ﻟﺖ ﺑﺎ ﺭﺍ ﻓﺮ ﮔﺮﺩﺍﻥ ﺳﻴﺦ ﺍﺯ ﺍﺳﺘﻔﺎﺩﻩ ﻫﻨﮕﺎﻡ ﺗﻭﺟﻪ ﮔﺮﺩﺍﻥ ﺳﻴﺦ ﮐﻪ ﮐﻨﻴﺪ ﺍﻧﺘﺨﺎﺏ ﺯﻣﺎﻧﯽ ﻓﻘﻂ ﺭﺍ G ﮔﺮﻣﺎﺩﻫﯽ ﺣﺎﻟﺖ ﮐﻨﻴﺪ ﮔﺮﻡ ﺍﺳﺖ ﺷﺪﻩ ﺩﺍﺩﻩ ﻗﺮﺍﺭ ﻣﺤﻞ ﺩﺭ 1 ﺑﭽﺮﺧﺎﻧﻴﺪ G ﻣﻮﻗﻌﻴﺖ ﺭﻭی ﺭﺍ ﻓﺮ ﺗﻨﻈﻴﻢ ﭘﻴﭻ 2 ﮐﻨﻴﺪ ﺗﻨﻈﻴﻢ ﺭﺍ ﺩﻣﺎ ﻣﻘﺪﺍﺭی ﻣﻨﻈﻮﺭﻩ ﻫﻤﻪ ﺳﻴﻨﯽ ﺩﺭ ﭼﺮﺑﯽ ﻫﺎی ﭼﮑﻪ ﺁﻭﺭی ﺟﻤﻊ ﺑﺮﺍی ﺗﻭﺟﻪ ﺑﺮﻳﺰﻳﺪ ﺁﺏ ﮔﺭﺩﺍﻥ ﺳﻳﺦ ﺑﺭﺩﺍﺷﺗﻥ ﺳﻭﺧﺗﮕﯽ ﺧﻁﺭ ﻫﺷﺩﺍﺭ ﻧﮑﻨﻴﺪ ﻟﻤﺲ ﺭﺍ ﺣﺮﺍﺭﺗﯽ ﻫﺎی ﺍﻟﻤﻨﺖ ﻳﺎ ﭘﺨﺖ ﻣﺤﻔﻈﻪ ﺩﺍﻍ ﺳﻄﻮﺡ ﻫﺮﮔﺰ ﺩﺳﺘﮕﺎﻩ ﺩﺭﺏ ﺩﺍﺭﻳﺪ ﻧﮕﻪ ﺩﺳﺘﮕﺎﻩ ﺍﺯ ﺍﻳﻤﻦ ﺍی ﻓﺎﺻﻠﻪ ﺩﺭ ﺭ...

Page 35: ... ﭘﻴﭻ ﮐﻨﻴﺪ ﺭﻭﺷﻦ ﺳﻭﺯی ﺁﺗﺵ ﺧﻁﺭ ﻫﺷﺩﺍﺭ ﻫﺮﮔﺰ ﺷﻮﺩ ﻣﯽ ﭘﺨﺶ ﻓﻀﺎ ﺩﺭ ﮔﺎﺯ ﺷﻌﻠﻪ ﺷﺪﻥ ﺧﺎﻣﻮﺵ ﺻﻮﺭﺕ ﺩﺭ ﮐﻨﻴﺪ ﺣﺎﺻﻞ ﺍﻃﻤﻴﻨﺎﻥ ﻧﮑﻨﻴﺪ ﺭﻫﺎ ﻧﻈﺎﺭﺕ ﺑﺪﻭﻥ ﮐﺎﺭ ﻫﻨﮕﺎﻡ ﺭﺍ ﮔﺎﺯ ﺳﺮﺷﻌﻠﻪ ﺑﺎﺷﺪ ﻧﺪﺍﺷﺘﻪ ﻭﺟﻮﺩ ﻫﻮﺍ ﺟﺮﻳﺎﻥ ﻧﺷﺩ ﻣﺷﺗﻌﻝ ﮔﺎﺯ ﺳﺭﺷﻌﻠﻪ ﺍﮔﺭ ﻓﻨﺪک ﻫﺎی ﺷﻤﻌﮏ ﺷﺪﻥ ﻣﺮﻃﻮﺏ ﻳﺎ ﺑﺮﻕ ﺟﺮﻳﺎﻥ ﻗﻄﻊ ﺻﻮﺭﺕ ﺩﺭ ﮐﻨﻴﺪ ﺭﻭﺷﻦ ﮐﺒﺮﻳﺖ ﻳﺎ ﻓﻨﺪک ﻳﮏ ﺍﺯ ﺍﺳﺘﻔﺎﺩﻩ ﺑﺎ ﺭﺍ ﮔﺎﺯ ﺳﺮﺷﻌﻠﻪ ﮔﺎﺯ ﺳﺭﺷﻌﻠﻪ ﮐﺭﺩﻥ ﺧﺎﻣﻭﺵ ﺑﭽﺮﺧﺎﻧﻴﺪ Û ﻣﻮﻗﻌﻴﺖ ﺑﻪ ﺭﺍ ﻧﻈﺮ ﻣﻮﺭﺩ ﺷﻌﻠﻪ ﺗﻨﻈﻴﻢ ﭘﻴﭻ ﻓﺭ ﻓﺭ ﺑﺎ ﮐﺭﺩﻥ ﮐﺎﺭ ﻓﺭ ﮐﺭﺩﻥ ﺭ...

Page 36: ...ﻳﮏ ﺑﺎ 5 ﮐﻨﻴﺪ ﺗﻤﻴﺰ ﺩﺍﻍ ﺻﺎﺑﻮﻥ ﺁﺏ ﺍﺯ ﺍﺳﺘﻔﺎﺩﻩ ﺑﺎ ﺭﺍ ﭘﺨﺖ ﻣﺤﻔﻈﻪ ﻓﺭ ﮐﺭﺩﻥ ﮔﺭﻡ ﺑﺴﺘﻪ ﺁﻥ ﺩﺭﺏ ﻭ ﺧﺎﻟﯽ ﻭﻗﺘﯽ ﺭﺍ ﻓﺮ ﻧﻮ ﺩﺳﺘﮕﺎﻩ ﺑﻮی ﮐﺮﺩﻥ ﻃﺮﻑ ﺑﺮ ﺑﺮﺍی ﮐﻨﻴﺪ ﮔﺮﻡ ﺍﺳﺖ 1 ﺑﭽﺮﺧﺎﻧﻴﺪ ﺣﺪﺍﮐﺜﺮ ﺣﺮﺍﺭﺕ ﺗﺎ ﺭﺍ ﺩﻣﺎ ﺍﻧﺘﺨﺎﺑﮕﺮ 2 ﮐﻨﻴﺪ ﺧﺎﻣﻮﺵ ﺭﺍ ﻓﺮ ﺩﻗﻴﻘﻪ 45 ﺍﺯ ﭘﺲ ﻓﺭ ﻣﺟﺩﺩ ﮐﺭﺩﻥ ﺗﻣﻳﺯ 1 ﮐﻨﻴﺪ ﺗﻤﻴﺰ ﺩﺍﻍ ﺻﺎﺑﻮﻥ ﺁﺏ ﺍﺯ ﺍﺳﺘﻔﺎﺩﻩ ﺑﺎ ﺭﺍ ﭘﺨﺖ ﻣﺤﻔﻈﻪ 2 ﺩﻫﻴﺪ ﻗﺮﺍﺭ ﺧﻮﺩ ﺟﺎی ﺩﺭ ﺭﺍ ﺩﺍﺭ ﻗﻼﺏ ﻫﺎی ﺭﻳﻞ ﻫﺎ ﮐﻥ ﭘﺧﺵ ﺷﻌﻠﻪ ﻭ ﺳﺭﺷﻌﻠﻪ ﻫﺎی ﭘﻭﻟﮑﯽ ﮐﺭﺩﻥ ﺗﻣﻳﺯ 1 ﻣﺎﻳﻊ ﻭ ﺁﺏ ﺑﺎ ﺭﺍ B ﻫﺎی...

Page 37: ...ﺪ ﺳﻴﻤﯽ ﺗﻮﺭی ﺑﺎﺯ ﺳﻤﺖ ﮔﻴﺮﺩ ﻗﺮﺍﺭ ﭘﺎﻳﻴﻦ ﺳﻤﺖ ﺑﺎﺷﺪ ﭘﺎﻳﻴﻦ ﺑﻪ ﺭﻭ ﺁﻥ ﺑﻴﺮﻭﻧﯽ ﺭﻳﻞ ﻭ ﻋﻘﺐ ﺩﺭ ﺑﺮﺟﺴﺘﮕﯽ ﺷﻮﻳﺪ ﻣﻄﻤﺌﻦ ﭘﺨﺖ ﻫﺎی ﺳﻴﻨﯽ ﺩﺍﺩﻥ ﻗﺮﺍﺭ ﻫﻨﮕﺎﻡ ﺩﺭﺏ ﺳﻤﺖ ﺑﺎﻳﺪ ƒ ﺟﺎﻧﺒﯽ ﻟﻮﺍﺯﻡ ﺩﺍﺭ ﺷﻴﺐ ﻟﺒﻪ ﮔﻴﺮﺩ ﻗﺮﺍﺭ ﭘﺎﻳﻴﻦ ﺳﻤﺖ ﺑﻪ ﻭ ﮔﻴﺮﺩ ﻗﺮﺍﺭ ﺩﺳﺘﮕﺎﻩ ﻣﻨﻈﻮﺭﻩ ﻫﻤﻪ ﺳﻴﻨﯽ ﺷﮑﻞ ﺩﺭ ﺷﺪﻩ ﺩﺍﺩﻩ ﻧﻤﺎﻳﺶ ﻣﺜﺎﻝ ﻭﻳژﻩ ﺟﺎﻧﺑﯽ ﻟﻭﺍﺯﻡ ﺧﺮﻳﺪﺍﺭی ﻓﺮﻭﺵ ﺍﺯ ﭘﺲ ﺧﺪﻣﺎﺕ ﻣﺮﮐﺰ ﺍﺯ ﺗﻮﺍﻧﻴﺪ ﻣﯽ ﺭﺍ ﺟﺎﻧﺒﯽ ﻟﻮﺍﺯﻡ ﻧﻤﺎﻳﻴﺪ ﺟﺎﻧﺑﯽ ﻟﻭﺍﺯﻡ ﺷﺭﺡ ﻟﻌﺎﺑﯽ ﺳﻳﻧﯽ ﻏﺬﺍﻳﯽ ﻣﻮﺍﺩ ﻭ ﻫﺎ ﺷﻴﺮﻳﻨﯽ ﻭ ﻫﺎ ﻧﺎﻥ ﺑﺮﺍی ﮐﻮ...

Page 38: ...ﯽ ﻟﻭﺍﺯﻡ _ ﺑﺎ ﺍﻳﻨﺠﺎ ﺩﺭ ﺍﺳﺖ ﺷﺪﻩ ﺍﺭﺍﺋﻪ ﺟﺎﻧﺒﯽ ﻟﻮﺍﺯﻡ ﺗﻌﺪﺍﺩی ﺑﺎ ﻫﻤﺮﺍﻩ ﺷﻤﺎ ﺩﺳﺘﮕﺎﻩ ﺍﺳﺘﻔﺎﺩﻩ ﺑﻪ ﻣﺮﺑﻮﻁ ﺍﻃﻼﻋﺎﺕ ﻭ ﺩﺳﺘﮕﺎﻩ ﻫﻤﺮﺍﻩ ﺟﺎﻧﺒﯽ ﻟﻮﺍﺯﻡ ﺍﺯ ﮐﻠﯽ ﻧﻤﺎﻳﯽ ﺷﻮﻳﺪ ﻣﯽ ﺁﺷﻨﺎ ﺁﻧﻬﺎ ﺍﺯ ﺻﺤﻴﺢ ﺟﺎﻧﺑﯽ ﻟﻭﺍﺯﻡ ﺷﺭﺡ ﮐﺭﺩﻥ ﺑﺭﻳﺎﻥ ﻭ ﭘﺧﺗﻥ ﺳﻳﻣﯽ ﺗﻭﺭی ﻫﺎی ﻗﺎﻟﺐ ﻓﺮ ﻣﺨﺼﻮﺹ ﻇﺮﻭﻑ ﺑﺮﺍی ﮔﺮﻳﻞ ﻣﻮﺍﺩ ﮔﻮﺷﺖ ﻗﻄﻌﺎﺕ ﮐﻴﮏ ﺯﺩﻩ ﻳﺦ ﻏﺬﺍﻫﺎی ﻣﻧﻅﻭﺭﻩ ﻫﻣﻪ ﺳﻳﻧﯽ ﻏﺬﺍﻫﺎی ﺷﻴﺮﻳﻨﯽ ﺗﺮ ﻫﺎی ﮐﻴﮏ ﺑﺮﺍی ﺳﻴﻨﯽ ﮐﺒﺎﺏ ﺑﺰﺭگ ﻫﺎی ﺗﮑﻪ ﻭ ﺯﺩﻩ ﻳﺦ ﺁﻭﺭی ﺟﻤﻊ ﺑﺮﺍی ﺗﻮﺍﻧﺪ ﻣﯽ ﻣﻨﻈﻮﺭﻩ ﻫﻤﻪ ﻣﺴﺘﻘﻴﻢ ﮔﺮﻳﻞ ...

Page 39: ... ﮐﻨﺘﺮﻝ ﺑﺮﺍی ﺗﻨﻈﻴﻢ ﭘﻴﭻ ﺍﻳﻦ ﺗﻨﻈﻴﻢ ﭘﻴﭻ ﮐﺪﺍﻡ ﺑﻪ ﮔﺎﺯ ﺳﺮﺷﻌﻠﻪ ﺩﻫﻨﺪ ﻣﯽ ﻧﺸﺎﻥ ﺗﻨﻈﻴﻢ ﭘﻴﭻ ﺑﺎﻻی ﻫﺎی ﻋﻼﻣﺖ ﺩﺍﺭﺩ ﺗﻌﻠﻖ ﺗﻧﻅﻳﻣﺎﺕ ﻣﻔﻬﻭﻡ Û ﺧﺎﻣﻮﺵ ﺗﻮﺍﻥ ﺑﺎﻻﺗﺮﻳﻦ ﺯﻳﺎﺩ ﺷﻌﻠﻪ ﺗﻮﺍﻥ ﺗﺮﻳﻦ ﭘﺎﻳﻴﻦ ﮐﻢ ﺷﻌﻠﻪ ﻓﺭ ﺍﻧﺘﺨﺎﺑﮕﺮ ﻫﺴﺘﻴﺪ ﺗﻨﻈﻴﻢ ﭘﻴﭻ ﺩﻭ ﻧﻴﺎﺯﻣﻨﺪ ﺷﻤﺎ ﻓﺮ ﺍﻧﺪﺍﺯی ﺭﺍﻩ ﻣﻨﻈﻮﺭ ﺑﻪ ﺩﻣﺎ ﺍﻧﺘﺨﺎﺑﮕﺮ ﻭ ﻋﻤﻠﮑﺮﺩ ﻓﺭ ﺗﻧﻅﻳﻡ ﭘﻳﭻ ﻋﻣﻠﮑﺭﺩ ﺍﻧﺗﺧﺎﺑﮕﺭ ﮐﻨﻴﺪ ﺗﻨﻈﻴﻢ ﺭﺍ ﻧﻈﺮ ﻣﻮﺭﺩ ﮔﺮﻣﺎﺩﻫﯽ ﻧﻮﻉ ﻋﻤﻠﮑﺮﺩ ﺍﻧﺘﺨﺎﺑﮕﺮ ﺍﺯ ﺍﺳﺘﻔﺎﺩﻩ ﺑﺎ ﮔﺭﻣﺎﺩﻫﯽ ﺣﺎﻟﺕ ﺍﺳﺗﻔﺎﺩﻩ ﺭﻭﺵ ﺩﺍﻍ ﻫﻮﺍی ﻳﺎ ﻃﺒﻘﻪ ﻳﮏ ﺩﺭ...

Page 40: ... ﺭﺍ ﭘﺨﺖ ﺯﻣﺎﻥ ﻳﺎ ﺳﺎﻋﺖ ﺩﻫﺪ ﻣﯽ ﺑﻌﻼﻭﻩ ﺭﺍ ﭘﺨﺖ ﺯﻣﺎﻥ ﻳﺎ ﺳﺎﻋﺖ ﺩﻫﺪ ﻣﯽ ﺍﻓﺰﺍﻳﺶ ﺍﺟﺎﻕ ﺻﻔﺣﻪ ﺳﻭﺧﺗﮕﯽ ﺧﻁﺭ ﻫﺷﺩﺍﺭ ﻳﺎﺑﺪ ﻣﯽ ﺟﺮﻳﺎﻥ ﺑﻴﺮﻭﻥ ﺑﻪ ﺍﺟﺎﻕ ﺻﻔﺤﻪ ﺭﻭی ﺗﻬﻮﻳﻪ ﺷﮑﺎﻑ ﺍﺯ ﺩﺍﻍ ﻫﻮﺍی ﻧﺰﻧﻴﺪ ﺩﺳﺖ ﺗﻬﻮﻳﻪ ﺷﮑﺎﻑ ﺑﻪ ﻫﺮﮔﺰ ﺍﺳﺖ ﻣﺠﻬﺰ ﺍﺟﺎﻕ ﺻﻔﺤﻪ ﺳﺮﭘﻮﺵ ﺑﻪ ﺩﺳﺘﮕﺎﻩ ﺍﮔﺮ ﮐﻨﻴﺪ ﺩﻗﺖ ً ﻟﻄﻔﺎ ﺑﺎﺯ ﺍﺟﺎﻕ ﺳﺮﭘﻮﺵ ﮐﻪ ﺷﻮﻧﺪ ﺭﻭﺷﻦ ﺑﺎﻳﺪ ﺯﻣﺎﻧﯽ ﺗﻨﻬﺎ ﻧﻴﺰ ﻓﺮ ﻫﺎی ﺳﺮﺷﻌﻠﻪ ﺑﺎﺷﺪ ﺗﻭﺿﻳﺢ 1 ﮐﻴﻠﻮﻭﺍﺕ 2 9 ﺑﺰﺭگ ﺳﺮﺷﻌﻠﻪ 2 ﮐﻴﻠﻮﻭﺍﺕ 4 ﻭﻭک ﺳﺮﺷﻌﻠﻪ 3 ﮐﻴﻠﻮﻭﺍﺕ 1 8 ﻣﺘﻮﺳﻂ ﺳﺮﺷﻌﻠﻪ 4 ﺗﻬﻮﻳﻪ ﺷﮑﺎﻑ...

Page 41: ...ﺯ ﻗﺒﻞ ﺩﻗﻴﻘﻪ 10 ﻧﻤﺎﻳﻴﺪ ﺑﺮﺩﺍﺭی ﺑﻬﺮﻩ ﭘﺨﺖ ﻣﺮﺣﻠﻪ ﺍﺗﻤﺎﻡ ﺟﻬﺖ ﺩﺳﺘﮕﺎﻩ ﺍﺟﺎﻕ ﺻﻔﺣﻪ ﺍﺯ ﺍﺳﺗﻔﺎﺩﻩ ﻫﻧﮕﺎﻡ ﺍﻧﺭژی ﻣﺻﺭﻑ ﺩﺭ ﺟﻭﻳﯽ ﺻﺭﻓﻪ ﮐﻨﻴﺪ ﺍﺳﺘﻔﺎﺩﻩ ﻏﺬﺍ ﻣﻘﺪﺍﺭ ﺑﺎ ﻣﺘﻨﺎﺳﺐ ﺍﻧﺪﺍﺯﻩ ﺑﺎ ﺗﺎﺑﻪ ﻣﺎﻫﯽ ﺍﺯ ﻫﻤﻴﺸﻪ ﺩﺍﺭﺩ ﻧﻴﺎﺯ ﺯﻳﺎﺩی ﺍﻧﺮژی ﺑﻪ ﮐﻤﺘﺮ ﻏﺬﺍﻳﯽ ﻣﻮﺍﺩ ﺑﺎ ﺗﺮ ﺑﺰﺭگ ﻣﺎﻫﻴﺘﺎﺑﻪ ﺩﻫﻴﺪ ﻗﺮﺍﺭ ﻣﻨﺎﺳﺐ ﺩﺭﭘﻮﺵ ﻳﮏ ﺗﺎﺑﻪ ﻣﺎﻫﯽ ﺭﻭی ﻫﻤﻴﺸﻪ ﮐﻨﻴﺪ ﮐﻢ ﻣﻨﺎﺳﺐ ﻣﻮﻗﻊ ﺩﺭ ﺭﺍ ﺣﺮﺍﺭﺕ ﺑﺎﺷﺪ ﺗﻤﺎﺱ ﺩﺭ ﺗﺎﺑﻪ ﻣﺎﻫﯽ ﺗﻪ ﺑﺎ ﻫﻤﻴﺸﻪ ﺑﺎﻳﺪ ﮔﺎﺯ ﺷﻌﻠﻪ ﻣﺣﻳﻁﯽ ﺯﻳﺳﺕ ﺍﺻﻭﻝ ﻁﺑﻕ ﺑﺭ ﺩﺳﺗﮕﺎﻩ ﺍﻧﺩﺍﺧﺗﻥ ﺩﻭ...

Page 42: ... ﺁﺳﻴﺐ ﺩﺳﺘﮕﺎﻩ ﻟﻌﺎﺏ ﻭ ﺑﻮﺩ ﻧﺨﻮﺍﻫﻨﺪ ﺻﺤﻴﺢ ﺗﻮﺍﻧﻨﺪ ﻣﯽ ﺟﺎﻧﺒﯽ ﻟﻮﺍﺯﻡ ﺩﺳﺘﮕﺎﻩ ﻣﺪﻝ ﺑﺮﺣﺴﺐ ﺟﺎﻧﺒﯽ ﻟﻮﺍﺯﻡ ﮔﺬﺍﺭی ﺟﺎی ﻟﻮﺍﺯﻡ ﺷﻮﻧﺪ ﺁﻥ ﺷﻴﺸﻪ ﺭﻭی ﺍﻓﺘﺎﺩﻥ ﺧﻂ ﺑﺎﻋﺚ ﻓﺮ ﺩﺭﺏ ﺑﺴﺘﻦ ﻫﻨﮕﺎﻡ ﺟﻠﻮ ﭘﺨﺖ ﻣﺤﻔﻈﻪ ﺩﺍﺧﻞ ﺍﺳﺖ ﻣﻤﮑﻦ ﮐﻪ ﺟﺎﻳﯽ ﺗﺎ ﻫﻤﻴﺸﻪ ﺭﺍ ﺟﺎﻧﺒﯽ ﺑﺒﺮﻳﺪ ﺁﺏ ﺁﻥ ﺩﺍﺧﻞ ﺍﺳﺖ ﺩﺍﻍ ﻓﺮ ﮐﻪ ﻫﻨﮕﺎﻣﯽ ﺩﺍﻍ ﭘﺨﺖ ﻣﺤﻔﻈﻪ ﺩﺭ ﺁﺏ ﺑﻪ ﺗﻮﺍﻧﺪ ﻣﯽ ﺩﻣﺎ ﺗﻐﻴﻴﺮ ﮔﺮﺩﺩ ﻣﯽ ﺑﺨﺎﺭ ﺍﻳﺠﺎﺩ ﺑﺎﻋﺚ ﮐﺎﺭ ﺍﻳﻦ ﻧﺮﻳﺰﻳﺪ ﺑﺮﺳﺎﻧﺪ ﺁﺳﻴﺐ ﻟﻌﺎﺏ ﻃﻮﻻﻧﯽ ﻣﺪﺕ ﺑﺮﺍی ﺭﺍ ﻣﺮﻃﻮﺏ ﻏﺬﺍﻳﯽ ﻣﻮﺍﺩ ﻣﺮﻃﻮﺏ ﻏﺬﺍﻳﯽ ﻣﻮﺍﺩ ﺭﺳﺎﻧ...

Page 43: ...ﺍژﮔﻮﻥ ﺍﺯ ﺟﻠﻮﮔﻴﺮی ﺑﺮﺍی ﻫﺷﺩﺍﺭ ﻧﺼﺐ ﻫﺎی ﺩﺳﺘﻮﺭﺍﻟﻌﻤﻞ ﺑﻪ ﺷﻮﺩ ﺍﺳﺘﻔﺎﺩﻩ ﮐﻨﻨﺪﻩ ﺗﺜﺒﻴﺖ ﻭﺳﻴﻠﻪ ﺍﺯ ﮐﻨﻴﺪ ﺭﺟﻮﻉ ﮔﺭﻓﺗﮕﯽ ﺑﺭﻕ ﺧﻁﺭ ﻫﺷﺩﺍﺭ ﺗﻌﻤﻴﺮﺍﺕ ﺍﺳﺖ ﺧﻄﺮﻧﺎک ﻧﺎﻣﻨﺎﺳﺐ ﻭ ﻏﻴﺮﻣﺠﺎﺯ ﺗﻌﻤﻴﺮﺍﺕ ﺷﺒﮑﻪ ﺩﻳﺪﻩ ﺁﻣﻮﺯﺵ ﻫﺎی ﺗﮑﻨﻴﺴﻴﻦ ﺍﺯ ﻳﮑﯽ ﺗﻮﺳﻂ ﺑﺎﻳﺪ ﻓﻘﻂ ﺻﻮﺭﺕ ﺩﺭ ﮔﻴﺮﺩ ﺻﻮﺭﺕ ﻣﺎ ﻓﺮﻭﺵ ﺍﺯ ﭘﺲ ﺧﺪﻣﺎﺕ ﺧﺎﺭﺝ ﺑﺮﻕ ﭘﺮﻳﺰ ﺍﺯ ﺁﻧﺮﺍ ﺩﻭﺷﺎﺧﻪ ﺩﺳﺘﮕﺎﻩ ﺑﻮﺩﻥ ﻣﻌﻴﻮﺏ ﻣﻨﺰﻝ ﻓﻴﻮﺯ ﺟﻌﺒﻪ ﺩﺭ ﻣﻮﺟﻮﺩ ﺟﺮﻳﺎﻥ ﻗﻄﻊ ﮐﻠﻴﺪ ﻳﺎ ﻭ ﮐﻨﻴﺪ ﺍﺯ ﭘﺲ ﺧﺪﻣﺎﺕ ﻣﺮﮐﺰ ﺑﺎ ﺩﻫﻴﺪ ﻗﺮﺍﺭ ﺧﺎﻣﻮﺵ ﺣﺎﻟﺖ ﺩﺭ ﺭﺍ ﺑﮕﻴﺮﻳﺪ ﺗﻤﺎﺱ...

Page 44: ...ﺪ ﻣﯽ ﺍﻣﺮ ﺗﻮﺍﻧﺪ ﻣﯽ ﻫﻮﺩ ﻓﻴﻠﺘﺮ ﺩﺭ ﻣﺎﻧﺪﻩ ﺑﺎﻗﯽ ﭼﺮﺑﯽ ﮔﺮﺩﺩ ﺁﻥ ﺑﺎﻻی ﻇﺮﻑ ﮐﻪ ﻫﻨﮕﺎﻣﯽ ﻓﻘﻂ ﺭﺍ ﮔﺎﺯ ﻫﺎی ﺷﻌﻠﻪ ﺷﻮﺩ ﻣﺸﺘﻌﻞ ﮐﻨﻴﺪ ﺭﻭﺷﻦ ﺩﺍﺭﺩ ﻗﺮﺍﺭ ﺁﻧﻬﺎ ﺭﻭی ﺁﺷﭙﺰی ﺗﻮﺍﻧﺪ ﻣﯽ ﻣﻮﺿﻮﻉ ﺍﻳﻦ ﺷﻮﺩ ﻣﯽ ﺩﺍﻍ ﺑﺴﻴﺎﺭ ﺩﺳﺘﮕﺎﻩ ﭘﺸﺖ ﺑﺮﻕ ﻫﺎی ﺳﻴﻢ ﮔﺮﺩﺩ ﺑﺮﻕ ﻫﺎی ﮐﺎﺑﻞ ﺑﻪ ﺭﺳﻴﺪﻥ ﺁﺳﻴﺐ ﺑﺎﻋﺚ ﮔﻴﺮﻧﺪ ﻗﺮﺍﺭ ﺗﻤﺎﺱ ﺩﺭ ﺩﺳﺘﮕﺎﻩ ﭘﺸﺖ ﺑﺎ ﻧﺒﺎﻳﺪ ﮔﺎﺯ ﻫﺎی ﻟﻮﻟﻪ ﻭ ﺳﻭﺧﺗﮕﯽ ﺧﻁﺭ ﻫﺷﺩﺍﺭ ﭘﺨﺖ ﻣﺤﻔﻈﻪ ﺩﺍﻍ ﺳﻄﻮﺡ ﻫﺮﮔﺰ ﺷﻮﺩ ﻣﯽ ﺩﺍﻍ ﺑﺴﻴﺎﺭ ﺩﺳﺘﮕﺎﻩ ﺩﻫﻴﺪ ﺍﺟﺎﺯﻩ ﻫﻤﻴﺸﻪ ﻧﮑﻨﻴﺪ ﻟﻤﺲ ﺭﺍ ﺣﺮﺍﺭﺗﯽ ﻫﺎی ﺍﻟﻤﻨﺖ...

Page 45: ...ﺑﺎﺷﻨﺪ ﺩﺍﺷﺘﻪ ﻗﺮﺍﺭ ﻧﻈﺎﺭﺕ ﺗﺤﺖ ﻧﺎﺷﯽ ﺧﻄﺮﺍﺕ ﻭ ﻧﻤﻮﺩﻩ ﺩﺭﻳﺎﻓﺖ ﺩﺳﺘﮕﺎﻩ ﺍﺯ ﺍﻳﻤﻦ ﺍﺳﺘﻔﺎﺩﻩ ﺯﻣﻴﻨﻪ ﺑﺎﺷﻨﺪ ﮐﺮﺩﻩ ﺩﺭک ﺭﺍ ﺁﻥ ﺍﺯ ﮐﻮﺩﮐﺎﻥ ﮐﻨﻨﺪ ﺑﺎﺯی ﺁﻥ ﺍﻃﺮﺍﻑ ﻳﺎ ﺩﺳﺘﮕﺎﻩ ﺍﻳﻦ ﺑﺎ ﻧﺒﺎﻳﺪ ﮐﻮﺩﮐﺎﻥ ﺁﻥ ﮐﻠﯽ ﻧﮕﻬﺪﺍﺭی ﺑﻪ ﻧﺴﺒﺖ ﻳﺎ ﮐﻨﻨﺪ ﺗﻤﻴﺰ ﺭﺍ ﺩﺳﺘﮕﺎﻩ ﺍﻳﻦ ﻧﺒﺎﻳﺪ ﺍﻳﻦ ﻧﻈﺎﺭﺕ ﺗﺤﺖ ﻭ ﺑﺎﺷﻨﺪ ﺳﺎﻟﻪ 15 ﺣﺪﺍﻗﻞ ﺍﻳﻨﮑﻪ ﻣﮕﺮ ﮐﻨﻨﺪ ﺍﻗﺪﺍﻡ ﺩﻫﻨﺪ ﺍﻧﺠﺎﻡ ﺭﺍ ﮐﺎﺭ ﺳﻴﻢ ﻭ ﺩﺳﺘﮕﺎﻩ ﺍﺯ ﺍﻳﻤﻦ ﻓﺎﺻﻠﻪ ﺩﺭ ﺭﺍ ﺳﺎﻝ 8 ﺍﺯ ﮐﻤﺘﺮ ﮐﻮﺩﮐﺎﻥ ﺩﺍﺭﻳﺪ ﻧﮕﻪ ﺑﺮﻕ ﻗﺮﺍﺭ ﭘﺨﺖ ﻣﺤﻔﻈﻪ ﺩﺭ ﺻﺤﻴﺢ ﺷﮑﻞ ﺑﻪ ﻫﻤﻴﺸﻪ ﺭﺍ ...

Page 46: ...13 ﺟﺎﻧﺒﯽ ﻭﺳﺎﻳﻞ ﻛﺮﺩﻥ ﺗﻤﻴﺰ 13 ﮔﺮﺩﺍﻥ ﺳﻴﺦ ﺑﺮﺍی ﺩﺍﺭ ﺭﺯﻭﻩ ﻫﺎی ﺑﻮﺵ ﻧﺼﺐ 13 ﺗﺴﻠﮑﻮﭘﯽ ﺭﻳﻞ ﻣﺠﻤﻮﻋﻪ ﻧﺼﺐ 14 ﺩﺳﺗﮕﺎﻩ ﺍﻧﺩﺍﺯی ﺭﺍﻩ 1 14 ﺍﺟﺎﻕ ﺻﻔﺤﻪ 14 ﻓﺮ 14 ﮔﺮﺩﺍﻥ ﺳﻴﺦ 16 ﺯﻣﺎﻥ ﺗﻧﻅﻳﻣﺎﺕ ﻫﺎی ﮔﺯﻳﻧﻪ O 16 ﮐﻧﻧﺩﻩ ﺗﻣﻳﺯ ﻣﺎﺩﻩ D 16 ﻣﻨﺎﺳﺐ ﮐﻨﻨﺪﻩ ﺗﻤﻴﺰ ﻣﻮﺍﺩ 17 ﭘﺨﺖ ﻣﺤﻔﻈﻪ ﺩﺍﺧﻞ ﺳﻄﻮﺡ 18 ﺩﺳﺘﮕﺎﻩ ﺩﺍﺷﺘﻦ ﻧﮕﻪ ﺗﻤﻴﺰ 18 ﭘﺨﺖ ﻣﺤﻔﻈﻪ ﮐﺮﺩﻥ ﺗﻤﻴﺰ 18 ﻫﺎ ﺭﻳﻝ p 18 ﺩﺍﺭ ﻗﻼﺏ ﻫﺎی ﺭﻳﻞ ﺑﺮﺩﺍﺷﺘﻦ 18 ﺩﺍﺭ ﻗﻼﺏ ﺭﻳﻞ ﮔﺬﺍﺭی ﺟﺎی 19 ﺩﺳﺗﮕﺎﻩ ﺩﺭﺏ q 19 ﺩﺭﺏ ﻫﺎی ﺷﻴﺸﻪ ﻣﺠﺪﺩ ﻧﺼﺐ ﻭ ﮐﺮﺩ...

Page 47: ......

Page 48: ... 9001160915 9001160915 970331 ...

Reviews: