background image

5IBOLZPVGPSCVZJOHB
#PTDI)PNF"QQMJBODF

3FHJTUFSZPVSOFXEFWJDFPO.Z#PTDIOPXBOEQSPGJUEJSFDUMZGSPN

t&YQFSUUJQTUSJDLTGPSZPVSBQQMJBODF
t8BSSBOUZFYUFOTJPOPQUJPOT
t%JTDPVOUTGPSBDDFTTPSJFTTQBSFQBSUT
t%JHJUBMNBOVBMBOEBMMBQQMJBODFEBUBBUIBOE
t&BTZBDDFTTUP#PTDI)PNF"QQMJBODFT4FSWJDF

'SFFBOEFBTZSFHJTUSBUJPOoBMTPPONPCJMFQIPOFT

XXXCPTDIIPNFDPNXFMDPNF

-PPLJOHGPSIFMQ 
:PV}MMGJOEJUIFSF

&YQFSUBEWJDFGPSZPVS#PTDIIPNFBQQMJBODFTOFFEIFMQXJUIQSPCMFNT


PSBSFQBJSGSPN#PTDIFYQFSUT


'JOEPVUFWFSZUIJOHBCPVUUIFNBOZXBZT#PTDIDBOTVQQPSUZPV

XXXCPTDIIPNFDPNTFSWJDF


$POUBDUEBUBPGBMMDPVOUSJFTBSFMJTUFEJOUIFBUUBDIFETFSWJDFEJSFDUPSZ

3PCFSU#PTDI)BVTHFSÉUF(NC)

$BSM8FSZ4USB•F
.ßODIFO
(FSNBOZ

XXXCPTDIIPNFDPN

*9001594189*

9001594189

0

10321

(

B

)

Summary of Contents for HKL060070M

Page 1: ...3FHJTUFS ZPVS OFX EFWJDF PO Z PTDI OPX BOE HFU GSFF CFOFGJUT CPTDI IPNF DPN XFMDPNF en Instruction manual Free standing cooker Free standing cooker HKL060070M ...

Page 2: ......

Page 3: ...14 Setting procedure 14 Table of cooking times 14 1 Operating the appliance 16 Switching the appliance on and off 16 Setting the type of heating and temperature 16 Rapid heating 16 D Cleaning 17 Cleaning agents 17 Keeping the appliance clean 19 p Rails 19 Detaching and refitting the rails 19 q Appliance door 20 Detaching and attaching the oven door 20 Removing and refitting the door panels 21 Addi...

Page 4: ...cooking compartment the right way round Accessories on page 12 Important safety information Importantsafetyinformation Warning Risk of fire Combustible items stored in the cooking compartment may catch fire Never store combustible items in the cooking compartment Never open the appliance door if there is smoke inside Switch off the appliance and unplug it from the mains or switch off the circuit b...

Page 5: ... injury If the appliance is placed on a base and is not secured it may slide off the base The appliance must be fixed to the base Risk of injury The hinges on the appliance door move when opening and closing the door and you may be trapped Keep your hands away from the hinges Risk of injury If you leave the appliance door open people may bump into it resulting in injury The appliance door must be ...

Page 6: ...osed cooking compartment for extended periods of time Do not store food in the cooking compartment Cooling with the appliance door open Following operation at high temperatures only allow the cooking compartment to cool down with the door closed Do not trap anything in the appliance door Even if the door is only left open a crack the front of nearby furniture may become damaged over time Only leav...

Page 7: ...objects in the plinth drawer It could be damaged 7Environmental protection EnvironmentalprotectionYour new appliance is particularly energy efficient Here you can find tips on how to save even more energy when using the appliance and how to dispose of your appliance properly Saving energy Only preheat the appliance if this is specified in the recipe or in the tables in the operating instructions L...

Page 8: ...e the upper diameter of the saucepan This is usually bigger than the diameter of the base of the pan Use a small saucepan for small quantities A larger less full saucepan requires a lot of energy Always place suitable lids on saucepans When cooking without a lid four times the energy is required Cook with only a little water This will save energy Vitamins and minerals in vegetables are preserved S...

Page 9: ... present in the installation circuit This is not necessary if the appliance is connected by a plug that is accessible to the user Electrical safety The cooker corresponds to safety class I and may only be used in conjunction with a safety earth terminal A type H 05 VV F or equally rated lead must be used to connect the appliance Levelling the cooker Always place the cooker directly on the floor 1 ...

Page 10: ... design depends on the respective appliance model Residual heat indicator The hob has a residual heat indicator for each hotplate It shows which hotplates are still hot Even if the hob is switched off the display remains lit until the hotplate has cooled down sufficiently You can save energy by using the residual heat to keep a small dish warm for example Explanations 1 Hob 2 Control panel 3 Cooli...

Page 11: ...es the heat from the ring shaped heating element in the back wall evenly around the cooking compartment This type of heating is used to measure both the energy consumption in air recirculation mode and the energy efficiency class Grill large area For grilling flat items such as steaks or sausages for making toast and for browning food The whole area below the grill element becomes hot 7 Circulated...

Page 12: ...a certain period afterwards _Accessories AccessoriesYour appliance is accompanied by a range of accessories Here you can find an overview of the accessories included and information on how to use them correctly Accessories included Your appliance is equipped with the following accessories Only use genuine accessories They are specially adapted for your appliance You can buy accessories from the af...

Page 13: ...23 Optional accessories Wire rack For cookware cake tins and ovenproof dishes and for roasts and grilled food Baking tray For tray bakes and small baked items Universal pan For moist cakes baked items frozen food and large roasts It can be used to catch dripping fat when you are grilling directly on the wire rack Wire insert For meat poultry and fish For inserting into the universal pan to catch d...

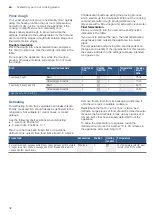
Page 14: ...ted After the cooking compartment has cooled down clean the smooth surfaces with soapy water and a dish cloth Cleaning the accessories Clean the accessories thoroughly using soapy water and a dish cloth or soft brush 1 Setting the cooking time SettingthecookingtimeThis chapter explains how to set a hotplate The table shows heat settings and cooking times for various meals Setting procedure Adjust ...

Page 15: ...s 10 20 mins Braising Roulades Pot roasts Goulash 3 4 3 4 3 4 50 60 mins 60 100 mins 50 60 mins Frying Escalope plain or breaded Escalope frozen Steak 3 cm thick Fish and fish fillet plain Fish and fish fillet breaded Fish and fish fillet breaded and frozen e g fish fingers Stir fry frozen Pancakes 6 7 6 7 7 8 4 5 4 5 6 7 6 7 5 6 6 10 mins 8 12 mins 8 12 mins 8 20 mins 8 20 mins 8 12 mins 6 10 min...

Page 16: ...e Top bottom heating at 190 C 1 Use the function selector to set the heating function 2 Use the temperature selector to set the temperature or grill setting The appliance starts to heat up after a few seconds Once the food is cooked turn the function selector to the Off position to switch the appliance off Changing The heating function and temperature can be changed at any time using the relevant ...

Page 17: ... cleaning Optional available for some appliances depending on the appliance model Upper glass cover depending on appli ance model Glass cleaner Clean with a soft cloth You can remove the upper glass cover for cleaning To find out how to do this please refer to the section Upper glass cover Rotary knobs Do not remove Hot soapy water Clean with a dish cloth and dry with a soft cloth Hob surround Hot...

Page 18: ...t is cold Please use the self cleaning function to clean self cleaning surfaces To find out how to do this please refer to the section Self cleaning Caution Never use oven cleaner on self clean ing surfaces Glass cover for the oven light Hot soapy water Clean with a dish cloth Shelf Hot soapy water Clean with a dish cloth or a brush You can remove the shelves for cleaning To find out how to do thi...

Page 19: ...With good care and cleaning your appliance will retain its appearance and remain fully functional for a long time to come This will tell you how to remove the shelves and clean them Detaching and refitting the rails The rails can be removed for cleaning The oven must have cooled down Unhooking the rails 1 Hold the shelf frames from underneath and pull slightly forward Pull the extension pins at th...

Page 20: ...urposes and to remove the door panels you can detach the oven door The oven door hinges each have a locking lever When the locking levers are closed figure A the oven door is secured in place It cannot be detached When the locking levers are open in order to detach the oven door figure B the hinges are locked They cannot snap shut Warning Risk of injury Whenever the hinges are not locked they snap...

Page 21: ... top also anticlockwise Fig B 3 Remove the cover Fig C The parts that have been removed must not be washed Clean the panels with a glass cleaner and a soft cloth Warning Risk of injury Scratched glass in the appliance door may develop into a crack Do not use a glass scraper sharp or abrasive cleaning aids or detergents Refitting 1 Place the cover back in position Fig A 2 First retighten the two sc...

Page 22: ...he bulb socket contacts are live Before replacing the bulb unplug the appliance from the mains or switch off the circuit breaker in the fuse box Warning Risk of burns The appliance becomes very hot Never touch the interior surfaces of the cooking compartment or the heating elements Always allow the appliance to cool down Keep children at a safe distance 1 Place a tea towel in the cold cooking comp...

Page 23: ...tion Due to the significant differences in temperature between the appliance interior and the external parts of the appliance condensation may build up on the door the control panel or the front panels of adjacent kitchen cabinets This is a normal physical phenomenon Condensation can be reduced by preheating the oven or opening the door carefully General information Recommended setting values The ...

Page 24: ... baked items You can find the ideal settings for many dishes in the settings tables Also refer to the notes in the section on allowing dough to rise Baking tins For optimal cooking results we recommend using dark coloured metal baking tins Tinplate baking tins ceramic dishes and glass dishes extend baking time and mean that the baked item will not brown evenly If you are using silicone moulds foll...

Page 25: ...with moist topping 2 levels Universal pan baking tray 3 1 150 170 40 65 Plaited ring loaf Universal pan 2 160 170 35 40 Swiss roll Universal pan 2 170 190 15 20 Strudel sweet Universal pan 2 190 210 55 65 Strudel frozen Universal pan 3 200 220 35 40 Preheat for 10 minutes Meal Accessories cookware Shelf posi tion Type of heating Temperature in C Cooking time in mins Muffins Muffin tray 2 170 190 2...

Page 26: ...rolls fresh Universal pan 3 200 220 20 30 Toast with topping 4 slices Wire rack 3 200 220 15 20 Toast with topping 12 slices Wire rack 3 220 240 15 25 Preheat Dish Accessories cookware Shelf posi tion Heating function Temperature in C Cooking time in min Pizza fresh Universal pan 2 190 210 20 30 Pizza fresh 2 levels Universal pan baking tray 3 1 160 180 35 45 Pizza fresh thin crust Universal pan 2...

Page 27: ...he cake one level higher in the oven the next time The baked item is too dark on top and too light underneath Bake the cake one level lower in the oven the next time Select a lower temperature and extend the baking time The baked item is too dark in a tin or loaf tin Place the baking tray in the middle of the accessory not directly against the back wall The baked item is too dark in colour overall...

Page 28: ... slide the universal pan in at least one shelf position lower with the slanted edge facing the appliance door Any dripping fat will be caught When grilling try wherever possible to use pieces of food which are of a similar thickness and weight This will allow them to brown evenly and remain succulent and juicy Place the food to be grilled directly onto the wire rack Use tongs to turn the pieces of...

Page 29: ... to be turned Place the whole fish into the cooking compartment in swimming position with the dorsal fin facing upwards Placing half a potato or a small oven proof container in the stomach cavity of the fish will provide stability You can tell when the fish is cooked because the dorsal fin can be removed easily When stewing add two to three tablespoons of liquid and a little lemon juice or vinegar...

Page 30: ...e grill tray The grill tray can be bought later as a special accessory The roast is too dark and the crack ling is burned in places and or the roast is too dry Check the shelf position and temperature Select a lower temperature the next time and reduce the roasting time if necessary The crackling is too thin Increase the temperature or switch on the grill briefly at the end of the roasting time Th...

Page 31: ...ut evenly and slightly heaped on the wire rack Use the following shelf positions for drying 1 wire rack Position 3 2 wire racks Positions 3 1 Turn very juicy fruit and vegetables several times After drying remove the dried food from the paper immediately In the table you will find settings for drying various foodstuffs The temperature and drying time are dependent on the type moisture ripeness and...

Page 32: ...ings table are intended as a guide only Defrosting For defrosting frozen fruit vegetables and baked items Poultry meat and fish should ideally be defrosted in the refrigerator Not suitable for cream cakes or cream gateaux Use the following shelf positions when defrosting 1 wire rack Position 2 2 wire racks Positions 3 1 Tip Food that has been frozen flat or in portions defrosts more quickly than f...

Page 33: ...6 ...

Page 34: ...6 ...

Page 35: ...6 ...

Page 36: ...JBODFT 4FSWJDF SFF BOE FBTZ SFHJTUSBUJPO o BMTP PO NPCJMF QIPOFT XXX CPTDI IPNF DPN XFMDPNF PPLJOH GPS IFMQ PV MM GJOE JU IFSF YQFSU BEWJDF GPS ZPVS PTDI IPNF BQQMJBODFT OFFE IFMQ XJUI QSPCMFNT PS B SFQBJS GSPN PTDI FYQFSUT JOE PVU FWFSZUIJOH BCPVU UIF NBOZ XBZT PTDI DBO TVQQPSU ZPV XXX CPTDI IPNF DPN TFSWJDF POUBDU EBUB PG BMM DPVOUSJFT BSF MJTUFE JO UIF BUUBDIFE TFSWJDF EJSFDUPSZ 3PCFSU PTDI BVT...

Reviews: