background image

7

Set-up, gas and electricity connection

Gas connection

Installation must only be performed by an approved expert or a 

licensed after-sales service engineer in accordance with the 

instructions specified under "Gas connection and conversion to 

a different gas type".

For the licensed expert or after-sales service
Caution!

The setting conditions for this appliance are specified on the 

rating plate on the back of the appliance. The gas type set in 

the factory is marked with an asterisk (*).

Before setting up the appliance, check the grid access 

conditions (gas type and gas pressure) and ensure that the 

gas setting of the appliance meets these conditions. If the 

appliance settings have to be changed, follow the instructions 

in the section "Gas connection and conversion to a different 

gas type".

This appliance is not connected to a waste gas main. It must 

be connected and commissioned in accordance with the 

installation conditions. Do not connect the appliance to a 

waste gas main. All ventilation regulations must be observed.

The gas connection must be made via a fixed, i.e. not mobile 

connection (gas line) or via a safety hose. 

If using the safety hose, ensure that the hose is not trapped 

or crushed. The hose must not come into contact with hot 

surfaces.

The gas line (gas pipe or safety hose) can be connected to 

the right or left-hand side of the appliance. The connection 

must have an easily accessible locking device.

Safety information

The rated working pressure of your appliance is:
for natural gas (G20) 2 kPa;
for LPG (G30) 3 kPa;
for LPG (G31) 3,7 kPa.
Your appliance must be operated with these pressures. All the 

information on the rating plate of your appliance is based on 

these pressures. The manufacturer takes no responsibility for 

the resulting operability or performance of the appliance or for 

other risks if the appliance is operated with pressures other 

than those specified.

Caution!

If the pressure of your local gas supply is higher than:
natural gas (G20) 2,5 kPa;
LPG (G30) 3,6 kPa;
or LPG (G31) 4,5 kPa; for safety reasons, the appliance must 

be equipped with a suitable pressure regulator. The connection, 

maintenance and setting of the pressure regulator must be 

carried out by an approved gas fitter.
If you do not know the pressure of your local gas supply, ask 

your gas supplier.

For your safety

This appliance is adjusted to operate on LPG only.

Faults in the gas installation/smell of gas

If you notice a smell of gas or faults in the gas installation, you 

must

immediately shut off the gas supply and/or close the gas 

cylinder valve

immediately extinguish all naked flames and cigarettes

switch off electrical appliances and lights

open windows and ventilate the room

call the after

­

sales service or the gas supplier

Burn back

Fire in burner tube or chamber
In the event of a burn-back, where the flame burns back to the 

jet, immediately turn off the gas supply at the control valve on 

the panel.
After ensuring the flame is extinguished, re-light the appliance 

in the normal manner.
Should the appliance again burn back, close the control valve 

and call a service technician. Do not use the appliance again 

until the service technician has declared that it is safe to do so.

Gas-pressure regulator

This appliance requires an operating pressure of 2,8 kPa at the 

appliance. A suitable LPG regulator that coplies with the 

requirements of SANS 1237 must be installed.

Important information for the user
This appliance may only be installed by a registeres LP Gas 

installer.

All registered installers are issued with a card carrying their 

registration number. Ask to be shown the card before allowing 

the installation work to be shown the card before allowing the 

installation work to commence and make a note of the installer 

QCC number.
Upon completion of the installation, the installer is required to 

explain the operational details of the appliance together with 

the safety instructions.
You should only sign for acceptance of the installation and be 

provided with a copletion certificate. You should only sign for 

acceptance of the installation when the installation is completed 

to your satisfaction.
Note that your invoice is required in the event that you wish 

make a quarantee claim.

Important information for the installer

This appliance may only be installed by a registered LP Gas 

installer registered with the Liquefied Petroleum Gas 

Association of Southern Africa.
The appliance must be installed in accordance with the 

requirements of SANS 10087-1 and any fire department 

regulations and/or local bylaws applicable to the area. If in 

doubt check with the relevant authority before undertaking the 

installation.
Upon completion of the installation you are required to fully 

explain and demonstrate to the user the operational details and 

safety practices applicable to the appliance and the installation.

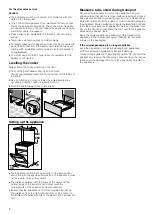
Moving the appliance by the gas line or door handle

Do not move the appliance while holding the gas line; the gas 

pipe could be damaged. There is a risk of a gas leak! Do not 

move the appliance while holding it by the door handle. The 

door hinges and door handle could be damaged.

Electrical connection

Caution!

Have the appliance set up by your after-sales service. A 16 A 

fuse is required for connection. The appliance is designed for 

operation at 220-240 V. 

If the electricity supply drops below 180 V, the electrical 

ignition system does not work.

Any damage arising from the appliance being connected 

incorrectly will invalidate the guarantee.

If the supply cord is damaged, it must be replaced by the 

manufacturer, its service agent or similarly qualified persons 

in order to avoid a hazard.

Summary of Contents for HGG223121Z

Page 1: ... en Instruction manual Free standing cooker HGG223121Z ...

Page 2: ......

Page 3: ...and cap 13 Making settings on the hob 13 Igniting the gas burners 13 Table Cooking 13 Setting the oven 14 This is how you adjust the lower gas burner in the oven 14 Setting procedure for the gas grill in the oven 14 Care and cleaning 15 Upper glass cover 15 Cleaning agents 15 Detaching and refitting the rails 16 Detaching and attaching the oven door 17 Troubleshooting 17 Malfunction table 17 Repla...

Page 4: ...ing the level of mechanical ventilation where present This appliance is not intended for operation with an external timer or a remote control This appliance may be used by children over the age of 8 years old and by persons with reduced physical sensory or mental capabilities or by persons with a lack of experience or knowledge if they are supervised or are instructed by a person responsible for t...

Page 5: ...nding area particularly the hob surround if fitted become very hot Never touch the hot surfaces Keep children at a safe distance Risk of burns During operation the surfaces of the appliance become hot Do not touch the surfaces when they are hot Keep children away from the appliance Risk of burns Empty cookware becomes extremely hot when set on a gas hotplate that is in operation Never heat up empt...

Page 6: ... is not closed when the oven is started up Damage to the oven Caution Accessories foil greaseproof paper or ovenware on the cooking compartment floor do not place accessories on the cooking compartment floor Do not cover the cooking compartment floor with any sort of foil or greaseproof paper Do not place ovenware on the cooking compartment floor if a temperature of over 50 ºC has been set This wi...

Page 7: ... or the gas supplier Burn back Fire in burner tube or chamber In the event of a burn back where the flame burns back to the jet immediately turn off the gas supply at the control valve on the panel After ensuring the flame is extinguished re light the appliance in the normal manner Should the appliance again burn back close the control valve and call a service technician Do not use the appliance a...

Page 8: ...ions The appliance must not be set up on any other object The distance between the top edge of the oven and the bottom edge of the extractor hood must meet the requirements of the extractor hood manufacturer Ensure that the appliance is not moved again after set up The distance from the high output burner or wok burner to the fronts of the adjacent units or the wall must be at least 50 mm Measures...

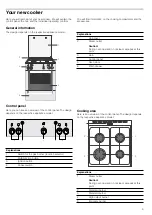
Page 9: ...n the respective appliance model Cooking area Here is an overview of the control panel The design depends on the respective appliance model Explanations 1 Hob cover 2 Steam outlet Caution During oven operation hot steam escapes at this point 3 Hob 4 Control panel 5 Oven door 6 Plinth drawer Explanations 1 Switch for the gas burner function selector 2 Multi function button 3 Ignition button 4 Cooke...

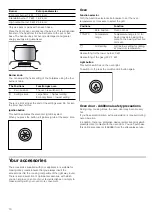
Page 10: ...or may become very hot If you have small children extra supervision is required during oven operation In addition there is a protective device protective grid which prevents direct contact with the oven door You can purchase this optional accessory 469088 from the after sales service Your accessories The accessories supplied with your appliance are suitable for making many meals Ensure that you al...

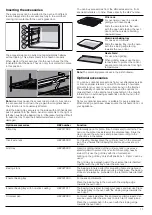
Page 11: ...de facing the oven door and the curvature pointing downwards Aluminium baking tray For cakes and biscuits Slide the baking tray into the oven with the sloping edge facing towards the oven door Heat shield For use when grilling When grilling always use the pro tective plate to protect the control panel and control knobs from high temperatures Optional accessories HEZ number Function Pizza tray HEZ3...

Page 12: ...nt with the elbow pointing downwards Secure the protective plate in the groove underneath the control panel using the retainers Make sure that the protective plate is engaged in the retainers If the protective plate cannot be pulled out it is correctly engaged You can now use the protective plate safely Otherwise insert the protective plate into a groove at a slightly higher angle and make sure th...

Page 13: ...t the same time The gas burner ignites 4 Press and hold the burner knob for approximately 1 3 seconds The safety pilot is activated If the gas flame goes out the gas supply is automatically interrupted by the safety pilot 5 Set the desired flame size Between setting û Off and setting the flame is not stable Therefore always choose a setting between large and small flame 6 If the flame goes out aga...

Page 14: ... not light within 15 seconds wait for at least one minute Then repeat the ignition process Setting procedure for the gas grill in the oven 1 Open the top cover The top cover must remain open for as long as the oven is in operation 2 Open the main gas supply to the appliance Connect the plug in the socket 3 Insert the protective plate into the groove under the control panel The protective plate is ...

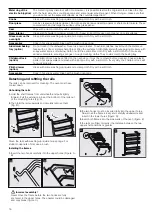
Page 15: ...dishwasher detergent scouring pads abrasive cleaning agents such as oven cleaner or stain remover high pressure cleaners or steam jets Do not clean individual parts in the dishwasher When cleaning the oven do not use sharp or abrasive cleaning agents cleaning agent with a high alcohol content scouring pads high pressure cleaners or steam jets Do not clean individual parts in the dishwasher Wash ne...

Page 16: ...as this could damage them Knobs Clean with some washing up liquid and a damp cloth Dry with a soft cloth Door glass Can be cleaned with glass cleaner Do not use any abrasive cleaning agents or sharp metal objects These could scratch and damage the surface of the glass panel Seal Wipe with a damp cloth Dry with a soft cloth Oven interior Clean with hot water or vinegar solution For heavy soiling On...

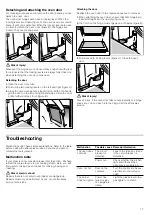
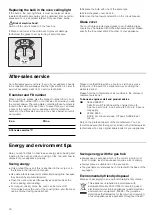
Page 17: ...nge must engage on both sides figure B 3 Fold back both locking levers figure C Close the oven door Risk of injury Risk of injury If the oven door falls out accidentally or a hinge snaps shut do not reach into the hinge Call the after sales service Troubleshooting Malfunctions often have simple explanations Refer to the table before calling the after sales service as you may be able to remedy the ...

Page 18: ...list To book an engineer visit and product advice Rely on the professionalism of the manufacturer You can therefore be sure that the repair is carried out by trained service technicians who carry original spare parts for your appliances Energy and environment tips Here you can find tips on how to save energy when baking and roasting in the oven and when cooking on the hob and how to dispose of you...

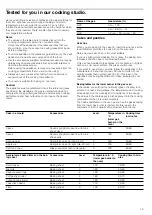
Page 19: ...ncreases and the cake is not browned evenly Only use heat resistant glass dishes Do not place a hot glass dish on a cold or wet surface The glass could break If you want to use silicone moulds follow the guidelines in the manufacturer s instruction manual Silicone moulds turn out slightly smaller than normal cake tins For this reason the quantities may be slightly different to those indicated in y...

Page 20: ...risen in the middle but is lower around the edge Do not grease the edge of the springform cake tin After baking loosen the cake care fully with a knife The cake is too dry Make tiny holes in the finished cake using a cocktail stick Then drizzle fruit juice or an alcoholic drink over it Next time reduce the baking time The bottom of a fruit cake is too light Place the cake one level lower the next ...

Page 21: ...heck the shelf height and temperature The roast looks good but the juices are burnt Next time use a smaller roasting dish or add more liquid The roast looks good but the juices are too clear and watery Next time use a larger roasting dish and use less liquid Steam rises from the roast when basted This is normal and due to the laws of physics The majority of the steam escapes through the steam outl...

Page 22: ......

Page 23: ......
Page 24: ...02 111293 9000742879 9000742879 Robert Bosch Hausgeräte GmbH Carl Wery Straße 34 81739 München Germany www bosch home com ...

Reviews: