


Environmental protection and saving energy
en
7
▶
The burner cup and burner cover must be in exactly
the right position.
Food may spill.
▶
Remove spills immediately.
▶
Use deep pots for dishes with a lot of liquid.
▶
This prevents overflowing.
Penetrating liquid may cause damage to the appliance.
▶
The area around the appliance must be clean and
dry.
▶
Always keep the appliance and the area around it
clean and dry after cleaning.
▶
Ensure that there are no cleaning materials, clean-
ing products or water marks on any of the appli-
ance's surfaces.
The glass lid may crack.
▶
Ensure that the upper cover is not closed, e.g. by
playing children, while you are using the hotplate.
The handles or grips on pots or pans may be dam-
aged.
▶
Place the pot or pan precisely in the centre of the
steel grid of the burner.
▶
This will optimise transfer of the heat from the
burner flame to the pot or ban base.
▶
The handle or grip does is not damaged, and
greater energy savings are guaranteed.
The base of the pot or pan may be damaged.
▶
Cookware that is used on the hotplate must be se-
curely in place.
▶
Only use pots and pans with an even base.
▶
Do not heat up empty pots or pans.
Damage may occur if hard or pointed objects fall on
the hob.
▶
Do not let hard or pointed objects fall onto the hob.
Do not hold and move the appliance at the gas pipe
(collector). Damage to the gas pipe may lead to gas
leak. The gas pipe is not designed for the weight of the
appliance.
▶
Do not hold and move the appliance at the gas
pipe.
If you are cleaning food remnants or residue liquids
that are penetrating below the hotplates into the the
burner seat using lyes or similar chemicals, this may
lead to damage to the gas components.
▶
If you remove the food remnants or residue liquids
from the burner seat, do not use lye or similar effect-
ive chemicals.
2.3 Drawer area
Follow the corresponding instructions when using the
drawer.
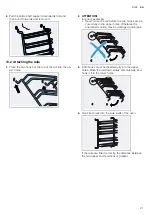
ATTENTION!
Do not place hot objects in the plinth drawer. The plinth
drawer may be damaged.
▶
Do not place hot objects in the plinth drawer.
Do not place oven accessories that exceed the height
of the drawer into the plinth drawer. Otherwise, this
may damage the appliance.
▶
Do not place oven accessories that exceed the
height of the drawer into the plinth drawer.
3 Environmental protection and saving energy
3.1 Disposing of packaging
The packaging materials are environmentally compat-
ible and can be recycled.
▶
Sort the individual components by type and dispose
of them separately.
3.2 Saving energy
If you follow these instructions, your appliance will use
less energy.
Only preheat the appliance if the recipe or the recom-
mended settings tell you to do so.
¡
Not preheating the appliance can reduce the en-
ergy used by up to 20%.
Use dark-coloured, black-coated or enamelled baking
tins.
¡
These types of baking tin absorb the heat particu-
larly well.
Open the appliance door as little as possible during
operation.
¡
This maintains the temperature in the cooking com-
partment and eliminates the need for the appliance
to reheat.
When baking multiple dishes, do so in succession or
in parallel.
¡
The cooking compartment is heated after baking
the first dish. This reduces the baking time for the
second cake.
If the cooking time is relatively long, you can switch
the appliance off 10 minutes before the cooking time
ends.
¡
There will be enough residual heat to finish cooking
the dish.
Remove any accessories that are not being used from
the cooking compartment.
¡
Accessories that are not being used do not need to
be heated.
Allow frozen food to defrost before cooking.
¡
This saves the energy that would otherwise be re-
quired to defrost it.
Note:
The appliance requires:
¡
A maximum of 1 W when the appliance is in opera-
tion with the display switched on
¡
A maximum of 0.5 W when the appliance is in oper-
ation with the display switched off
Saving energy
If you follow these instructions, your appliance will use
less energy.
Choose a burner roughly the same size as your pan.
Centre the cookware on the hob.
Tip:
Cookware manufacturers often give the upper
diameter of the saucepan. It is often larger than the
base diameter.
¡
Unsuitable cookware or incompletely covered cook-
ing zones consume a lot of energy.


