Parts included
en-us
5
Parts included
3 Parts included
Parts included
After unpacking all the parts, check for any damage in
transit and for completeness of delivery.
¡
1x front range toe kick
¡
1x left range toe kick
¡
1x right range toe kick
¡
3x screws
Tools and parts needed
4 Tools and parts needed
Tools and parts needed
Prepare these tools and accessories before you start to in-
stall your accessory.
¡
Phillips head screwdriver
¡
Gloves
Installing range toe kick
5 Installing range toe kick
Installing range toe kick
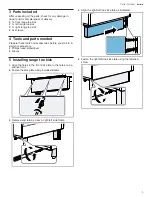
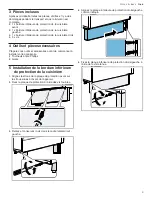
1.
Align the holes in the front kick plate to the holes on ap-
pliance front.
2.
Fasten the kick plate using included screws.
3.
Remove and retain screw in right/left side frame.
4.
Align the right/left toe kick plate as indicated.
5.
Fasten the right/left toe kick plate using the retained
screw.


