background image

5

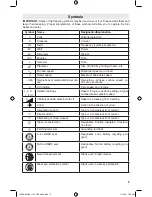
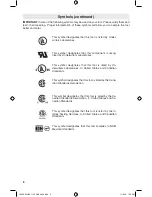
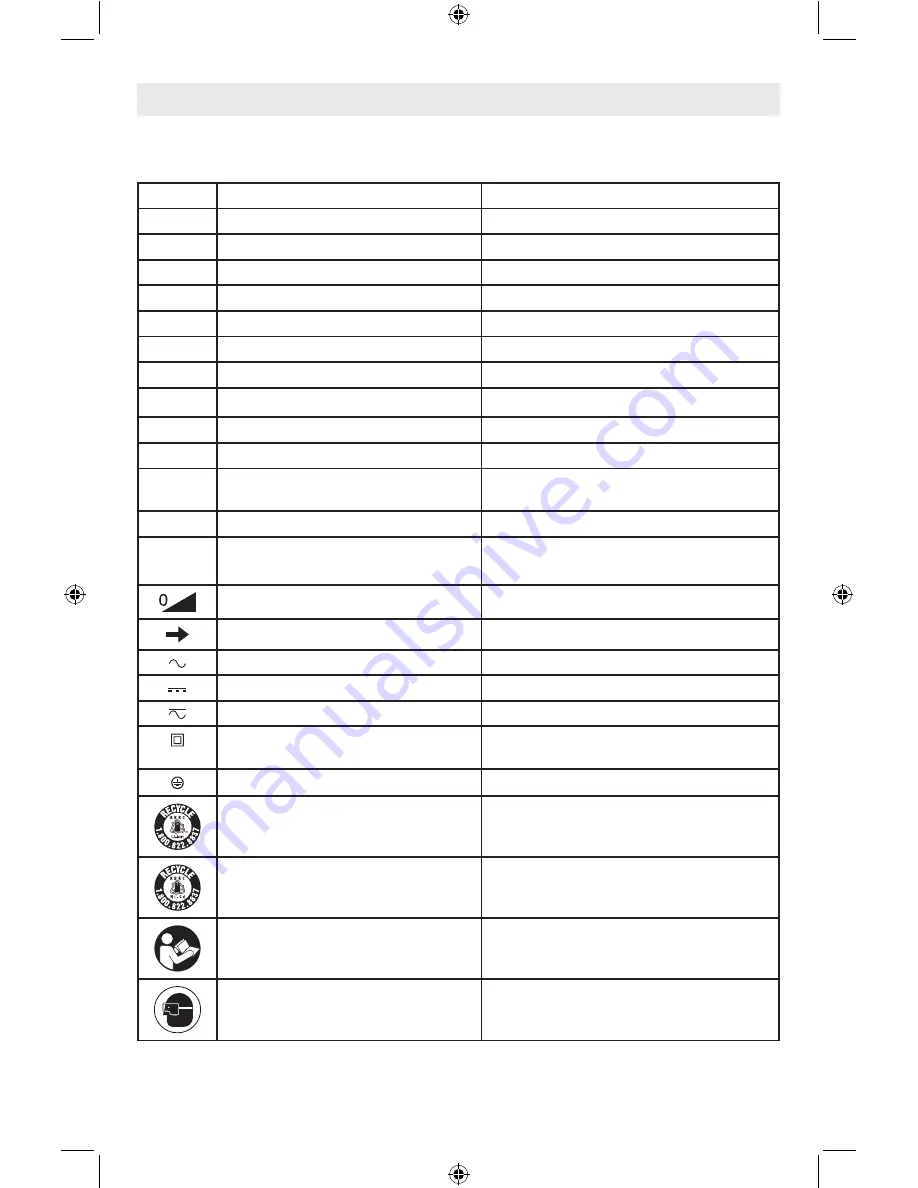
Symbols

IMPORTANT: Some of the following symbols may be used on your tool.  Please study them and 

learn their meaning.  Proper interpretation of these symbols will allow you to operate the tool 

better and safer.

Symbol

Name

Designation/Explanation

V

Volts

Voltage (potential)

A

Amperes

Current

Hz

Hertz

Frequency (cycles per second)

W

Watt

Power

kg

Kilograms

Weight

min

Minutes

Time

s

Seconds

Time

Diameter

Size of drill bits, grinding wheels,  etc. 

n

0

No load speed

Rotational speed, at no load

n

Rated speed

Maximum attainable speed 

.../min

Revolutions or reciprocation per min-

ute

Revolutions, strokes, surface speed, or-

bits etc. per minute

0

Off position

Zero speed, zero torque...

1, 2, 3, ...

I, II, III,

Selector settings

Speed, torque or position settings. Higher 

number means greater speed

Infinitely variable selector with off

Speed is increasing from 0 setting

Arrow

Action in the direction of arrow

Alternating current

Type or a characteristic of current

Direct current

Type or a characteristic of current

Alternating or direct current

Type or a characteristic of current

Class II construction

Designates Double Insulated Construc-

tion tools.

Earthing terminal

Grounding terminal

Li-ion RBRC seal

Designates Li-ion battery recycling pro-

gram

Ni-Cad RBRC seal

Designates Ni-Cad battery recycling pro-

gram

Read manual symbol

Alerts user to read manual

Wear eye protection symbol

Alerts user to wear eye protection

1600A00HX5 11-15 GSS20-40.indd   5

11/9/15   7:22 AM

Summary of Contents for GSS20-40

Page 1: ...e sécurité d utilisation Instrucciones de funcionamiento y seguridad 1 877 BOSCH99 1 877 267 2499 www boschtools com Call Toll Free for Consumer Information Service Locations Pour obtenir des informa tions et les adresses de nos centres de service après vente appelez ce numéro gratuit Llame gratis para obtener información para el consumidor y ubicaciones de servicio GSS20 40 1600A00HX5 11 15 GSS20...

Page 2: ...ric shock Do not abuse the cord Never use the cord for carrying pulling or unplugging the power tool Keep cord away from heat oil sharp edges or moving parts Damaged or entangled cords increase the risk of electric shock When operating a power tool outdoors use an extension cord suitable for outdoor use Use of a cord suitable for outdoor use reduces the risk of electric shock If operating a power ...

Page 3: ...on The correct power tool will do the job better and safer at the rate for which it was designed Do not use the power tool if the switch does not turn it on and off Any power tool that cannot be controlled with the switch is dangerous and must be repaired Disconnect the plug from the power source and or the battery pack from the power tool before making any adjustments changing accessories or stor...

Page 4: ...t microscopic particles Safety Rules for Orbital Sanders Unplug the sander before changing ac cessories Accidental start ups may occur if sander is plugged in while changing an ac cessory Use clamps or other practical way to se cure and support the workpiece to a sta ble platform Holding the work by hand or against your body is unstable and may lead to loss of control Your tool is equipped with a ...

Page 5: ...minute 0 Off position Zero speed zero torque 1 2 3 I II III Selector settings Speed torque or position settings Higher number means greater speed Infinitely variable selector with off Speed is increasing from 0 setting Arrow Action in the direction of arrow Alternating current Type or a characteristic of current Direct current Type or a characteristic of current Alternating or direct current Type ...

Page 6: ...ries This symbol designates that this tool is listed by Un derwriters Laboratories to United States and Canadian Standards This symbol designates that this tool is listed by the Cana dian Standards Association This symbol designates that this tool is listed by the Ca nadian Standards Association to United States and Ca nadian Standards This symbol designates that this tool is listed by the In tert...

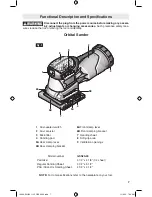
Page 7: ...SS20 40 Pad Size Regular Sanding Sheet PSA Stick On Sanding Sheet 4 1 2 x 4 1 8 1 4 sheet 4 1 2 x 5 1 2 4 1 2 x 4 1 2 NOTE For tool specifications refer to the nameplate on your tool 1 Dust sealed switch 2 Dust canister 3 Microfilter 4 Sanding pad 5A Rear clamp lever 5B Rear clamping bracket 6A Front clamp lever 6B Front clamping bracket 7 Sanding sheet 8 Soft grip area 9 Ventilation openings 4 5A...

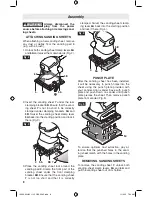
Page 8: ...mping bracket 6B Ensure that the sanding sheet 7 is not too short and that it is correctly clamped Swivel the sanding sheet clamp ing lever 6A back into the starting position and lock it there Fig 4 PUNCH PLATE After the sanding sheet has been installed it will be necessary to punch holes into the sheet using the punch plate provided with your sander Align sander base with punch plate and push dow...

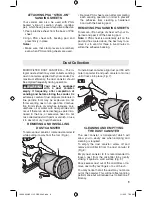
Page 9: ...eful of dust disposal materials in fine particle form may be explosive Do not throw sanding dust on an open fire Combus tion from mixture of varnishes lacquers poly urethane oil or water with dust particles can occur if there is a static discharge spark intro duced in the box or excessive heat Do not mix collected dust with paint or varnish or use it to absorb or dry liquid chemicals REMOVING AND ...

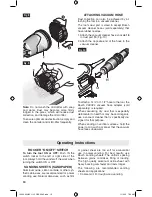
Page 10: ...e carcinogenic use a vacuum cleaner that is specifically de signed for that purpose When sanding on vertical surfaces hold the power tool in such a manner that the vacuum hose faces downward Fig 10 3 Fig 8 3 Fig 9 Operating Instructions ROCKER ON OFF SWITCH To turn the tool ON or OFF Push IN the switch rocker to the left or right side of the tool Always hold the sander off the work when turning th...

Page 11: ...system virtually eliminate any benefit from pressing on the sander Exces sive pressure to the sander may result in an uneven sanding job and premature grit wear Constant and excessive pressure can cause overheating and possible damage to the motor as well as premature wear out of the pad It s usually best to work in strokes that paral lel the grain using some lateral motion so the main strokes are...

Page 12: ...fore cleaning The tool may be cleaned most effectively with com pressed dry air Always wear safety goggles when cleaning tools with compressed air Ventilation openings and switch levers must be kept clean and free of foreign matter Do not attempt to clean by inserting pointed ob jects through opening Certain cleaning agents and solvents damage plastic parts Some of these are gasoline car bon tetra...

Page 13: ...ctro portatif le risque de choc électrique augmente Ne maltraitez pas le cordon Ne vous en servez ja mais pour transporter l outil électroportatif pour le tirer ou pour le débrancher Éloignez le cordon de la chaleur des huiles des arêtes coupantes ou des pièces mobiles Les cordons abîmés ou emmêlés augmentent les risques de choc électrique Si vous utilisez un outil électroportatif à l extérieur em...

Page 14: ...pas sur l outil électroportatif Utilisez l outil électroportatif qui convient à la tâche à ef fectuer L outil qui convient à la tâche fait un meilleur travail et est plus sûr à la vitesse pour lequel il a été conçu Ne vous servez pas de l outil électroportatif si son interrupteur ne parvient pas à le mettre en marche ou à l arrêter Tout outil électroportatif qui ne peut pas être commandé par son i...

Page 15: ... saillie au delà du bloc de ponçage peut également causer des lacérations graves Avertissements supplémentaires concernant la sécurité L emploi d un GFCI et de dispositifs de protection per sonnelle tels que gants et chaussures d électricien en caoutchouc améliorent votre sécurité personnelle N utilisez pas un outil conçu uniquement pour le C A sur une alimentation en C C Même si l outil semble fo...

Page 16: ...éro couple zéro 1 2 3 I II III Réglages du sélecteur Réglages de vitesse de couple ou de position Un nombre plus élevé signifie une vitesse plus grande Sélecteur variable à l infini avec arrêt La vitesse augmente depuis le réglage 0 Flèche Action dans la direction de la flèche Courant alternatif Type ou caractéristique du courant Courant continu Type ou caractéristique du courant Courant alternati...

Page 17: ...aboratories Ce symbole signifie que cet outil est approuvé par Underwriters Laboratories selon les normes des États Unis et du Canada Ce symbole signifie que cet outil est approuvé par l Association ca nadienne de normalisation Ce symbole signifie que cet outil est approuvé par l Association ca nadienne de normalisation selon les normes des États Unis et du Canada Ce symbole signifie que cet outil...

Page 18: ...util Fig 1 Numéro de modèle GSS20 40 Cotes du patin Feuille de ponçage ordinaire Feuille de ponçage autoadhésive 114 x 105 mm 4 1 2 po x 4 1 8 po 1 4 feuille 114 x 114 mm 4 1 2 po x 4 1 2 po 114 x 114 mm 4 1 2 po x 4 1 2 po 1 Interrupteur étanche à la poussière 2 Réservoir à poussière 3 Microfiltre 4 Patin de ponçage 5A Levier de fixation arrière 5B Support de fixation arrière 6A Levier de fixatio...

Page 19: ...nt 6B Assurez vous que la feuille de ponçage 7 n est pas trop courte et qu elle est attachée correctement Faites pivoter à nouveau le levier de fixation de la feuille de ponçage 6A dans sa position de départ et verrouillez le dans cette position Fig 4 PLAQUE DE PERFORATION Après avoir terminé l installation de la feuille de pon çage vous devrez percer des trous dans la feuille en utilisant la plaq...

Page 20: ...oussière Les matériaux sous forme de fines particules peuvent être explosifs Ne jetez pas la poussière sur une flamme nue Il y a risque de combustion de vernis laques polyuréthane huile ou eau mélangés avec des particules de pous sière en présence d une décharge électrostatique d une étincelle introduite dans la boîte ou de chaleur excessive Ne mélangez pas de poussière recueillie avec de la peint...

Page 21: ...açon que le tuyau de l aspirateur soit orienté vers le bas Fig 10 3 Fig 8 3 Fig 9 Consignes de fonctionnement INTERRUPTEUR MARCHE ARRÊT À BASCULEUR POUR DÉMARRER OU ARRÊTER L OUTIL Enfoncez le basculeur de l interrupteur vers la gauche ou vers la droite de l outil Écartez toujours la ponceuse de la pièce de travail quand vous la mettez en marche ou que vous l arrêtez FEUILLES DE PONÇAGE PAPIER DE ...

Page 22: ...appuyez trop fort sur la ponceuse le ponçage risque d être irrégulier et le papier de s user prématurément Une pression excessive constante peut provoquer une surchauffe qui peut éventuellement abîmer le moteur ainsi qu user prématurément le patin Normalement il est préférable de déplacer la pon ceuse dans le sens du fil avec un léger mouvement latéral pour que les coups principaux se recouvrent j...

Page 23: ...jours l outil et ou le chargeur de la source de courant avant de nettoyer La façon la plus efficace de nettoyer l outil est à l aide d air sec com primé Portez toujours des lunettes de sécurité en nettoyant les outils à l air comprimé Gardez les prises d air et les interrupteurs propres et libres de débris N essayez pas de les nettoyer en in troduisant des objets pointus dans leurs ouvertures Cert...

Page 24: ...dón de extensión adecuado para uso a la intemperie La utilización de un cordón adecuado para uso a la intemperie reduce el riesgo de que se produzcan sacudidas eléctricas Si es inevitable utilizar una herramienta mecánica en un lugar húmedo utilice una fuente de energía protegida por un interruptor de circuito accionado por corriente de pérdida a tierra GFCI El uso de un GFCI reduce el riesgo de s...

Page 25: ...ta hará el trabajo mejor y con más seguridad a la capacidad nominal para la que fue diseñada No use la herramienta mecánica si el interruptor no la enciende y apaga Toda herramienta mecánica que no se pueda controlar con el interruptor es peligrosa y debe ser reparada Desconecte el enchufe de la fuente de energía y o el paquete de batería de la herramienta mecánica an tes de hacer cualquier ajuste...

Page 26: ...l o retroceso El papel extra que sobresalga de la za pata de lijar también puede causar laceraciones graves Advertencias de seguridad adicionales Un GFCI y los dispositivos de protección personal como guantes de goma y calzado de goma de electri cista mejorarán más su seguridad personal No use herramientas mecánicas con capacidad nom inal solamente para CA con una fuente de energía de CC Aunque pu...

Page 27: ...ro 1 2 3 I II III Graduaciones del selector Graduaciones de velocidad par motor o posición Un número más alto significa mayor velocidad Selector infinitamente variable con apagado La velocidad aumenta desde la graduación de 0 Flecha Acción en la dirección de la flecha Corriente alterna Tipo o una característica de corriente Corriente continua Tipo o una característica de corriente Corriente altern...

Page 28: ...a que Underwriters Laboratories ha catalogado esta herramienta indicando que cumple con las normas estadoun idenses y canadienses Este símbolo indica que esta herramienta está catalogada por la Ca nadian Standards Association Este símbolo indica que la Canadian Standards Association ha cata logado esta herramienta indicando que cumple con las normas es tadounidenses y canadienses Este símbolo indi...

Page 29: ...nte colocada en la herramienta Fig 1 Número de modelo GSS20 40 Tamaño de la zapata Hoja de lijar normal Hoja de lijar de PSA adhesiva 4 1 2 x 4 1 8 1 4 de hoja 4 1 2 x 5 1 2 4 1 2 x 4 1 2 1 Interruptor hermético al polvo 2 Recipiente para polvo 3 Microfiltro 4 Almohadilla de lijar 5A Palanca de la abrazadera trasera 5B Soporte de fijación trasero 6A Palanca de la abrazadera delantera 6B Soporte de...

Page 30: ...ntero 6B Asegúrese de que la hoja de lijar 7 no sea demasiado corta y que esté sujeta correctamente con las abrazaderas Gire la palanca de la abrazadera de la hoja de lijar 6A de vuelta hasta la posición de inicio y bloquéela ahí Fig 4 PLACA PERFORADORA Después de haber instalado la hoja de lijar será nece sario perforar agujeros en ella utilizando la placa per foradora suministrada con la lijador...

Page 31: ... ser explosivos No tire el polvo generado por el lijado a llamas al descubierto Se puede producir combustión de la mezcla de barnices lacas poliureta no aceite o agua con partículas de polvo si hay una descarga de electricidad estática si se introduce una chispa en la caja o si hay calor excesivo No mezcle el polvo recolectado con pintura o barniz ni lo utilice para absorber o secar productos quím...

Page 32: ...eléctrica de manera que la manguera de aspi radora esté orientada hacia abajo Fig 10 3 Fig 8 3 Fig 9 INTERRUPTOR OSCILANTE DE ENCENDIDO Y APAGADO PARA ENCENDER O APAGAR LA HERRAMIENTA Em puje hacia ADENTRO el interruptor oscilante hacia el lado izquierdo o derecho de la herramienta Sostenga siempre la lijadora alejada de la pieza de trabajo cu ando ponga el interruptor en la posición de encendido ...

Page 33: ...a de li jar por el sistema de fijación eliminan prácticamente cualquier ventaja de presionar sobre la lijadora La presión excesiva sobre la lijadora puede producir un trabajo de lijado desigual y un desgaste prematuro del grano Una presión constante y excesiva puede causar recalentamiento y posibles daños al motor así como desgaste prematuro de la zapata Generalmente lo mejor es trabajar en pasada...

Page 34: ...argador de la fuente de energía antes de la limpieza La herramienta se pu ede limpiar más eficazmente con aire comprimido seco Use gafas de se gu ridad siempre que limpie herramientas con aire comprimido Las aberturas de ventilación y las palancas de inter ruptor deben mantenerse limpias y libres de materias extrañas No intente lim piar introduciendo objetos puntiagudos a través de las aberturas C...

Page 35: ...35 Notes Remarques Notas 1600A00HX5 11 15 GSS20 40 indd 35 11 9 15 7 22 AM ...

Page 36: ...U POUR RESPONSABLE DES INCIDENTS OU DOMMAGES INDIRECTS INCLUANT MAIS NE SE LIMITANT PAS AUX PERTES DE PROFITS CONSÉCUTIFS À LA VENTE OU L USAGE DE CE PRODUIT CERTAINS ÉTATS AMÉRICAINS ET CERTAINES PROVINCES CANA DIENNES N ADMETTANT PAS LE PRINCIPE DE LA LIMITATION NI L EXCLUSION DES DOMMAGES INDIRECTS ET CONSÉQUENTIELS IL EST POSSIBLE QUE LES LIMITATIONS OU EXCLUSIONS CI DESSUS NE S APPLIQUENT PAS...

Reviews: