


1. Recovery via USB
The system in the BEA 750 is restored with the aid of a
recovery USB stick. You can created this recovery USB
stick yourself using a commercially available USB stick.
i
A recovery should be done if errors occur in the ins-
talled system that can be traced back to the system.
i
The procedure described in the following creates
a recovery USB stick for BEA 750 country variants
with an open Windows operating system:
R
Germany
R
France
R
Finland
i
A separate recovery USB stick must be created for
country variants with a closed operating system. For
further information, see 1 689 978 620.
1.1
Creating a bootable USB stick
!
The updated version of the BoschBEA750Recovery-
Maker software must always be used.
!
During the process of creation all the existing data
on the USB stick will be deleted. Required data must
be backed up beforehand.
i
A USB stick with at least 8 GB storage capacity is
required.
i
Administrator rights are needed to create the boota-
ble USB stick.
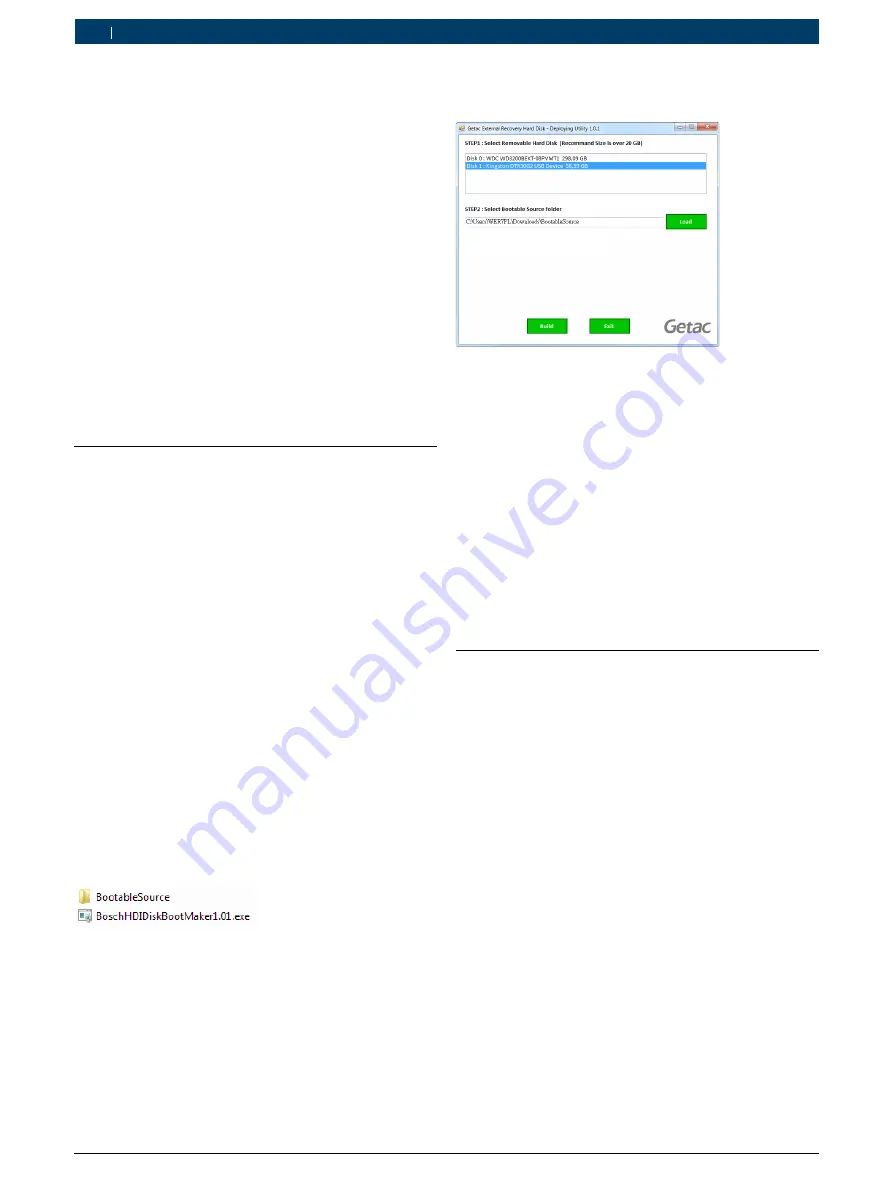
1.
Download the software BoschBEA750RecoveryMaker
from
http://cdn.esitronic.de/BEA/Service/BoschBEA750RecoveryMaker.zip
.
2.
Unzip the zip file at a desired location with enough
free storage capacity (e. g. Desktop or My Docu-
ments).
?
This creates a folder and an executable file:
3.
Connect the USB stick.
4.
Execute the software BoschHDIDiskBootMakerX.
XX.exe with a double click.
5.
In STEP 1, select the appropriate USB stick.
6.
In STEP 2, specify the path to the "Bootable Source"
folder.
i
If the executable file and the "Bootable Source folder"
are in the same directory, the software will automati-
cally select the correct path.
7.
Select <
Build
>.
?
The message "Deploying successfully" appears.
8.
Select <
Exit
>.
"
The USB stick is now converted into a bootable USB
stick.
!
The USB stick is now bootable, but it does not yet
contain any image and therefore no system data.
In this state, the USB stick is not yet suitable for
installation.
1.2
Loading the current Windows image
to the USB stick
i
The size of the recovery image is approx. 4 GB. The
download can therefore take some time to complete,
depending on the Internet connection.
1.
Download the current Windows image from the
following link.
http://cdn.esitronic.de/BEA/750/Recovery/pr7bosch.wim
2.
Connect the USB stick.
3.
Copy the WIM file to the
sources
folder on the USB
stick.
"
The image is on the USB stick and can be used for the
installation.
i
As long as there is no new version of the Bosch-
HDIDiskBootMaker software available, a new image
can be run by replacing the old WIM file on the USB
stick.
!
The USB stick with this image can be used for
recovery of every country variant. In this case, the
recovery process only restores the operating system.
The desired country variant must be installed after-
wards, see 1.4.
1 689 978 638
2019-04-08
|
Robert Bosch GmbH
6 | 1 687 370 330 | Recovery via USB
en


