background image

27

Statement of Limited Product Warranty

Bosch Dishwashers

What this Warranty Covers & Who it Applies to: 

 The limited warranty 

provided by BSH Home Appliances (“Bosch”) in this Statement of Limited 
Product  Warranty  applies  only  to  Bosch  dishwashers  (“Product”)  sold  to 

you, the  rst using purchaser, provided that the Product was purchased: 

(1) for your normal, household (non-commercial) use, and has in fact at 
all times only been used for normal household purposes; (2) new at retail 
(not a display, “as is”, or previously returned model), and not for resale, or 
commercial use; and (3) within the United States or Canada, and has at 
all times remained within the country of original purchase. The warranties 

stated herein apply only to the  rst purchaser of the Product and are not 

transferable.  

• 

Please  make  sure  to  return  your  registration  card;  while  not 
necessary to effectuate warranty coverage, it is the best way for 
Bosch to notify you in the unlikely event of a safety notice or product 
recall. 

How Long the Warranty Lasts: 

 Bosch warrants that the Product is free 

from defects in materials and workmanship for a period of three hundred 

sixty  ve (365) days from the date of purchase.  The foregoing timeline 

begins to run upon the date of purchase, and shall not be stalled, tolled, 
extended, or suspended, for any reason whatsoever.    Labor and shipping 
costs are included in this basic coverage.

Extended Limited Warranty:

  Bosch also provides these additional limited 

warranties: 

• 

2  Year  Limited  Warranty: 

  Bosch  will  repair  or  replace  any 

component that proves to be defective in materials or workmanship 
(excludes labor charges).

• 

5  Year  Limited  Warranty  on  Electronics:

    Bosch  will  repair  or 

replace  any  Bosch  microprocessor  or  printed  circuit  board  if  it 
proves to be defective in materials or workmanship (excludes labor 
charges).

• 

5 Year Limited Warranty on Dish Racks:

  Bosch will replace the 

upper or lower dish rack (excluding rack components), if the rack 
proves  defective  in  materials  or  workmanship  (excludes  labor 
charges).

• 

Lifetime Warranty against Stainless Steel Rust Through:

 Bosch 

will  replace  your  dishwasher  with  the  same  model  or  a  current 
model that is substantially equivalent or better in functionality, if 
the inner liner should rust through (excludes labor charges). Bosch 
will replace the stainless steel door if the door should rust through 
(excludes labor charges).

The  foregoing  timeline  begins  to  run  upon  the  date  of  purchase,  and 
shall  not  be  stalled,  tolled,  extended,  or  suspended,  for  any  reason 
whatsoever.  

Repair/Replace as Your Exclusive Remedy


During this warranty period, 

Bosch or one of its authorized service providers will repair your Product 
without charge to you (subject to certain limitations stated herein) if your 
Product proves to have been manufactured with a defect in materials or 
workmanship.    If  reasonable  attempts  to  repair  the  Product  have  been 
made  without  success,  then  Bosch  will  replace  your  Product  (upgraded 
models may be available to you, in Bosch’s sole discretion, for an additional 
charge).  All removed parts and components shall become the property 
of Bosch at its sole option. All replaced and/or repaired parts shall assume 
the  identity  of  the  original  part  for  purposes  of  this  warranty  and  this 
warranty shall not be extended with respect to such parts. Bosch’s sole 
liability and responsibility hereunder is to repair manufacturer-defective 
Product  only,  using  a  Bosch-authorized  service  provider  during  normal 
business hours. For safety and property damage concerns, Bosch highly 
recommends that you do not attempt to repair the Product yourself, or 
use an un-authorized servicer; Bosch will have no responsibility or liability 
for repairs or work performed by a non-authorized servicer.  If you choose 
to have someone other than an authorized service provider work on your 
Product, THIS WARRANTY WILL AUTOMATICALLY BECOME NULL AND VOID. 
Authorized service providers are those persons or companies that have been 
specially trained on Bosch products, and who possess, in Bosch’s opinion, 
a superior reputation for customer service and technical ability (note that 
they are independent entities and are 

not

 agents, partners, af liates or 

representatives of Bosch). Notwithstanding the foregoing, Bosch will not 
incur any liability, or have responsibility, for the Product if it is located in a 
remote area (more than 100 miles from an authorized service 

provider)  or  is  reasonably  inaccessible,  hazardous,  threatening,  or 
treacherous locale, surroundings, or environment; in any such event, if 
you request, Bosch would still pay for labor and parts and ship the parts 
to the nearest authorized service provider, but you would still be fully 
liable and responsible for any travel time or other special charges by the 
service company, assuming they agree to make the service call.  

Out  of  Warranty  Product:   

Bosch  is  under  no  obligation,  at  law  or 

otherwise,  to  provide  you  with  any  concessions,  including  repairs,  
pro-rates, or Product replacement, once this warranty has expired.

Warranty Exclusions: 

 The warranty coverage described herein excludes 

all defects or damage that are not the direct fault of Bosch, including 

without limitation, one or more of the following: (1) use of the Product 

in  anything  other  than  its  normal,  customary  and  intended  manner 
(including without limitation, any form of commercial use, use or storage 
of an indoor product outdoors, use of the Product in conjunction with air 
or water-going vessels); (2) any party’s willful misconduct, negligence, 
misuse,  abuse,  accidents,  neglect,  improper  operation,  failure  to 
maintain, improper or negligent installation, tampering, failure to follow 
operating instructions, mishandling, unauthorized service (including self-

performed “ xing” or exploration of the appliance’s internal workings); (3) 

adjustment, alteration or modi cation of any kind; (4) a failure to comply 

with any applicable state, local, city, or county electrical, plumbing and/or 
building codes, regulations, or laws, including failure to install the product 

in strict conformity with local  re and building codes and regulations; 

(5) ordinary wear and tear, spills of food, liquid, grease accumulations, 
or other substances that accumulate on, in, or around the Product; and 
(6)  any  external,  elemental  and/or  environmental  forces  and  factors, 

including without limitation, rain, wind, sand,  oods,  res, mud slides, 

freezing  temperatures,  excessive  moisture  or  extended  exposure  to 
humidity,  lightning,  power  surges,  structural  failures  surrounding  the 
appliance, and acts of God.  In no event shall Bosch have any liability or 
responsibility whatsoever for damage to surrounding property, including 

cabinetry,  oors,  ceilings,  and  other  structures  or  objects  around  the 

Product.  Also excluded from this warranty are scratches, nicks, minor 
dents, and cosmetic damages on external surfaces and exposed parts; 
Products  on  which  the  serial  numbers  have  been  altered,  defaced,  or 
removed;  service  visits  to  teach  you  how  to  use  the  Product,  or  visits 
where there is nothing wrong with the Product; correction of installation 
problems (you are solely responsible for any structure and setting for the 
Product, including all electrical, plumbing or other connecting facilities, 

for proper foundation/ ooring, and for any alterations including without 

limitation cabinetry, walls,  oors, shelving, etc.); and resetting of breakers 

or fuses.


TO THE EXTENT ALLOWED BY LAW, THIS WARRANTY SETS OUT YOUR 

EXCLUSIVE  REMEDIES  WITH  RESPECT  TO  PRODUCT,  WHETHER  THE 
CLAIM ARISES IN CONTRACT OR TORT (INCLUDING STRICT LIABILITY, 
OR NEGLIGENCE) OR OTHERWISE.  THIS WARRANTY IS IN LIEU OF ALL 
OTHER WARRANTIES, WHETHER EXPRESS OR IMPLIED. ANY WARRANTY 
IMPLIED  BY  LAW,  WHETHER  FOR  MERCHANTABILITY  OR  FITNESS 
FOR A PARTICULAR PURPOSE, OR OTHERWISE, SHALL BE EFFECTIVE 
ONLY FOR THE PERIOD THAT THIS EXPRESS LIMITED WARRANTY IS 
EFFECTIVE. IN NO EVENT WILL THE MANUFACTURER BE LIABLE FOR 
CONSEQUENTIAL, SPECIAL, INCIDENTAL, INDIRECT, “BUSINESS LOSS”, 
AND/OR  PUNITIVE  DAMAGES,  LOSSES,  OR  EXPENSES,  INCLUDING 
WITHOUT  LIMITATION  TIME  AWAY  FROM  WORK,  HOTELS  AND/OR 
RESTAURANT MEALS, REMODELLING EXPENSES IN EXCESS OF DIRECT 
DAMAGES WHICH ARE DEFINITIVELY CAUSED EXCLUSIVELY BY BOSCH, 
OR OTHERWISE.  SOME STATES DO NOT ALLOW THE EXCLUSION OR 
LIMITATION  OF  INCIDENTAL  OR  CONSEQUENTIAL  DAMAGES,  AND 
SOME  STATES  DO  NOT  ALLOW  LIMITATIONS  ON  HOW  LONG  AN 
IMPLIED WARRANTY LASTS, SO THE ABOVE LIMITATIONS MAY NOT 
APPLY TO YOU.  THIS WARRANTY GIVES YOU SPECIFIC LEGAL RIGHTS, 
AND YOU MAY ALSO HAVE OTHER RIGHTS WHICH VARY FROM STATE 
TO STATE.  

No attempt to alter, modify or amend this warranty shall be 

effective unless authorized in writing by an of cer of BSH.

How  to  Obtain  Warranty  Service:

    TO  OBTAIN  WARRANTY  SERVICE 

FOR  YOUR  PRODUCT,  YOU  SHOULD  CONTACT  THE  NEAREST  BOSCH 
AUTHORIZED SERVICE CENTER, OR CALL 800-944-2904, or write Bosch 

at:  BSH Home Appliances - 5551 McFadden Avenue, Huntington Beach, 

Summary of Contents for Ascenta Evolution SHE6AF0

Page 1: ...9000433252 Rev A 05 09 ...

Page 2: ... herein is very important We highly recommend that you read this manual before you use your dishwasher for the irst time To learn more about your dishwasher and available accessories as well as many other top quality Bosch appliances visit our website at www boschappliances com U S A OR www bosch appliances ca Canada If you have any questions or comments please contact us at 1 800 944 2904 or writ...

Page 3: ...he Dishware 4 8 Rack Accessories 5 9 10 Loading the Silverware Basket 6 11 13 Adding Detergent Rinse Agent 7 14 15 Dishwasher Features Options 8 16 Wash Cycle Information 9 17 Operating the Dishwasher 10 18 20 Care Maintenance 11 21 22 Self Help 12 23 25 Customer Service Information 13 26 Warranty Information 14 27 ...

Page 4: ...in this manual is incorrectly installed or if the dishwasher has been improperly grounded Do not use the dishwasher covered in this manual unless you are certain the electrical supply has been correctly installed or the dishwasher has been properly grounded Never use steam cleaning products to clean your dishwasher The manufacturer will not be liable for the possible damages or consequences Never ...

Page 5: ...mmendations d Do not operate your dishwasher unless all enclosure panels are in place e Do not tamper with or override controls and interlocks Do not abuse sit on or stand on the door or dish 6 racks of the dishwasher To reduce the risk of injury do not allow children 7 to play in or on the dishwasher When children become old enough to operate 8 the appliance it is the legal responsibility of the ...

Page 6: ...t Filter System Serial Number Label Top Rack Top Rack Spray Arm Bottom Rack Spray Arm Rinse Agent Dispenser Bottom Rack Silverware Basket Detergent Dispenser 2 Dishwasher Components FILTER SYSTEM Features vary by model ...

Page 7: ... Features Dishware Materials NOTE Before using your dishwasher for the irst time check the information in this section Some items are not dishwasher safe and should be handwashed others require special loading Recommended Aluminum Colored anodized aluminum may fade over time Minerals in your water may cause the aluminum to darken or spot This can usually be removed with a soap illed steel wool pad...

Page 8: ...re facing the spray arms Avoid nesting and contact points between dishes Separate items of dissimilar metals Loading the Top Rack NOTE Ensure items do not protrude through the bottom of the racks and block the spray arms NOTE When pushing the top rack into the dishwasher push it until it stops against the back of the tub so the top rack spray arm will connect to the water supply at the back of the...

Page 9: ...bags packing materials or anything other than normal dishwasher safe dishware and kitchenware NOTICE Unloading the Dishwasher Unload the bottom rack irst Unload the silverware basket Unload the top rack BOTTOM RACK 12 PLACE SETTING w Standard Silverware Basket TOP RACK 12 PLACE SETTING ...

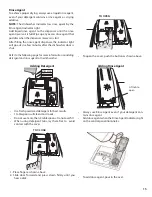
Page 10: ...ts on the bottom rack s left side or center To remove the sprinkler and return the dishwasher to its normal condition Turn the sprinkler counterclockwise and remove it Do not block vent Retrieve the top rack Tilt the rack upwards and position the top rack rollers onto the roller guides Continue pushing the top rack until the rollers are on the guide Push the rack into the dishwasher all the way Fl...

Page 11: ...e basket select models its in the back of the lower rack The basket lid can be snapped to the handle to leave the basket open CAUTION The sharp points and edges of knives and other sharp utensils can cause serious injuries Load knives and other sharp utensils with edges down Do not al low children to handle or play near knives and sharp utensils Re insert the rack with the other set of rollers on ...

Page 12: ... 4 3 6 7 The Flexible Silverware Basket This basket splits along its length resulting in two halves that may be placed in a variety of positions in the lower rack greatly increasing the lower rack s loading versatility The basket snaps together back to back as shown below To split the Flexible Silverware Basket Grasp the basket and slide the two halves in opposite directions as shown Pull the two ...

Page 13: ...13 1 Salad Fork 5 Table Spoon 2 Tea Spoon 6 Serving Spoon 3 Dinner Fork 7 Serving Fork 4 Knife Some Basket Placement Options Loading the Flexible Silverware Basket ...

Page 14: ...essary to the least amount required to get your kitchenware clean Use the measuring lines in the detergent dispenser cup as a guide to measure the amount of detergent recommended in the Tables below To avoid dishwasher damage do not use hand dishwashing products in your dishwasher To avoid dishwasher damage do not use too much detergent if your water is soft Using too much detergent in soft water ...

Page 15: ...ent pour in the oval TO CLOSE TO OPEN Adding Detergent Adding Rinse Agent 3TBSMAX 2TBS 25ML 1TBS 15ML Lift tab to open Rinse Agent To achieve proper drying always use a liquid rinse agent even if your detergent contains a rinse agent or drying additive NOTE The dishwasher indicates low rinse agent by the Rinse Agent Indicator Light Add liquid rinse agent to the dispenser until the rinse agent rese...

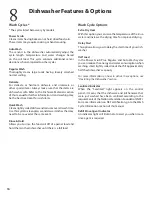
Page 16: ...Allows you to rinse the food soil of of a partial load and hold them in the dishwasher until there is a full load Wash Cycle Options Extra Dry Heat With this option you can raise the temperature of the rinse water and increase the drying time for improved drying Delay Start This option allows you to delay the start time of your dish washer Half Load In the Power Scrub Plus Regular and Auto Wash cy...

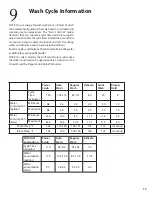
Page 17: ...feature will reduce the water consumption by approximately 30 percent in the Power Scrub Plus Regular and Auto Wash cycles Power Scrub Auto Wash Regular Wash Delicate Quick Wash Rinse Hold Cycle Time minutes 130 105 119 95 115 80 30 9 Water consumption gallons Minimum 6 8 3 6 2 3 3 0 3 0 1 0 Maximum 6 8 6 0 5 2 3 0 3 0 1 0 Water consumption liters Minimum 25 6 13 6 8 7 11 3 11 3 4 0 Maximum 25 6 2...

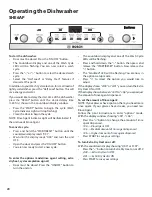
Page 18: ...adjust the Rinse Agent settings If the Clean and Sanitized LED are lashing you can set the Extra Dry Heat To set the amount of Rinse Agent NOTE If your glasses have spots on them you need more rinse agent If your glasses have streaks you need less Rinse Agent Follow the prior instructions to enter options mode With the Clean and Rinse Agent LEDs lashing Press the button to change the amount of rin...

Page 19: ...hwasher drains Press the ON OFF button The Clean indicator light will illuminate You are now ready to start a new cycle To enter the options mode rinse agent setting extra dry heat cycle completion signal Door must be closed Press the ON OFF button to turn the unit on One of the Wash Cycle LEDs will be lashing Press and hold down the button then press and release the START RESET button Now release...

Page 20: ...ing extra dry heat cycle completion signal Door must be closed Press the ON OFF button to turn the unit on The countdown display and one of the Wash Cycle LEDs will be lashing Press and hold down the button then press and release the START RESET button Now release the button The Sanitized LED will be lashing You are now in the options setup mode Press to select the option you would like to adjust ...

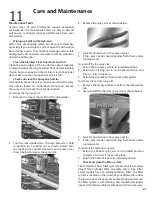
Page 21: ...urn the locking nut counter clockwise and remove it as shown below to release the spray arm Remove the spray arm as shown below 3 Look for obstruction in the spray nozzles 4 If the spray nozzles need cleaning lush them under 5 running water To reinstall the top spray arm Return the top spray arm to its installed position 1 Return the locking nut to its installed position and 2 turn it 1 8 turn clo...

Page 22: ...ise 1 4 turn until it is 2 locked The arrow on the ring handle and the arrow on the Fine Filter should point to each other Clean the Exterior Door Panel Colored Doors Use only a soft cloth that is lightly dampened with soapy water Stainless Steel Doors Use a soft cloth with a non abrasive cleaner preferably a liquid spray made for cleaning stainless steel For the best results apply the stainless s...

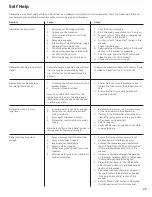
Page 23: ...isplay only illuminates when the door is opened and controls are visible Check the fuse or circuit breaker box and 1 replace the fuse or reset the breaker if neces sary Ensure that door is properly latched and 2 completely closed Dishwasher seems to run a long time Incoming water is not warm enough 1 Cycle time can vary due to soil and 2 water conditions Rinse agent dispenser is empty 3 Dishwasher...

Page 24: ... it ushes and interrupt the cycle and place an 8 oz cup of distilled white vinegar solu tion on the top rack and then nish the cycle Dishwasher not lling with water Restriction in the water supply system 1 Previous wash cycle was not com 2 pleted Delay start is active 3 Ensure that the water supply valve typically 1 located under kitchen sink is open and check that the water supply line has no kin...

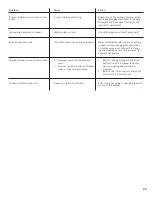
Page 25: ...suspect items are banging into each other or into the spray arms refer to the Prepar ing and Loading section of this manual for optimal arrangement Detergent dispenser cover will not shut Improper operation of detergent 1 cover Previous cycle has not been nished 2 reset or cycle was interrupted Refer to Adding Detergent and Rinse 1 Aid section of this manual for instruc tions on opening and closin...

Page 26: ...ontact your installer or the Bosch Authorized Service Contractor in your area 2 Contact Customer Service from our website www boschappliances com 3 Write us at the address below BSH Home Appliances Corporation 5551 McFadden Avenue Huntington Beach CA 92649 4 Call us at 1 800 944 2904 Please be sure to include your model information listed below as well as an explanation of the problem and the date...

Page 27: ...ed in a remote area more than 100 miles from an authorized service provider or is reasonably inaccessible hazardous threatening or treacherous locale surroundings or environment in any such event if you request Bosch would still pay for labor and parts and ship the parts to the nearest authorized service provider but you would still be fully liable and responsible for any travel time or other spec...

Page 28: ...ous recommandons fortement de lire ce guide avant d utiliser ce lave vaisselle la première fois Pour en connaître plus sur ce lave vaisselle et les accessoires disponibles ainsi que les autres appareils Bosch de haute qualité visitez notre site www boschappliances com U S A OU www bosch appliances ca Canada Vous pouvez communiquer avec nous pour tout commentaire et toute question en téléphonant au...

Page 29: ...ent de la vaisselle 4 34 35 Accessoires de panier 5 36 37 Charger la panier á ustensils 6 37 39 Ajout de Détergent Agent de rinçage 7 40 41 Options du lave vaisselle 8 42 Information sur les cycles de lavage 9 43 Fonctionnement du lave vaisselle 10 44 46 Entretien 11 47 48 Aide 12 49 51 Service à la clientèle 13 52 Énoncé de la garantie 14 53 ...

Page 30: ...électrique au lave vaisselle décrit dans ce guide est mal installée ou si la mise à la terre est inadéquate Ne pas utiliser l appareil en cas d incertitude quant à l alimentation électrique Ne jamais utiliser de produits nettoyants à vapeur pour nettoyer le lave vaisselle Le fabricant ne sera pas responsable des dommages ou problèmes possibles Ne jamais utiliser de produits chimiques pour nettoyer...

Page 31: ...les lave vaisselle En cas de doute voir les recommandations du fabricant d Ne pas actionner l appareil si les panneaux ne sont pas en place e Ne pas jouer avec ni outrepasser les contrôles et les dispositifs de verrouillage Ne pas abuser s asseoir ni se tenir debout sur la 6 porte ni sur les paniers de l appareil Pour réduire tout risque de blessures ne pas 7 laisser les enfants jouer avec ou dans...

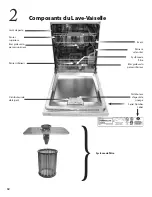
Page 32: ...erial Number Label Panier supérieur Bras gicleur du panier supérieur Bras gicleur du panier inférieur Distributeur d agent de rinçage Panier inférieur Panier à ustensiles Distributeur de détergent 2 Composants du Lave Vaiselle Système de iltre ...

Page 33: ...e lave vaisselle la première fois consulter l information ci dessous Certains articles ne vont pas au lave vaisselle et devraient être lavés à la main d autres requièrent un chargement spécial Communiquer avec le fabricant de ces articles ain de s assurer qu ils vont au lave vaisselle en toute sécurité Recommandés Aluminum L aluminium anodisé coloré peut pâlir avec le temps Les minéraux dans l eau...

Page 34: ...les points de contact entre les articles Séparer les articles de métaux diférents Chargement du panier supérieur REMARQUE s assurer que les articles ne dépassent pas le fond du panier et n obstruent pas les bras gicleurs REMARQUE au moment de pousser le panier supérieur dans le lave vaisselle le pousser jusqu au fond ain que le bras gicleur supérieur se branche sur l alimentation en eau Ne pas pou...

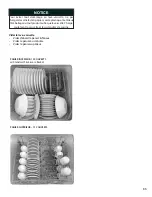
Page 35: ... emballageoutoutproduitautrequelavaisselle Charger seulement la vaisselle et les ustensiles de cuisine NOTICE Vider le lave vaisselle Vider d abord le panier inférieur Vider le panier à ustensiles Vider le panier supérieur PANIER INFÉRIEUR 12 COUVERTS w Standard Silverware Basket PANIER SUPÉRIEUR 12 COUVERTS ...

Page 36: ... et remettre l appareil en état initial Tourner le bras gicleur dans le sens contre horaire et Ne pas obstruer l évent l enlever Reprendre le panier supérieur Incliner le panier vers le haut et positionner les roulettes sur les guides Continuer de pousser jusqu à ce que les roulettes soient dans les guides Pousser complètement le panier jusqu au fond Dents rabattables Les paniers de certains modèl...

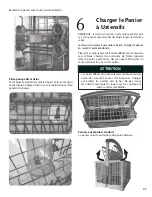
Page 37: ...r à ustensiles abaissé charger le panier en suivant l exemple donné Placerlescouteauxetlesustensilesafûtésaveclemanche vers le haut Charger des ustensiles de forme spéciale dans le panier à ustensiles dessus ouvert ain qu ils ne s entassent pas les uns sur les autres ATTENTION Les bords afûtés et tranchants des couteaux et autres ustensiles peuvent causer des blessures Charger ces articles les poi...

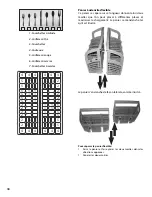
Page 38: ...tiés que l on peut placer à diférentes places et maximiser le chargement Le panier se réenclenche tel qu il est illustré Pour séparer le panier lexible Saisir le panier et faire glisser les deux moitiés dans des directions opposées Séparer les deux moitiés Le panier s enclenche de façon latérale comme illustré 4 5 5 5 1 1 1 1 1 1 1 1 1 1 1 1 5 5 5 2 2 2 2 2 2 2 2 2 2 2 2 5 5 5 5 5 5 4 4 4 3 3 3 3 ...

Page 39: ...39 OPTIONS D EMPLACEMENT DE PANIER 1 Fourchettes à salade 5 Cuillères à soupe 2 Cuillères à thé 6 Cuillères à service 3 Fourchettes 7 Fourchettes à service 4 Couteaux ...

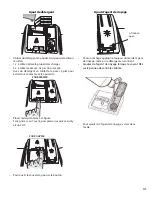
Page 40: ... main dans l appareil Pour éviter tout dommage ne pas trop utiliser de détergent si l alimentation en eau est douce cela cause des rayures sur les verres ATTENTION REMPLISSAGE Du DISTRIBuTEuR DE DéTERGENT Remplir le distributeur tel qu il est recommandé dans le tableau ci dessus REMARQuE le lave vaisselle indique que l agent de rinçage est bas par un symbole à l aichage à rebours Ajouter de l agen...

Page 41: ...jours utiliser de l agent de rinçage même si le détergent en contient Ajouter de l agent de rinçage lorsque le voyant DEL sur le pannau de contrôle s allume Placer le doigt comme à la igure Faire glisser vers l avant puis presser jusqu à ce qu il y ait un CLIC Pour ouvrir le couvercle pousser le bouton Pour ajouter de l agent de rinçage verser dans l ovale POUR FERMER POUR OUVRIR Ajout de détergen...

Page 42: ...us régulier lavage automatique et délicat économique l on peut réduire la consommation d énergie et d eau au moment de laver de petite charge légèrement sale qui remplit environ la moitié du lave vaisselle Pour activer sélectionner la touche demie charge en plus de la touche du cycle récurage puissant plus régulier lavage automatique ou délicat économique Chaleur de séchage additionnelle Avec cett...

Page 43: ...onibles pour le modèle en particulier REMARQUE sur certains modèles la demie charge réduit la consommation d eau d environ 30 pour les cycles de ré curage plus régulier et lavage automatique Power Scrub Auto Wash Regular Wash Delicate Quick Wash Rinse Hold Durée Cycle minutes 130 105 119 95 115 80 30 9 Conosommation en eau en gallons Minimum 6 8 3 6 2 3 3 0 3 0 1 0 Maximum 6 8 6 0 5 2 3 0 3 0 1 0 ...

Page 44: ... la quantité d agent de rinçage REMARQUE Si les verres sont tachés il faut plus d agent de rinçage si les verres sont rayés il en faut moins Suivre les instructions ci dessus pour passer en mode op tion Lorsque les voyants DEL propre et agent de rinçage clignotent Presser la touche pour changer la quantité d agent de rinçage 0 DEL distributeur d agent de rinçage hors circuit 1 DEL quantité minimal...

Page 45: ...ne Fermer la porte et attendre 1 minute ain que le lave vaisselle se draine Ouvrir la porte et presser la touche MARCHE ARRÊT L on peut maintenant enclencher un nouveau cycle Pour passer en mode option réglage agent de rinçage chaleur de séchage additionnelle signal de in de cycle La porte doit être fermée Presser la touche MARCHE ARRÊT pour mettre l appareil en circuit Un des voyants DEL de cycle...

Page 46: ...ARCHE ARRÊT L on peut maintenant enclencher un nouveau cyc Pour passer en mode option réglage agent de rinçage chaleur de séchage additionnelle signal de in de cycle La porte doit être fermée Presser la touche MARCHE ARRÊT pour mettre l appareil en circuit Un des voyants DEL de cycle de lavage clignote Presser et maintenir la touche puis presser et relâcher MARCHE REMISE Relâcher la touche Le voya...

Page 47: ...er cet écrou dans le sens contre horaire et l enlever comme ci dessous pour dégager le bras gicleur Enlever le bras gicleur comme ci dessous 3 Vériier s il y a des obstructions dans les trous 4 S il faut le nettoyer le passer à l eau courante 5 Pour réinstaller le bras gicleur supérieur Remettre le bras gicleur à sa position initiale 1 Remettre l écrou de verrouillage en position initiale et 2 le ...

Page 48: ...à ce qu il se verrouille La lèche sur la poignée et celle du iltre in doivent pointer l une vers l autre Nettoyer le panneau de porte extérieur Porte de couleur Utiliser seulement un chifon doux légèrement humide d eau savonneuse Porte en acier inoxydable Utiliser un chifon doux avec un nettoyant non abrasif préférablement en vaporisateur conçu pour l acier inoxydable Pour de meilleurs résultats a...

Page 49: ... que les contrôles sont visibles Le lave vaisselle semble fonc tionner longtemps 1 L eau de remplissage n est pas suf sam ment chaude 2 La durée du cycle peut varier à cause de la saleté et des conditions de l eau 3 Le distributeur d agent de rinçage est vide 4 Le lave vaisselle est branché sur l alim entation en eau froide Remarque Données du tableau de cycle dans ce guide pour la durée t ypique ...

Page 50: ...rnier cycle Consulter Annuler ou changer un cycle dans ce guide 5 Enlever toute obstruction du tuyau de drain age en téléphonant à du personnel quali é Remarque si l odeur persiste effectuer un cycle de lavage normal pour vidanger puis arrêter le cycle et mettre une tasse de 8 onces de solution de vinaigre blanc distillé dans le panier supérieur et terminer le cycle Le lave vaisselle ne se remplit...

Page 51: ...té interrompu Consulter Ajout de détergent et d agent 1 de rinçage dans ce guide sur les in structions sur la façon d ouvrir et fermer le couvercle Consulter Annuler ou changer un cycle 2 dans ce guide Impossible de sélectionner le cycle désiré Le cycle précédent n est pas complété Consulter Annuler ou changer un cycle dans ce guide Problem Cause Action Taches dans la cuve Les taches à l intérieur...

Page 52: ...e 1 Communiquer avec l installateur ou un centre de service autorisé Bosch dans la région 2 Communiquer avec le service à la clientèle du site www boschappliances com 3 Écrire à l adresse ci dessous BSH Home Appliances Corporation 5551 McFadden Avenue Huntington Beach CA 92649 4 Téléphoner au 1 800 944 2904 S assurer d inclure l information du modèle indiquée ci dessous ainsi qu une explication du...

Page 53: ...sible de façon raisonnable dans un environnement hasardeux dangereux dans une telle éventualité à la demande du consommateur Bosch pourrait payer les frais de main d œuvre et de pièces et expédier les pièces à un centre de service autorisé le plus près mais le consommateur serait entièrement responsable pour toute durée de déplacement et autres frais spéciaux encourus par le centre de service en a...

Page 54: ...ste manual antes de utilizar su lavadora de platos por la primera vez Para averiguar aún más detalles acerca de su lavadora de platos y los accesorios disponibles además de muchos otros aparatos domésticos de la alta calidad Bosch visite nuestro sitio web a www boschappliances com U S A OR www bosch appliances ca Canada Por favor comuníquese con nosotros en caso que tenga preguntas o comentarios N...

Page 55: ...0 61 Como Cargar la lavadora de Platos 5 62 63 Cómo Cargar la Canasta para Cubiertos 6 63 65 Cómo Añadir Detergente y Agente de Enjuague 7 66 67 Caracteristicas y Opciones 8 68 Información de los Ciclo de Lavado 9 69 Cómo Operar la Lavadora de Platos 10 70 72 Cuidado y Mantenimiento 11 73 74 Autoayuda 12 75 77 Servicio al Cliente 13 78 Información de la Garantía 14 79 ...

Page 56: ...uandolalavadoradeplatosseconectómal atierra existeelriesgodeunadescargaeléctricaoun fuego No use la lavadora de platos cubierta en este manual si usted no está seguro que la alimentación eléctrica ha sido instalada correctamente o que el lavavajillas ha sido aterrizado correctamente Nunca use productos de limpieza con vapor para limpiar su lavadora de platos El fabricante no será responsable de po...

Page 57: ...para averiguar sus recomendaciones d No opere su lavadora de platos a menos de que todos los paneles del gabinete estén instalados correctamente e No intente alterar modiicar o sobrecontrolar los controles o los interruptores de seguridad eléctricos No abuse ni se siente o se pare en la puerta o en 6 las rejillas para trastes de la lavadora de platos Con el in de reducir el riesgo de heridas no 7 ...

Page 58: ...n el número de Modelo Serie Rejilla superior Brazo rociador de la rejilla superior Brazo rociador de la rejilla inferior Surtidor del Agente de Enjuague Rejilla inferior Canasta para los cubiertos Surtidor de Detergente 2 Componentes de la Lavadora de Platos Sistema de Filtración ...

Page 59: ...dora de platos por primera vez revise la información en esta sección Algunos artículos que usted desea limpiar no están a prueba de lavadora de platos y deben ser lavados a mano otros requieren de un acomodo especial Póngase en contacto con el fabricante del artículo si usted tiene dudas acerca de que el uso de la lavadora de platos sea apropiado Recomendado Aluminio El aluminio anodizado de color...

Page 60: ...llas y sartenes encaren los brazos rociadores Evite amontonar las piezas y los puntos de contacto entre éstas Separe los artículos hechos de metales diferentes Cómo Cargar la Rejilla Superior NOTA Asegúrese que los artículos no se salgan del fondo de las rejillas y que bloqueen los brazos rociadores NOTA Cuando reintroduzca la rejilla superior hacia adentro de la lavadora de platos empújela hasta ...

Page 61: ... sea vajilla o utensilio de cocina normal a prueba de lavadoras de platos AVISO Cómo Descargar la Lavadora de Platos Descargue primero la rejilla inferior Descargue la canasta para cubiertos Descargue la rejilla superior REJILLA INFERIOR Juego de vajilla para 12 personas w Standard Silverware Basket REJILLA SUPERIOR Juego de vajilla para 12 personas ...

Page 62: ... tablas de plástico para cortar alimentos y No tape la abertura de ventilación las bandejas para hornear en el lado izquierdo de la rejilla inferior o en el centro Para extraer el rociador y restablecer la lavadora de platos a su condición normal Gire el rociador en el sentido contrario del reloj y sáquelo Recoja la rejilla superior Incline la orilla delantera de la rejilla superior hacia ar riba ...

Page 63: ...s cubiertos según los modelos indicados abajo Acomode los cuchillos y artículos ilosos con el mango hacia arriba pero los tenedores y cucharas con el mango hacia abajo En caso de que tenga que cargar artículos grandes o algunos de forma irregular en la canasta para los cubiertos con la tapadera hacia arriba acomódelos de modo que no se amontonen PRECAUCIÓN Las puntas ilosas o los ilos de cuchillos...

Page 64: ... y así ampliar considerablemente su versatilidad para cargarla Se pueden unir ambas mitades a presión para volver a formar una canasta completa como se muestra abajo Cómo Dividir la Canasta para los Cubiertos Agarre la canasta y deslice las dos mitades en direcciones opuestas tal como se muestra Jale y separe las dos mitades También se pueden unir las mitades a lo largo como se muestra abajo 4 5 5...

Page 65: ...nas Sugerencias Cómo Puede Acomodar las Mitades La Canasta Flexible para los Cubiertos 1 Tenedor para Ensalada 5 Cuchara Grande 2 Cucharita 6 Cuchara de Servir 3 Tenedor de Mesa 7 Tenedor de Servir 4 Cuchillo ...

Page 66: ... agua en su casa es blanda Demasiado detergente en agua muy blanda puede rayar la cristalería ATENCIÓN Agente de Enjuague Paralograrunsecadoapropiado siempreuseunagentede enjuague líquido aún si su detergente también contiene algún agente de enjuague o aditivo para secado NOTA La lavadora de platos indica la falta del agente de enjuague exhibiendo el símbolo en el visualizador de cuenta regresiva ...

Page 67: ...ue aún cuando su de tergente contenga un agente de enjuague Añada agente de enjuague cuando se ilumina la luz LED en el panel de control Coloque su dedo como se muestra arriba Deslicelatapahaciaadelanteypresiónelairmemente hasta que la tapa cierre a presión Presione el botón como se muestra arriba para abrir la tapa Para añadir agente de enjuague échelo en el óvalo Para Cerrar Para Abrir Cómo Añad...

Page 68: ...s de una carga parcial de vajillas y retener o guardarlos en la lavadora de platos hasta que se llene ésta Opciones de los Ciclos de Lavado Calor Extra Secante Con esta opción usted puede subir la temperatura del agua de enjuague y aumentar el tiempo de secado lo cual producirá un secado mejor Retardar la Puesta en Marcha Esta opción le permite retardar el tiempo de la puesta en marcha para su lav...

Page 69: ...onibles en su modelo especíico NOTA En algunos modelos la opción de Media Carga re ducirá el consumo de agua por casi el 30 porciento en los ciclosdelavadoPowerScrubPlus FregadoPotente Regular y Automático Fregado Fuerte Lavado Automatico Lavado Regular Lavado Delicado Lavado Rápido Enjuagar y Retener Tiempo de ciclo minutos 130 105 119 95 115 80 30 9 Consumo de agua en galones Mínimo 6 8 3 6 2 3 ...

Page 70: ...len rayados usted necesita menos agente de enjuague Siga las instrucciones anteriores para entrar al modo de opciones Con los LEDs de Limpio y Agente de En juague parpadeando Pulse el botón para cambiar la cantidad de agente de enjuague dispensado 0 LEDs parpadean Dispensador del agente de en juague está apagado 1 LED parpadea Mínima cantidad del agente de en juague 2 LEDs parpadean Cantidad media...

Page 71: ...n ciclo Mantenga presionado el botón START RESET hasta que se apague el LED de Activo Espere 1 minuto hasta drenar la lavadora Pulse el botón On Of Prender Apagar Ahora usted puede iniciar un ciclo nuevo Para entrar al modo de opciones ajuste del agente de enjuague calor extra secante señal de terminación de ciclo La puerta debe estar cerrada Pulse el botón ON OFF Prender Apagar para prender la la...

Page 72: ...uerta y pulse el botón On Of Prender Apagar Ahora usted puede iniciar un ciclo nuevo Para entrar al modo de opciones ajuste del agente de enjuague calor extra secante señal de terminación de ciclo La puerta debe estar cerrada Pulse el botón ON OFF Prender Apagar para prender la lavadora Uno de los LEDs del Ciclo de Lavado estará parpade ando Mantenga presionado el botón luego pulse y suel te el bo...

Page 73: ...rejilla El brazo rociador superior está sujetado 2 con una contratuerca como se muestra abajo Gire la tuerca en sentido contrario del reloj y quítela como se muestra abajo para soltar el brazo rociador Desprenda el brazo rociador como se muestra abajo 3 Revise que las boquillas rociadoras no estén obstruidas 4 Si se necesita destapar las boquillas límpielas bajo un 5 chorro de agua Para reinstalar...

Page 74: ...n sentido del reloj hasta que 2 quede bloqueada La lecha en la agarradera de anillo y la lecha en el iltro ino deben apuntarse una a la otra Limpiar la Cara Exterior de la Puerta Puertas Pintadas Use únicamente un paño suave ligeramente humedecido con agua enjabonada Puertas de Acero Inoxidable Use un paño suave con un limpiador no abrasivo preferiblemente en forma líquida suministrado a través de...

Page 75: ...e o la caja del cortacircuitos y 1 cambie el fusible o resetee el cortacircuitos si es necesario Asegúrese que la puerta esté bien trancada y 2 completamente cerrada Parece que el ciclo dura demasiado tiempo en termi narse El agua entrante no está caliente 1 El tiempo del ciclo puede variar debido 2 a las suciedades y las condiciones del agua El surtidor del agente de enjuague 3 está vacío El lava...

Page 76: ...errumpa el ciclo y ponga una taza de 8 oz 0 25 l de vinagre blanco destilado en la rejilla superior y luego termine el ciclo La lavadora de platos no se llena con agua El sistema de suministro de agua tiene 1 un ujo reducido No se terminó el ciclo de lavado 2 anterior Está activada la opción Retardar la 3 Puesta en Marcha Asegúrese que la válvula de suministro de agua 1 esté abierta generalmente d...

Page 77: ...o si usted sospecha que los trastes se están pe gando o que están pegando los brazos rocia dores consulte la sección Preparar y Cargar de este manual para un óptimo acomodo La tapa del surtidor de detergente no se cierra Operación equivocada de la tapa de 1 detergente El ciclo anterior no ha terminado no 2 ha sido reseteado o el ciclo fue inter rumpido Consulte la sección Añadir Detergente 1 y Age...

Page 78: ...atista de servicio autorizado por Bosch en su área 2 Póngase en contacto con el servicio al cliente a través de la página Web www boschappliances com 3 Escríbanos a la siguiente dirección BSH Home Appliances Corporation 5551 McFadden Avenue Huntington Beach CA 92649 4 Llámenos al1 800 944 2904 Por favor incluya la información de su modelo listado abajo así como una explicación del problema y la fe...

Page 79: ...sted lo solicita Bosch aún así pagaría la mano de obra y las partes y enviaría las partes al proveedor de servicio autorizado más cercano pero usted tendría toda la responsabilidad de viajar y enfrentar los gastos especiales generados por la empresa de servicio suponiendo que ésta acepta la visita para dar el servicio Producto fuera de garantía Bosch no está obligado por la ley o de otra forma de ...

Page 80: ...e modiier les données techniques ou le design sans préavis Certains modèles sont certiiés pour une utilisation au Canada BSH n est pas responsable pour les produits transportés des États Unis pour une utilisation au Canada Vériier auprès d un marchand ou distributeur canadien BSH Home Appliances Corporation 5551 McFadden Avenue Huntington Beach CA 92649 BSHsereservaelderechodemodiicarlasespeciicac...

Reviews: