background image

EN

WWW.BORMANNTOOLS.COM

4

Operating instructions

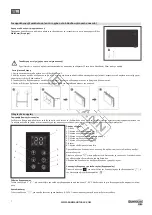
Wall mounting (While use the heater as fixed appliance)

Please note that the product must be installed at least 15 cm from the floor and 50 cm from the ceiling.

- For wall mounting study scheme 

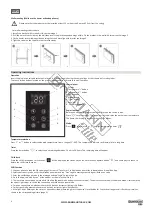
1. Install the bracket with screws firstly, see the image 1.

2. Drill the holes at each sides on the wall,then insert the plastic expanded plugs within, Fix the bracket in the wall with screw,see the image 2.

3. Fit the heater into suitable position ensuing that the holes align with bracket see image 3.

4. Tight the screw on the top of bracket to catch steady.

Wall

Operation

Insert the plug into a suitable socket outlet on an A.C. power supply having the same voltage as that shown on its rating label.

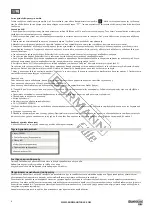
The touch screen buttons located on the product correspond to the remote control functions:

Control panel

1. Display

2. Tempe” button

3. Temperature“-“ button

4. Power button

5. Mode button

6. Timer button

7. Receiver

8.  Child clock button

1. 

5. 

6. 

7. 
8. 

4. 

3. 

2. 

Power function

Before you working the heater,your should turn on the switch in side.

Press “

” to set functions. The upper part of the display shows the room temperature

The heater is working at low power heating conditions.

Mode

Press “

” to regulate low ''  '', or high temperature power ''

''.

Temperature selection 

Press "+" or "-" button to select the desired temperature from a range of 5°-40°C. The temperature indicator will remain lit for a long time.

Timer

Press the timer button ”

”, to select the desired range between 1 hour to 24 hours. The remaining time will appear.

Child clock

Press the child clock button for 3 seconds, ”

” will be display on the screen,so you can not make any operate beside ”

 ”, and same ways to touch to 

delete the child clock function.

WIFI Function

1. Use your phone to scan the QR code (page 2)or search “Tuya Smart” in Application on market to download and install the App.

2. Select your country code, enter the cellphone number and tap “Get” to get a message containing verification on code.

3. Enter the verification on code in the message and tap“Login” to login the App.

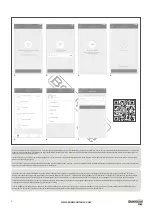
4. Go to the App, tap “add device” at the bottom, as shown in the picture 1. 

5. There are two connection on methods for the App (hotspot mode and quick connect mode). The quick connect mode is the default mode. Users could tap 

the upper right corner to switch the connection on method to hotspot mode.

a. For quick connect mode, please make sure the device’s instructor light quickly flashes.

b. For hotspot mode, please make sure the device’s instructor light slowly flashes.

c. If the light is not flashing as the status as above described, please long press the device’s reset button for 5 seconds or longer until it flashes correctly as 

shown in the corresponding picture (page 2).

Summary of Contents for Elite 036791

Page 1: ...WWW BORMANNTOOLS COM en el v2 1 BEH5250 036791 ...

Page 2: ...rvice department of the manufacturer Ο κατασκευαστής διατηρεί το δικαίωμα να πραγματοποιήσει δευτερεύουσες αλλαγές στο σχεδιασμό του προϊόντος και στα τεχνικά χαρακτηριστικά χωρίς προηγούμενη ειδοποίηση εκτός εάν οι αλλαγές αυτές επηρεάζουν σημαντικά την απόδοση και λειτουργία ασφάλειας των προϊόντων Τα εξαρτήματα που περιγράφονται απεικονίζονται στις σελίδες του εγχειριδίου που κρατάτε στα χέρια ...

Page 3: ...d until it has been inspected by a qualified service center 18 Close supervision is necessary when the heater is being used by or near children persons suffering from any physical impairment or pets 19 Do not use to dry clothes or any fabric 20 Do not use the heater to dry your laundry Never obstruct the intake and outlet grilles danger of overheating 21 Do not move the appliance while it is funct...

Page 4: ...power Temperature selection Press or button to select the desired temperature from a range of 5 40 C The temperature indicator will remain lit for a long time Timer Press the timer button to select the desired range between 1 hour to 24 hours The remaining time will appear Child clock Press the child clock button for 3 seconds will be display on the screen so you can not make any operate beside an...

Page 5: ...ccount g About 9 Add sharing As shown in the picture users could type in a new member s cellphone number and share the device with him The new member could con trol the device with his own account see picture 7 Operating sound The appliance emits a beep upon each operation setting Cleaning and maintenance Before cleaning always remove the plug from the electrical socket outlet Clean the air inlet ...

Page 6: ... αυτό μπορεί να προκαλέσει ηλεκτροπληξία πυρκαγιά ή βλάβη στη συσκευή 17 Εάν η συσκευή έχει πέσει ή έχει υποστεί βλάβη δεν πρέπει να χρησιμοποιείται μέχρι να επιθεωρηθεί από το εξειδικευμένο τμήμα σέρβις 18 Είναι απαραίτητη η στενή επιτήρηση όταν η θερμάστρα χρησιμοποιείται από ή κοντά σε παιδιά άτομα που πάσχουν από οποιαδήποτε σωματική βλάβη ή κατοικίδια ζώα 19 Μη χρησιμοποιείτε την συσκευή για ...

Page 7: ...υ και βεβαιωθείτε πως η τάση της αντιστοιχεί στην ετικέτα τεχνικών χαρακτηριστικών του Τα πλήκτρα της οθόνης αφής στον πίνακα ελέγχου της συσκευής εκτελούν τις αντίστοιχες λειτουργίες με αυτές του τηλεχειριστηρίου Πίνακας ελέγχου 1 Οθόνη 2 Πλήκτρο ελέγχου θερμοκρασίας 3 Πλήκτρο ελέγχου θερμοκρασίας 4 Πλήκτρο ενεργοποίησης απενεργοποίησης 5 Πλήκτρο επιλογής λειτουργίας 6 Πλήκτρο ελέγχου χρονοδιακόπ...

Page 8: ...ε στον πίνακα ελέγχου της συσκευής Παρατηρήσεις Όταν η συσκευή είναι συνδεδεμένη θα υπάρχει μια πράσινη κουκκίδα στο μπροστινό μέρος του εικονιδίου της συσκευής Όταν η συσκευή είναι εκτός σύνδεσης η κουκκίδα θα είναι γκρίζα Εάν η συσκευή είναι διαθέσιμη για σύνδεση και με άλλους χρήστες θα εμφανίζεται ένας διπλός βρόχος 8 Το προφίλ μου είναι το σημείο όπου οι χρήστες μπορούν να διαχειριστούν προσω...

Page 9: ......

Reviews: