


EN
WWW.BORMANNTOOLS.COM
5
MIG WELDING PRINCIPLES
MIG (Metal Inert Gas) welding allows you to fuse together two similar metals without altering the proper-
ties of the metal. A consumable wire electrode is continuously fed through the welding torch that is fitted
with a concentric gas nozzle. the wire is connected to a high voltage supply which creates an electric arc
between the electrode (the wire) and the workpiece. The arc is used to create the required heat to turn
the metal into a molten state. The wire is used as both the electrode and as a filler.
The gas is used to prevent oxidation and to shield the arc and the weld from atmospheric contamination.
The choice of gas is dependent upon the material being welded.
*Under certain conditions
When using the welder in a gasless configuration the shielding gas is created from the flux within the welding wire. When using the welder outside, you may
need to erect a wind break to make sure the shielding gas is not blown away, thereby leaving a poor quality weld.
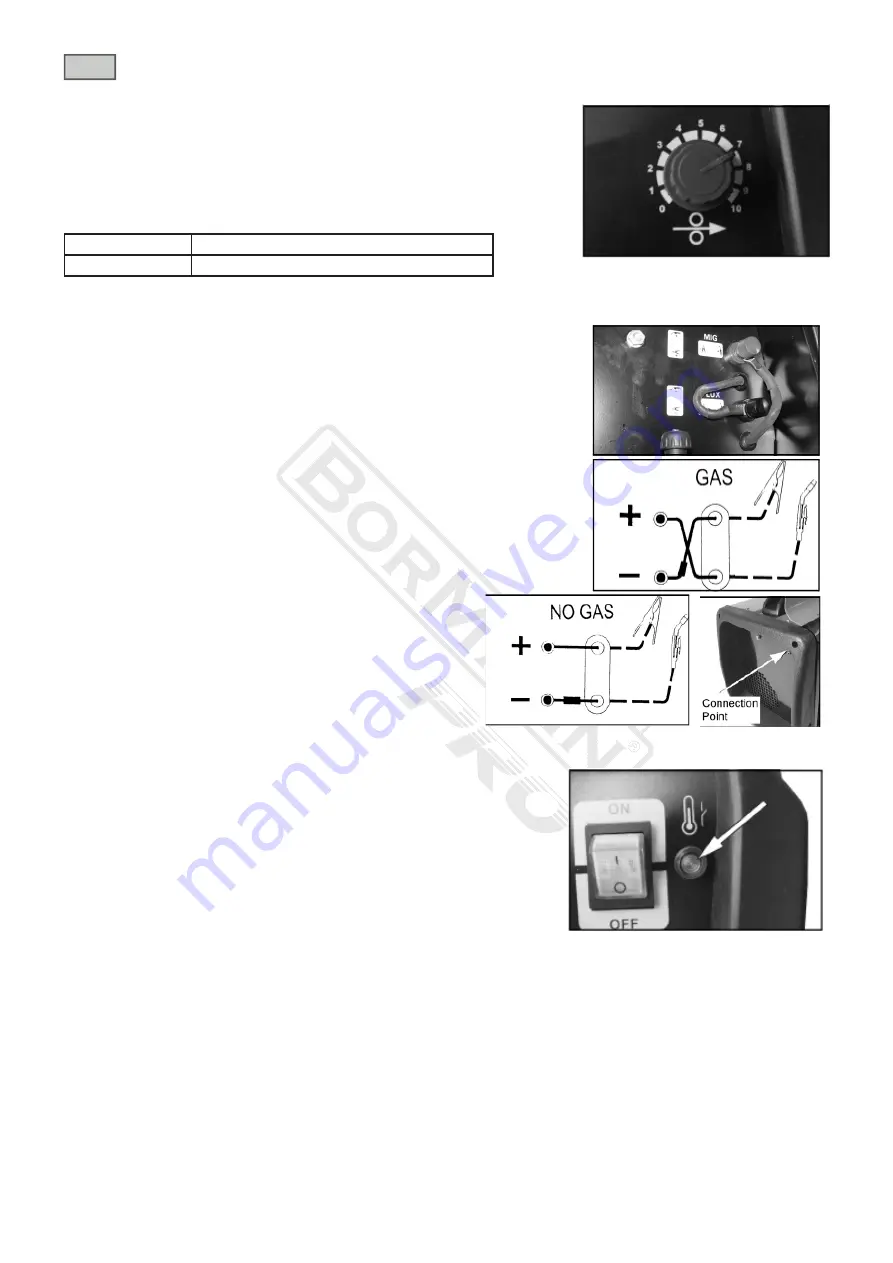
GAS/NO-GAS SELECTION
The welder can be configured to weld, with or without a gas supply according to the type of welding wire
being used.
· Solid core (With Gas)
· Flux Core (No Gas)
WELDING WITH GAS
1. If using solid wire, connect the terminal as shown.
· The earth cable (Thicker Lead) should be connected to the negative (Black) terminal.
· The cable from torch (Thinner Lead) should be connected to the positive (Red) terminal.
CONNECTING THE GAS SUPPLY
2. Connect a bottled gas supply to the small tube at the back of the welder.
WELDING WITHOUT GAS
1. If using flux cored wire, connect the terminal as shown.
· The earth cable (Thicker Lead) should be connected to the positive (Red) terminal.
· The cable from torch (Thinner Lead) should be connected to the Negative (Black) terminal
Carbon Dioxide (CO2)
For Mild Steel
CO2/Argon Mix
For thin metal sheets-Mild Steel / Stainless steel*
OPERATING THE WELDER
PREPARING THE WORKPIECE
The area being welded should be perfectly clean. Any coating, plating or corrosion
must be removed, otherwise a good weld will be impossible to achieve. Attach the
earth clamp to the workpiece as close to the point of weld as possible, without it
being intrusive.
OPERATION
1. With the welding current set and the wire trimmed, set the wire feed control to 6.
2. Plug the machine into the mains supply and switch ON the machine.
3. Cover your face with a welding mask or welding helmet.
· This is essential.
4. Lower the torch to the workpiece with one hand and approach the work with the torch tip at an
angle of about 35o and pull the torch trigger fully.
· As the wire touches the workpiece, an arc will be struck.
5. In order to produce a satisfactory weld, the controls may be fine tuned as required. This will come
with practice.
NOTE:
MIG welding is an acquired skill, it is strongly advised that, if you are not fully familiar with this
type of welding, you practice on a piece of material with the same characteristics as your workpiece,
until you are satisfied with the result, and you have fine tuned your welder to produce a satisfactory
weld.
NOTE:
One of the problems experienced with novice welders, is the welding wire sticking to the
contact tip. This is as a result of the wire feed speed being too slow. It is always better therefore to
start with too high a speed, and back off slightly, to avoid the possibility of the wire welding itself to the tip. This is the reason position 6 is recommended for
start up.
NOTE:
The Wire Feed control is for fine tuning the wire speed. The speed of wire delivery will increase automatically as the current is increased. Therefore,
once the ideal speed is achieved by fine tuning, it should not be necessary to adjust this control when the welding current is changed.
NOTE:
Listen to the sound made. An irregular crackling sound denotes too high a wire speed. Decrease the speed until a regular, strong buzzing sound is
heard.
THERMAL OVERLOAD
The ‘Thermal Overload’ shuts off the welder when it becomes too hot, due to the duty cycle being exceeded. This is to prevent any damage to the machine.
When this occurs, the warning lamp shown will glow (amber). Allow the welder to cool, until the amber light extinguishes before resuming work.
Summary of Contents for 028277
Page 1: ...WWW BORMANNTOOLS COM en User Manual el BIW1300 v2 1 028277...
Page 10: ...WWW BORMANNTOOLS COM 10 EL Service...
Page 11: ......


