background image

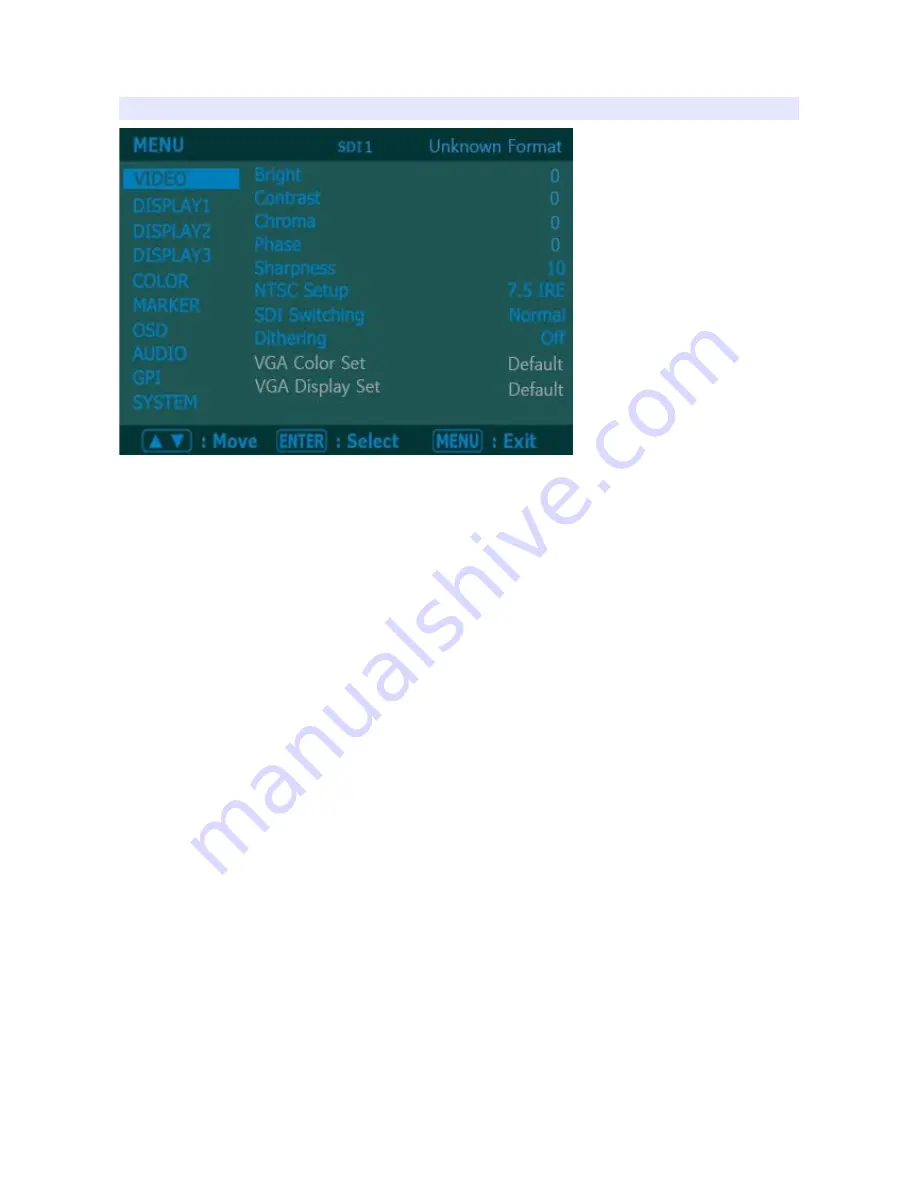
VIDEO

Brightness, Contrast, Chroma, Phase, Sharpness

Adjust color representation values.

NTSC Setup

Select IRE among 0 or 7.5 (Default)

SDI Switching

Normal : Use Normal in general condition but the screen might be blinking on 
screen change when you use Matrix or Routing Switcher.

Fast : Use Fast to minimize blinking on screen change.

Dithering

Turn this mode on to view motion pictures smoothely when the source has low 
quality.

8

Summary of Contents for BXM-183L3G

Page 1: ...Multi Format Broadcast Monitor BXM 183L3G BXM 243L3G BXM 243T3G BXM 323L3G User s Guide...

Page 2: ...16 OSD 18 AUDIO 20 GPI 22 SYSTEM 24 USB Firmware Update 26 External Remote Control 27 List of Compatible Video Formats HDMI Composite 29 List of Compatible Video Formats SDI 30 Specifications 32 Dime...

Page 3: ...ways Place the monitor on a solid surface and treat it carefully The screen is made of glass and can be damaged if dropped or sharply hit Do not attempt to remove the back cover as you will be exposed...

Page 4: ...dby 2 HDMI DVI Input 3 Analog Switches to an analog input in the order of CVBS1 CVBS2 CVBS3 SVIDEO RGB YpbPr VGA by pressing the button 4 WF VS Displays Waveform or Vector Scope The scope sizes such a...

Page 5: ...mode the order is Zero Scan Under Scan Over Scan Zoom Scan 10 H V Delay Displays auxiliary data for monitoring by H V delay This function displays for SDI CVBS S Video YpbPr RGB Input Only 11 R G B Gr...

Page 6: ...ponent YPbPr RGB or CVBS 1 2 3 Port 5 Component YPbPr RGB or CVBS 1 2 3 Port Loop Through Out 6 External Sync 7 External Sync Loop Through Out 8 DVI 9 HDMI Port 10 Ethernet Port External control via P...

Page 7: ...emote Ethernet Port 13 USB Update Port 14 Audio In Out Port MENU Description General Cautions for OSD menu or Display The menu may not be displayed even when user pressed Menu button if there s No Sig...

Page 8: ...g 0 or 7 5 Default SDI Switching Normal Use Normal in general condition but the screen might be blinking on screen change when you use Matrix or Routing Switcher Fast Use Fast to minimize blinking on...

Page 9: ...aspect ratio SDI Mode Select Single Mode normally Select Dual Mode for using two SDI SDI1 SDI2 input ports for a single screen SDI 3G Mode Turn it on for 3G SDI Dual Link Mode Select waveform display...

Page 10: ...n be adjusted when Blending selected Some signals cannot be used for P P function Refer to the combination table on the bottom of the section Waveform Display Mode Select whether to display waveform f...

Page 11: ...WF Intensity Adjust color saturation of the waveform between 0 to 63 WF Vector Size Select size of Waveform or Vector Scope WF Vector Blend Adjust transparency of the scope P P Combination Table 11...

Page 12: ...Set Y range value for range check C Range Max Min Set C range value for range check Blink Color The filled area color by range check can be either Black Blue Green or Red Blink Time Set blinking time...

Page 13: ...de This mode can be set also by pressing Focus Assist button in front Focus Assist Level The sensitivity of the focus assist function can be set between 0 to 48 Focus Assist Color Set brush color of f...

Page 14: ...among 3200K 5400K 6500K 9300K or USER Gain and Offset menu are displayed on USER temperature only Red Green Blue Gain USER mode only R G B gains are adjustable on User mode Red Green Blue Bias USER mo...

Page 15: ...een 2 2 2 35 2 6 DICOM Adjust User The common value is 2 2 Color Space Select Color Space is selectable between Auto NTSC PAL EBU3213 SMPTE C 240M BT 709 Rec 709 Native Adjust User D Cinema mode is al...

Page 16: ...yed on 16 9 screen Safety Area 4 3 Adjust size of the safety area when marker displayed on 4 3 screen Center Marker Set preference to display center marker or not Marker Color Select marker s color am...

Page 17: ...r Marker H1 User Marker H2 User Marker V1 User Marker V2 Set user marker s position H1 for left H2 for right V1 for top V2 for bottom The positions are saved as the selected marker name such as USER1...

Page 18: ...ransparency of the menu MENU Position Set menu position among Left Top Right Top Left Bottom Right Bottom and Center IMD UMD Mode Display IMD UMD The screen aspect ratio will turn to 16 9 on this mode...

Page 19: ...osite signal might contain V Chip data Turn this mode on to display V Chip information on screen CC708 Service Select one of CC service as your preference Service 1 general captions Service 2 translat...

Page 20: ...o channel for right Level Meter Select Turns on off audio level meters Level Meter Size Select the size of the meters Small or Large Level Meter Position Select the position of the meters Upper or Low...

Page 21: ...dio source if 3G SDI is used which has two audio sources Speaker Source Select the speaker output among Auto SDI Line In For HDMI use Auto mode Speaker Volume Set volume of speaker Be noted that Line...

Page 22: ...on All front buttons are locked on this mode To exit from this mode press and hold Menu button for 3 seconds Network Connection To connect to a network user should set Serial Remote to Network and us...

Page 23: ...one If you use a single monitor to control you can leave it unchanged MAC Address This address is unique address for each network device User does not need to change it 23...

Page 24: ...settled to a new backlight value Test Pattern Displays selected test pattern in 1080 30P Front Button LED Set front LEDs on off status Font Button Lock Locks front buttons not to work Press and hold...

Page 25: ...ate After firmware update the monitor should be turned off turned on and Factory Default should be loaded before use Firmware Version This version number is required when you request for service Opera...

Page 26: ...have FAT32 or FAT file system General USB memory has FAT32 file system usually Set Update Firmware item as USB from SYSTEM menu Some part of firmware cannot be updated by USB updating procedure so ple...

Page 27: ...first and connect update cable when you update monitor firmware Remote Control GPI Port Pin Assignments 1 2 3 4 5 6 7 8 Remote RJ 45 Remote PIN Assignment 1 PIN GPI Port 1 5 PIN GPI Port 5 2 PIN GPI P...

Page 28: ...3 Input Switches the input to CVBS 3 KEY UP CURSOR UP on Menu Control KEY DOWN CURSOR DOWN on Menu Control KEY MENU Menu On Off KEY ENTER Enter Button Aspect Aspect On Off 1 1 Scan On Off 1 1 SCAN Fu...

Page 29: ...List of Compatible Video Formats VGA DVI The output resolution can be automatically changed in DVI by PC Graphic Card settings 29...

Page 30: ...e Video Formats SDI The output resolution can be automatically changed in DVI The input signal frame rate displayed on screen can be different The edge of the picture might be cut by one or two lines...

Page 31: ...Specifications 31...

Page 32: ...32...

Page 33: ...33...

Page 34: ...s BXM 183L3G 438 x 310 x 60 mm 17 3 x 12 2 x 2 3 inch BXM 243L3G 554 x 406 x 63 mm 22 x 16 x 2 5 inch BXM 243T3G 552 x 408 x 91 mm 21 7 x 16 0 x 3 5 inch BXM 323L3G 783 x 494 x 91 mm 30 8 x 19 5 x 3 6...

Page 35: ...eared more than 3 times There s a delay in BON Logo Display on Startup It is normal and No Reaction Required BON Logo appeared on Startup but No Screen Output when Input Signal Connected Remove Input...

Page 36: ...Reconnect the Power and Restart the Monitor Try with Different Input Device If successful the Failed Input Device may Generate Non Standard Signal Please Inform Us its Model Name No Audio Output Chec...

Page 37: ...er 12 months from the purchase Modification of Product Dimensions specifications or design of the product are subject to change without prior notice for product improvement Caution on Menu Operation O...

Page 38: ...le Sky 2F 1479 Gayang 2 Gangseo gu Seoul South Korea Research Service Center Vision Tower 7F 1481 Gayang 2 Gangseo gu Seoul South Korea Telephone 82 2 2659 0333 FAX 82 2 2659 8133 Web http www bon co...

Reviews: