background image

User Manual 

10 of 24


MENU Basic Operation 

 
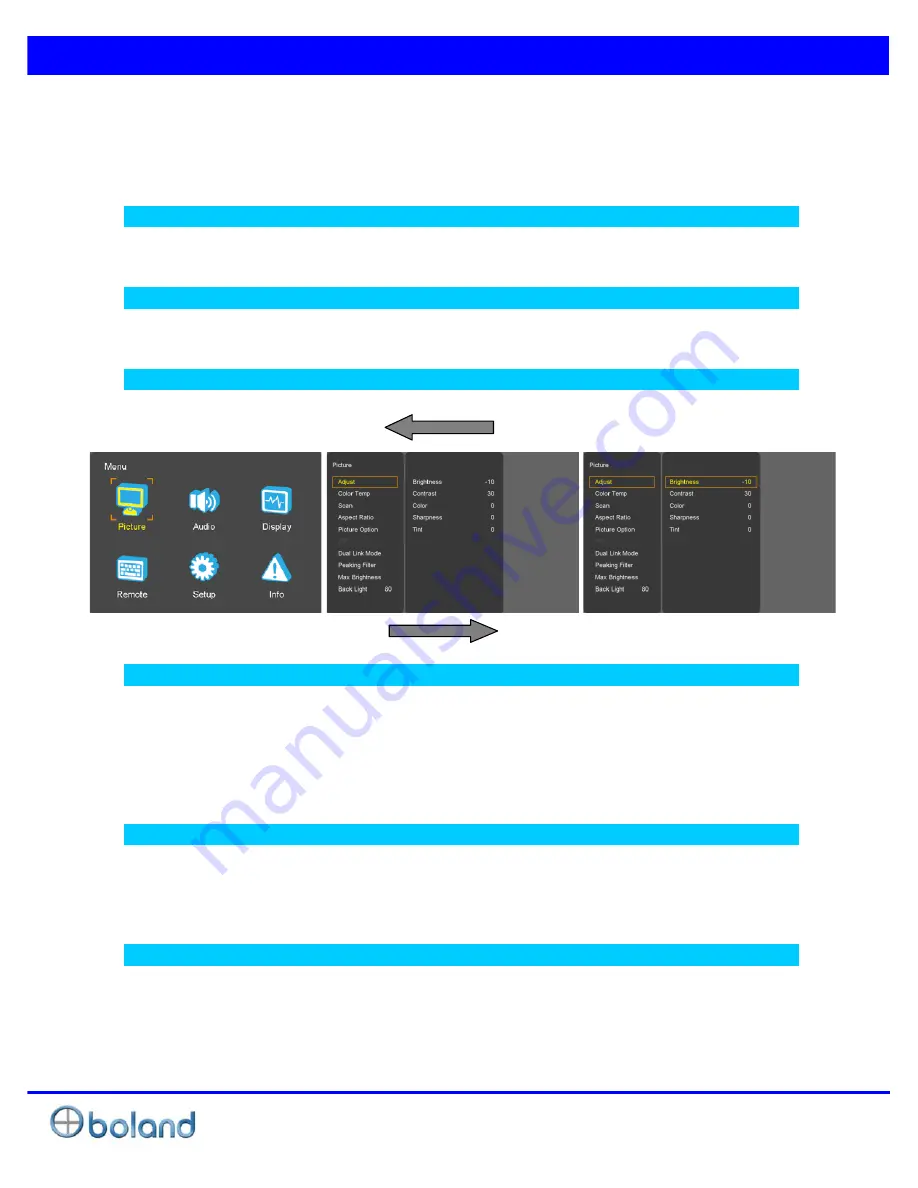
In this menu system, there are several ways to customize the menu settings provided.   
Most menus consist of three levels to set up the options, but some require greater depth for the variety of 
settings. If you press the 

MENU

 button, only the first and second level of the menu system will appear on 

the monitor screen. The third level can be displayed by pressing 

SEL/INPUT

. If a menu has more than 

three levels, the pop-up dialogue box will be displayed as the fourth or fifth level.


  To show and remove the Menu 

Press the 

MENU

 button to display the menu. A second press of the 

MENU

 button will take you back to 

monitor viewing. 

  To go to the next level   

Press 

SEL/INPUT

 button. 


  To go back to the previous level 

Press 

MENU

 button 


 Typical Menu Operation 

1. Press 

MENU

 button: The main menu will appear. 

2. Use 

UP/DOWN

 button to select the desired menu option (icon). 

3. While the desired menu option is selected, press 

SEL/INPUT

 to move to the second level. 

4. Use

 UP/DOWN

 button to select the second menu option. 

5. Press 

SEL/INPUT

 to move to the third level: Some menu options require additional steps. 

6. Press 

MENU

 to return to the previous menu to return to monitor viewing. 

Turning On the Monitor 

1. First, connect power cord correctly. At this moment, the monitor switches to standby or power on mode. 
In standby mode, in order to turn monitor on, press the 

ST-BY

 button. 

2. Select the viewing source by using 

SEL/INPUT 

button on Keypad in front of monitor 


Volume Adjustment 

1. Press the 

Adjust

 button on Keypad.(Turn Right / Turn Left) 

2. If you want to switch the sound off, press the 

FUNCTION (Audio mute)


button. 

3. You can cancel this function by pressing the 

FUNCTION (Audio mute)

 or volume control button. 


Summary of Contents for BVB07

Page 1: ...User Manual 1 of 24 High Definition Serial Digital Interface High Bright 2 Way Cross Conversion Monitor BVB07 User Manual BVB07 BVB07a BVB07b...

Page 2: ...EN MENUS LANGUAGE SELECTION 11 HOW TO SELECT VIDEO SOURCE BY OSD 11 PICTURE MENU 12 VIDEO MENUS OF EACH INPUT MODES 12 ADJUST 12 COLOR TEMPERATURE CONTROL 12 SCAN 12 ASPECT RATIO 13 ZOOM 13 PICTURE OP...

Page 3: ...LOAD SETUP SAVE 21 FUNCTION SWITCH 21 CONTROL 21 COMMUNICATION 22 IP CONFIG 22 SCREEN SAVER 22 SYNC CHECK PERIOD 22 SDI OUT HDMI OUT 22 INFO MENU 23 INPUT SUPPORT MODE 23 SUPPORT SIGNALS 23 SUPPORT TI...

Page 4: ...ting instructions should be retained for future reference Heed Warnings All warnings on the product and in the operating instructions should be adhered to Cleaning Disconnect the unit from the electri...

Page 5: ...attempt to service this product yourself as opening or removing covers may expose you to dangerous voltages or other hazards Refer all servicing to qualified service personnel If the Set does not ope...

Page 6: ...SDI HDMI Only 16 ch Audio Lever Meter Display SDI only QDORJ LJLWDO 6LJQDO XGLR HYHU 0HWHU LVSOD Lever Meter Position Scale display selectable XDO LQN 02 S RPSDWLEOH Closed caption CEA608 708 SDI Only...

Page 7: ...ections BVB7 Front F4 DOWN SEL INPUT SPEAKER_R MENU F3 Composite F2 SDI2 SDI1 STANDBY HDMI F1 ADJUST UP SPEAKER_L BVB7 Rear AUDIO IN HDMI IN SDI OUT SDI 1 IN HDMI OUT AUDIO OUT SDI 2 IN COMPOSITE DC 1...

Page 8: ......

Page 9: ......

Page 10: ...er On Off Only Fixed 8 GND COMMON GND Pin Signal Description 1 TxD TxD Monitor to Controller Not Used 2 GND SIGNAL GROUND 3 RxD RxD Controller to Monitor 4 RxD RxD Controller to Monitor 5 6 TxD TxD Mo...

Page 11: ......

Page 12: ...Peaking Filter Max Brightness z MENU Activates main OSD menu Navigates higher menu in main OSD menu Exits OSD menu z DOWN Decreases sound volume of speaker Decreases values of user menu in main OSD me...

Page 13: ...UT AUDIO MONITOR OUT z ETHERNET Network System Control Firmware Upgrade z GPI GPI 1 7 Control Port z DC 12V IN PIN NO Description 1 12V 2 GND 3 4 12V LEMO 8 PIN DC 12v Power Composite Video Tally Tri...

Page 14: ...tton Typical Menu Operation 1 Press MENU button The main menu will appear 2 Use UP DOWN button to select the desired menu option icon 3 While the desired menu option is selected press SEL INPUT to mov...

Page 15: ...nguage Supported Language English Spanish Portuguese German French Italiano How to Select Video Source by OSD 1 Press the SET INPUT button and then UP DOWN button to select each video source 2 Press t...

Page 16: ...sting RGB Gain Offset value directly User User setting RGB gain value VAR 3200K 11000K Often used value 11000K 9300K 6500K 5400K 3200K and 3D LUT Calibration value D65 6504K C 6774K D Cinema 6302K Col...

Page 17: ...ct or Enter button user can see the enlarged picture Menu key escape the zoom mode Picture Option z I P Mode Line Doubler inter Field Field Merge function on off z Gamma Select Gamma Level Select 0 8...

Page 18: ...al and type Analog CVBS 1 inputs Digital HDMI SDI SDI1 SDI2 inputs SDI SDI input PIP PIP MATRIX TABLE SDI 1 SDI 2 HDMI CVBS1 SDI 1 X O O O SDI 2 O X O O HDMI O O X O CVBS1 O O O X z Aspect Ratio Choos...

Page 19: ...only Dual Link Mode select Auto Off RGB444 YCbCr444 YCbCr422 Peaking Filter Peaking Filter Peaking Filter On Off Peaking Color Red Blue White Violet Peaking Level 0 100 Max Brightness Max Brightness O...

Page 20: ...Group Channel source select z SDI Gr Ch Audio output Group source select Group1 2 3 4 Audio output Channel source select Channel1 16 Channel1 2 3 4 5 6 7 8 9 10 11 12 13 14 15 16 off z SD2 Gr Ch Audio...

Page 21: ...a Line Color Select WHITE YELLOW BLUE RED BLACK z Line Width Marker line thickness setting 0 10 z Custom Marker The user wants Marker size setting Below panel size Waveform z Enable Waveform Vector Hi...

Page 22: ...R B z Size Time code size select Small Middle Large z Transparency Disable blending Time code background with video image 0 25 50 75 100 z DVITC Line Auto Line 1 31 Caption z Caption 608 Line21 608 AN...

Page 23: ...eut Input I D z Input ID source Message display z ID Style select Input Format Custom Label z Input Label Display user made name instead of input source name on source OSD and message OSD Video Range...

Page 24: ...reen tally lamp Marker On Off Displays the marker Function 1 4 Activates FUNCTION 1 4 buttons Scan Over Scan Zero Scan Under Scan Pixel to Pixel Aspect Sets the aspect ratio of the images Waveform Act...

Page 25: ...io channel in SDI input Audio Mute Toggles sound status of speaker headphone in mute Still image Toggles picture status between motion and still image Caption Caption on off False Color False Color on...

Page 26: ...ach Board must set ID numbers of each Board IP Config z Load Network Settings 7 51 7 FDEOH FRQQHFWHG DIWHU Enter ID IP Address Gateway Subnet Load z DHCP DHCP on off Manual IP settings DHCP on SSO HQW...

Page 27: ...kHz V Frequency Range 55 90 Hz Maximum resolution 1920x1080 60Hz Maximum pixel rate 162 MHz DTV mode support 720P 1080i 1080p CVBS NTSC PAL SECAM Support Timings z SDI Input SMPTE 428 1M 2048x1080P 24...

Page 28: ...User Manual 24 of 24 Mechanical Dimension BVB07...

Reviews: