BRT5128 BRT5118
Page
7
Assembly STEP 1
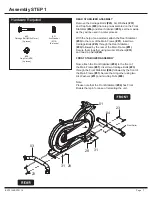
Remove the Carriage Bolts
(#23)
, Arc Washers
(#31)
and Cap Nuts
(#28)
that are pre-assembled on the Front
Stabilizer
(#04)
and Rear Stabilizer
(#03)
, set them aside
as they will be used in a later process.
With the help of an assistant, attach the Rear Stabilizer
(#03)
to the rear of the Main Frame
(#01)
. Insert two
Carriage Bolts
(#23)
through the Rear Stabilizer
(#03)
followed by the rear of the Main Frame
(#01)
.
Secure them together using two Arc Washers
(#31)
and two Cap Nuts
(#28)
.
FRONT STABILIZER ASSEMBLY
Now, attach the Front Stabilizer
(#04)
to the front of
the Main Frame
(#01)
. Insert two Carriage Bolts
(#23)
through the Front Stabilizer
(#04)
followed by the front of
the Main Frame
(#01)
.Secure them together using two
Arc Washers
(#31)
and two Cap Nuts
(#28)
.
Note:
Please note that the Front Stabilizer
(#04)
has Front
Rollers that spin for ease of relocating the unit.
REAR STABILIZER ASSEMBLY
Hardware Required
#23
Carriage Bolt (M10x57mm)
[4 pieces]
#31
Arc Washer
(M10)
[4 pieces]
#28
Cap Nut (M10)
[4 pieces]
Front Roller
01
03
04
23
23
31
31
28
28


