bObi Pet NW604001 Owner'S Manual Download Page 45

89

Step 6: 

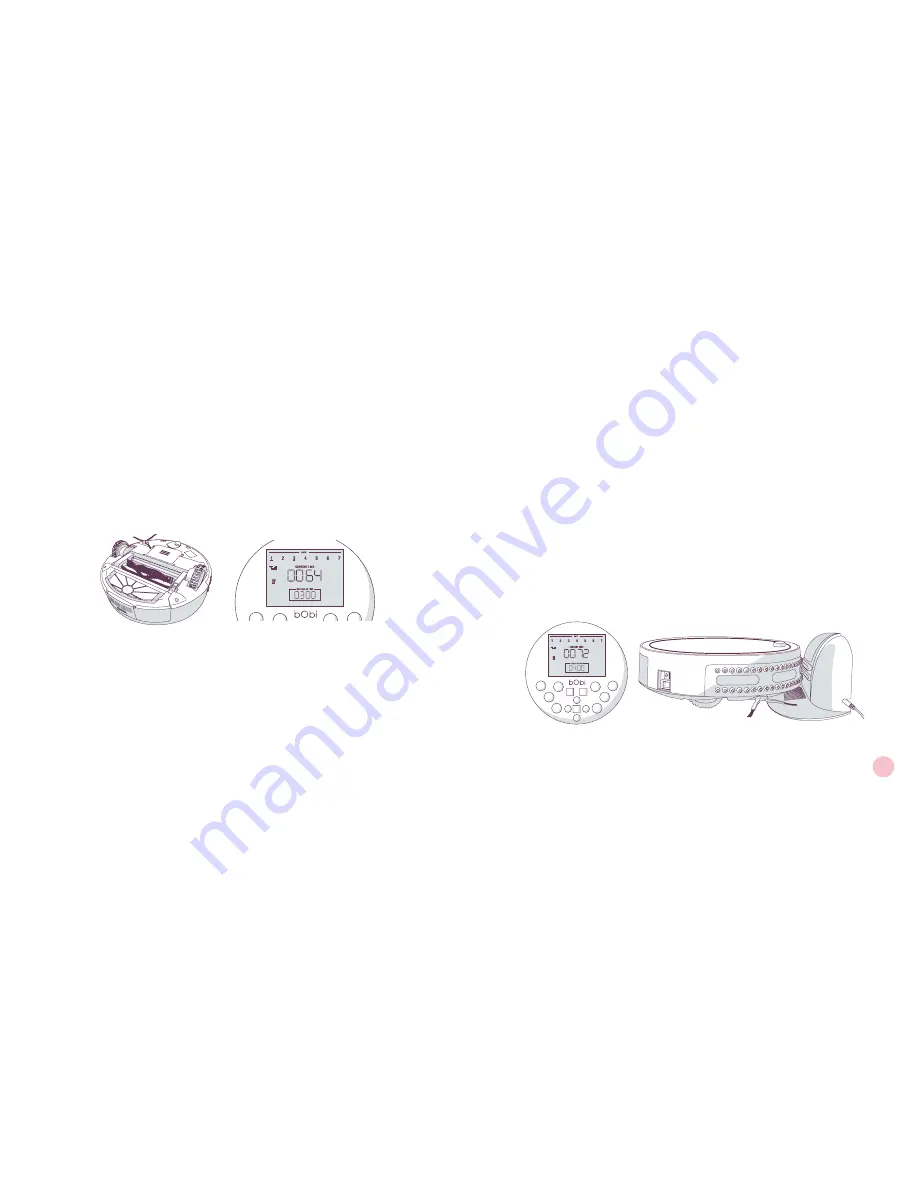
Left and Right Wheels, Brushes, and Vacuum Motor

       Flip bObi over onto a flat surface.
    While in mode 0200, press RGHT on the remote. The checkup mode  

       indicator should read 0300. As soon as bObi enters this mode, her wheels  

     should drive forward, her brushes should rotate, and her vacuum motor  

        should run. Numbers 1 and 3 at the top of the remote should be underlined,  

       indicating that the left and right wheels’ speed sensors are working.

Left Wheel:

 While in mode 0300, the 4-digit number in the center of screen 

indicates the current of bObi’s left wheel. Normal current ranges between 0020 

and 0110.

Right Wheel:


Press LEFT on the remote to enter checkup mode 0301. The 

main 4-digit number in the center of screen indicates the current of bObi’s right 

wheel. Normal current ranges between 0020 and 0110.

Main Brush:

 Press LEFT on the remote again to enter checkup mode 0302. 

The main 4-digit number in the center of screen indicates the current of bObi’s 

main brush. Normal current for the brushes is below 0280.

Vacuum Motor: 

Press LEFT on the remote again to enter checkup mode 0303. 

The main 4-digit number in the middle of screen indicates the current of the 

vacuum motor. Standard current ranges between 0160 and 0220.

Step 7: 

Charging Station

     While in mode 0303, press RGHT on the remote. The checkup mode  

      indicator should read 0400.

      The main 4-digit number in center of the screen should read 0000.

      Place bObi on her charging station with the nodes on her front resting  

      against the plates on her station. The main 4-digit number in the center  

     of the screen will now indicate the current bObi is receiving from the  

       station. If bObi is not fully charged, the test mode indicator should read  

        between 0400 and 0800. A number between 0050 and 0100 means bObi  

       is fully charged and receiving less energy from her station. If the remote  

     displays 0000 while bObi is on her station, then she is not connecting  

      with it properly.

Summary of Contents for Pet NW604001

Page 1: ...OWNER S MANUAL How to employ your intelligent floor cleaner bObi Pet Model NW604001...

Page 2: ...er best please read the Quick Start Guide and this manual thoroughly Welcome to the bObsweep family and happy cleaning If you have any questions or concerns feel free to contact our helpful team at su...

Page 3: ...ation 25 Manual Charging 27 Defining Boundaries 31 Syncing blOck 33 blOck Placement 35 Controls 38 Syncing Remote 40 Error Codes 75 Home Checkup Test 80 Cleaning Behavior 91 Remote Screen 44 Set Curre...

Page 4: ...r in areas where they may be present Do not use bObi in an enclosed space filled with vapors given off by oil based paint paint thinner moth proofing substances flammable dust or other explosive or to...

Page 5: ...mote Control 6 bObi blOck 7 Spare Side Brush 8 Cleaning Tool 9 Pack of Screws 10 Blindfold Stickers 11 Mini Mop Attachment 12 Mopping Cloths 13 Spare HEPA Filter 14 Owners Manual Quick Start Guide War...

Page 6: ...4 Charging Indicator 5 Touch Sensors 6 Wall Sensors 7 Charging Inlet 8 Power Switch Bottom View 1 Main Brush 2 Rubber Brush 3 Dustbin 4 Right Wheel 5 Left Wheel 6 Side Brush 7 Edge Sensors 8 Front Whe...

Page 7: ...Station 2 Remote Control 3 blOck Touchscreen Buttons 1 GO bObi will clean on her default cleaning mode 2 JUICE bObi will search for her charging station to refuel 3 WAFFLE bObi will clean localized m...

Page 8: ...Get bObi Ready to Clean...

Page 9: ...e bObi Remove the battery cover using a Phillips head screwdriver Plug the battery in at the circuit junction Tuck the wire into the side of the compartment and slide the battery in Replace the cover...

Page 10: ...N and press the GO button on her cover or remote bObi will clean on her default setting If bObi is left idle with her power switch ON her screen will go blank and she will enter standby mode To wake b...

Page 11: ...remove her from her charging station Touchscreen Buttons GO GO is bObi s default cleaning mode bObi will clean a large area until her battery reaches 15 capacity and then she will return to her chargi...

Page 12: ...Charging Station...

Page 13: ...5 m 10 ft 3 m bObi automatically searches for her charging station when her battery reaches 15 capacity She will chirp stop vacuuming and display JUICE on her cover while searching When bObi detects...

Page 14: ...chirp twice to let you know the sync was successful 4 5 To prolong bObi s battery life flip her power switch OFF when not in use Using the charging station Place bObi on her charging station with the...

Page 15: ...blOck...

Page 16: ...Power Button 2 Sync Button To set up digital barriers with blOck Press the power button The red power light on the front of blOck will turn on stay on for 10 seconds and then slowly blink every 3 sec...

Page 17: ...ed power light on the front of blOck will disappear If bObi does not respond to her blOck blOck likely needs to be synced To sync blOck Switch both bObi and blOck OFF The power light on the front of b...

Page 18: ...t The front of blOck is the side where the red power light is Position blOck with its front facing the direction you would like to create a barrier For example see the image below where blOck is place...

Page 19: ...Remote Control...

Page 20: ...E 11 WAFFLE 12 GO Remote Control CUR TIME Current Time Sets the current time and weekday SCH TIME Schedule Time Sets bObi s cleaning schedule ALL NONE Selects deselects all weekdays UV Turns bObi s UV...

Page 21: ...process Syncing bObi with her Remote Using the navigational arrows Hold down the remote s navigational buttons to keep bObi moving in the desired direction Release the button when you are done manual...

Page 22: ...Cleaning Schedule...

Page 23: ...sday 4 Thursday 5 Friday 6 Saturday 7 Sunday Signal Indicator Lights up when bObi and her remote communicate UV Indicator Indicates if the UV light is on or off Speed Indicator Indicates bObi s curren...

Page 24: ...the CUR TIME button on bObi s remote Press the RGHT button until the frame around number 1 on top of the screen starts to flash The first hour digit will start flashing Use the FWD and BACK buttons to...

Page 25: ...ound number 1 on top of the screen starts to flash The first hour digit under SCHEDULE TIME will start flashing Use the FWD and BACK buttons to adjust the first hour digit Press the FWD and BACK butto...

Page 26: ...sure bObi and her remote are synced and bObi s power switch is ON Press the SCH TIME on bObi s remote The first hour digit under SCHEDULE TIME will start flashing 1 2 Use FWD and BACK to scroll throug...

Page 27: ...ling and go will appear on the remote s screen Press the SCH TIME button again to save your settings 3 4 Press the SCH TIME button on the remote Press the STOP button and FFG0 will reset to the last s...

Page 28: ...Parts Maintenance...

Page 29: ...rside of bObi s dustbin Hold the attachment per pendicular to bObi and press down gently until the attachment snaps into place Lay the attachment flat along bObi s underside and lock it in place 1 2 3...

Page 30: ...res fine particles and allergens and prevents them from escaping back into the air To remove and clean the filter HEPA Filter Hold down the eject button on the back of the dustbin Eject the dustbin an...

Page 31: ...the vacuum motor To remove the vacuum motor To reinstall the dustbin With the motor and filter removed the dustbin may be washed with water Washing the Dustbin Eject the dustbin and remote the HEPA f...

Page 32: ...ver and press the latch on the side of the main brushes Lift the locking bar up and remove the main brushes 1 2 Use the cleaning tool to remove debris from the ends of the brush as well as the brush c...

Page 33: ...etal cores remain in place before replacing the brush ends Starting with the rubber brush replace the brushes Insert the socket ends first and lower the rubber ends into place under the latch bar Lowe...

Page 34: ...head screwdriver Use the cleaning tool to brush off hair tangled around the side brush as well as the socket where the side brush is held Replace the side brush and retighten the screw 1 2 3 Side Brus...

Page 35: ...e it is held Replace the wheel and push it down until it locks into place 1 2 3 Dirt and dust on bObi s wall and edge sensors can reduce her performance Regularly cleaning these sensors ensures that b...

Page 36: ...ld sticker and place one onto each of bObi s 4 edge sensors Make sure each sensor is completely covered Remember while bObi is blindfolded she will not be able to detect stairs or edges Blindfold Stic...

Page 37: ...Troubleshooting Checkup Test...

Page 38: ...y also contact our customer care center at support bobsweep com or call 1 888 549 8847 Visit owners bobsweep com for handy video guides or scan this QR code Troubleshooting Error Code 01 Er 01 Edge Se...

Page 39: ...of the brushes If bObi displays Error Code 02 while cleaning on a shag carpet or rug you may remove her main brushes and allow her to clean without them but she will not clean as effectively Error Co...

Page 40: ...n and empty it Turn the dustbin around and gently wipe the metal plates on its bottom with a soft dry cloth Look at where the dustbin connects to bObi s body Under the red plastic casing is the dustbi...

Page 41: ...te and GO JUICE and WAFFLE should all remain lit on bObi s cover The 5 lights above the touchscreen buttons should cycle sequentially bObi is now in checkup mode Press RGHT on bObi s remote to cycle t...

Page 42: ...testing her edge sensors Step 2 Firmware Version While in mode 0000 press LEFT on the remote The checkup mode indicator should read 0001 The main 4 digit number in the center of the screen indicates t...

Page 43: ...not be tested while she is charging If bObi is fully charged and the voltage is 0000 mv bObi s battery is disconnected Open the battery compartment and check the battery connection Step 4 Wall Sensors...

Page 44: ...be underlined Step 5 Usage Counter and blOck Press RGHT on the remote while in checkup mode 0100 Mode will change to 0200 In this mode the main 4 digit number in the center of the remote indicates the...

Page 45: ...ckup mode 0302 The main 4 digit number in the center of screen indicates the current of bObi s main brush Normal current for the brushes is below 0280 Vacuum Motor Press LEFT on the remote again to en...

Page 46: ...seem to be ignoring some spaces or spending too much time on others but don t worry Rest assured bObi will efficiently clean your home within the course of a full cycle just check bObi s dustbin for...

Page 47: ...long should bObi s battery last The exact time depends on the age of the battery and the type of surface bObi is cleaning Generally the smoother the surface e g hardwood or tile the longer the batter...

Page 48: ...ther debris have been caught in them and are clogging the areas where they attach to bObi You can use scissors to cut the hair wrapped around either brush until you are able to remove it 10 bObi is ge...

Page 49: ...problem as well as the solution 14 Where can I buy spare parts Extra parts are available for purchase on our owners website owners bobsweep com With bObi s modular design and our how to videos you ca...

Page 50: ...End User License Agreement...

Page 51: ...or software that you developed for your Bobsweep Any updates or supplements to the Bobsweep Software or the Bobsweep provided to you after the expiration of the one 1 year period are not covered by an...

Page 52: ...bObsweep and bObsweep Inc All rights reserved...

Reviews: