

Features of your Blueprint Digital Day/Night
Temperature Controller, BDTC-1
• Precisely control a 120V cooling or heating device
• Integrated photocell allows day, night or 24-hour operation
• Remote sensor on a 6.5’ cable accurately monitors temperature
• Stores minimum and maximum temperature values
• Wall mountable
• 3-year warranty
Specifications
Input Voltage: 120V
Maximum Amperage: 14.5A @ 120V
Temperature Control Range: 32-150ºF
Separate Day and Night Settings: Photocell Control
Temperature Deadband: 1 - 10ºF
Dimensions: 3” x 6” x 3.5”
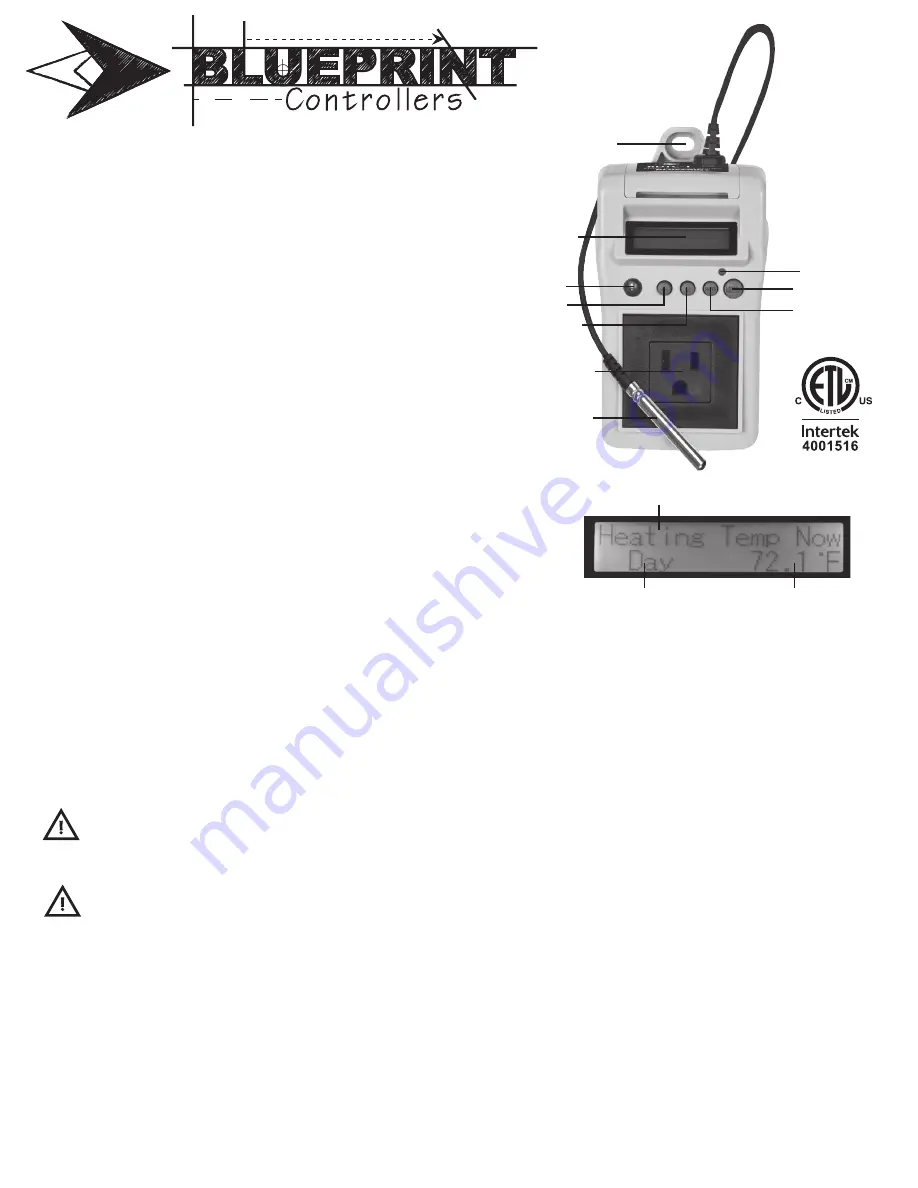
Equipment Power
Connection
Wall Mount Access
LCD Screen
Menu Button
LED Indicator
Enter Button
Photocell
Up Button
Down Button
Temperature Sensor
Thank you for choosing to grow with Blueprint
Controllers! Your satisfaction and success are
important to us. For best results, carefully read the
following instructions before using your Blueprint
Digital Day/Night Temperature Controller.
Installation
1. Connect the unit to a 120V power source.
2. If desired, mount the unit to the wall or alternate support
using the mounting tab.
3. Program desired settings.
4. Position remote sensor in best location to accurately gauge
environmental temperatures for proper unit functioning.
5. Connect the device to be controlled.
Ensure the device being connected to the
Controller has the proper voltage and will
not exceed the maximum amperage rating
of the unit.
Do not expose the unit to water.
Factory Settings
• Day Temperature: 78.0ºF
• Night Temperature: 75.0ºF
• Temperature Deadband: 2.0ºF
• Control Mode: Cooling
• Temperature Display: F
Restoring Factory Settings
Factory settings can be reinstated at any time by pressing and holding
the MENU and UP buttons for 3 seconds, then pressing ENTER. This
will reset all settings except for the Temperature Display (will not return
to ºF if it has been set to ºC).
LCD Screen
Selecting Controller Settings
Day Temperature:
To set the temperature the unit will use to
control the output when the photocell determines it is daytime,
press the MENU button. Use the UP and DOWN arrow buttons
to scroll through and find “Set Day Temp” on the LCD screen. To
change the setting, press the ENTER button. The current setting
will be highlighted to indicate the setting can be changed. Use
the UP and DOWN buttons to change the setting. Press the
ENTER button a second time to accept the new setting and store
it in memory.
Night Temperature:
To set the temperature the unit will use to
control the output when the photocell determines it is nighttime,
press the MENU button. Use the UP and DOWN arrow buttons
to scroll through and find “Set Night Temp” on the LCD screen.
To change the setting, press the ENTER button. The current
setting will be highlighted to indicate the setting can be changed.
Use the UP and DOWN buttons to change the setting. Press the
ENTER button a second time to accept the new setting and store
it in memory.
Temperature Deadband:
To change the temperature deadband,
press the MENU button to display the first menu item. Use the
UP and DOWN arrow buttons to scroll through and find “Set
Deadband” on the LCD screen. To change the setting, press the
ENTER button. The current setting will be highlighted to indicate
the setting can be changed. Use the UP and DOWN arrow but-
tons to change the setting. Press the ENTER button a second
time to accept the new setting and store it in memory.
Caution
Warning
Photocell Status
Current Temperature
Control Status
rev:112013


