background image

53

NL

UFO Led : Onderdelen 

A

i

ii

H

J

K

B

C

D

(x2)

G

(x3)

L

M

N

O

(x2)

Q

R

S

T

V

U

P

W

X

Y

Z

F

(x10)

E

(x2)

Summary of Contents for Coral Tank

Page 1: ...Instruction Manual Gebrauchsanweisung Mode d Emploi Gebruiksaanwijzing Coral Tank...

Page 2: ...2 Blue Marine Index...

Page 3: ...20 MANUAL SKIM 500 21 22 MANUAL UFO LED 23 25 TECHNISCHE INSTALLATION 26 29 ANLEITUNG REEFPOWER 1600 30 ANLEITUNG SKIM 500 31 32 ANLEITUNG UFO LED 33 35 INSTALLATION TECHNIQUE 36 39 INSTRUCTIONS REEF...

Page 4: ...WER 1600 Only suitable for indoor use Ensure voltage shown on the label match to the mains supply voltage Never let the pump run dry keep it submerged at all times If damaged the supply cord cannot be...

Page 5: ...cker und nehmen die Beleuchtung vorsichtig am Kabel aus dem Aquarium Keine Garantie bei Sch den die durch Eintauchen ins Wasser verursacht werden SICHERHEIT REEFPOWER 1600 Ausschlie lich zur Verwendun...

Page 6: ...arantie n est plus valide lorsque l clairage LED est endommag e par submersion S CURIT REEFPOWER 1600 Utilisation int rieure uniquement V rifiez si la tension d utilisation mentionn e sur l autocollan...

Page 7: ...onderdompeling kapot is gegaan VEILIGHEID REEFPOWER 1600 Alleen geschikt voor binnengebruik Zorg ervoor dat het voltage op het label overeen komt met de netspanning De pomp nooit laten droogdraaien zo...

Page 8: ...8 Parts Cabinet Coral Tank 7 4 26 26 6 24 2 4 2 11 7 10 8 13 6 12 3 2 1 9 4 4 5...

Page 9: ...9 Assembly Cabinet Coral Tank STEP 1 STEP 2 STEP 3 1 9 2 3 1 6 9 5 5 6 4 4 5 STEP 5 STEP 6 9 STEP 4 STEP 7 STEP 8 STEP 9...

Page 10: ...10 Assembly Cabinet Coral Tank STEP 12 STEP 14 STEP 13 8 7 STEP 10 STEP 11 8 7...

Page 11: ...11 STEP 16 STEP 17 STEP 15 12 11 10 10 11...

Page 12: ...12 Assembly Cabinet Coral Tank STEP 18...

Page 13: ...13 STEP 19...

Page 14: ...14 Parts Teile composants onderdelen 15 17 18 19 20 8 11 6 7 13 12 2 1 5 10 14 4 3 9 Glue Glue 16...

Page 15: ...htung 16 Klebstoff 17 Aquarium 18 Filterbecken Sumpf 19 Nachf lltank 20 Filterstrumpf D COMPOSANTS 1 Coude aspiration et retour 2 Tube de circulation avec robinet 3 Tuyau Aspiration et sortie 4 Presse...

Page 16: ...e tank is aligned with the cabinet Make sure the aquarium on its final position so it s not necessary to move the aquarium anymore Place the transit coupling 4 and secure step 4 don t forget the seals...

Page 17: ...th coupling 2 into the water feed and return pipe don t forget the seal Glue Glue Place the water feed pipe 5 into the water feed and return pipe 1 STEP 8 Screw the hose connector 10 into the pump A S...

Page 18: ...e cover on the pipe chamber Place the filter sock 20 and the skimmer 8 in the appropriate sections of the sump Place the pump 11 in the appropriate section of the sump Place the overflow pipe 7 over t...

Page 19: ...ee the UFO manual section p 23 for the installation of the UFO Led STEP 14 STEP 16 STEP 17 STEP 15 The aquarium is now ready for use Open the tap of the transit pipe and fill the tank until the maximu...

Page 20: ...ove the plug from the socket before any maintenance on the pump and tank Open the pump and remove the rotor and ceramic shaft Clean the rotor and shaft in a solution of 50 vinegar and 50 water let it...

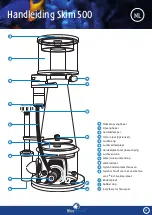
Page 21: ...inlet optional E Air hose F Bubble plate G Bubble plate to pump connection nut H Air venturi I Water level adjusting knob J Water outlet K Nylon base plate screws L Nylon screw to secure bubble plates...

Page 22: ...w OPTIONS Your Blue Marine skimmer has the following options You can add Ozone to the skimmer by removing the rubber end cap D and attached your Ozone appliance be careful with Ozone follow the instru...

Page 23: ...23 Manual UFO Led Parts GB A i ii H J K B C D x2 G x3 L M N O x2 Q R S T V U P W X Y Z F x10 E x2...

Page 24: ...24 Assembling UFO bracket Q K D N R Z ii F F W S T F N R J F G E X Y 1 2 3 4 5 7 6 8 Do not tighten the screws F completely so the pin N can be screwed into the UFO step 5...

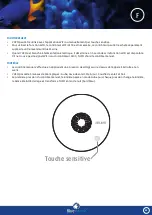
Page 25: ...r it will determine within 5 seconds which control function is available If no WiFi signal is found the UFO will choose Manual control TOUCH BUTTON CONTROL Manual control is by tapping on the top of t...

Page 26: ...as Aquarium auf seine endg ltige Position zu stellen sodass ein Verschieben des Beckens nicht mehr notwendig ist Schritt 1 Schritt 2 Schritt 3 Installieren Sie die Durchgangs verschraubung 4 und versc...

Page 27: ...Sie das Ablaufrohr 2 mit dem Zu und Ablaufrohr 1 Dichtung nicht vergessen Glue Glue Das Zulaufrohr 5 im Zu und Ablaufrohr 1 einsetzen Schritt 8 Drehen Sie den Schlauchstutzen 10 in die Pumpe A Schieb...

Page 28: ...blaufkammer 3 Platzieren Sie den Filter strumpf 20 und den Skimmer 8 in den entspre chenden Teil des Sumpfes Stellen Sie die Pumpe 11 in die entsprechende Sektion des Sumpfes Platzieren Sie das berlau...

Page 29: ...allation der UFO LED finden Sie im Bereich der UFO Bedienungsanleitung Seite 33 Schritt 14 Schritt 16 Schritt 17 Schritt 15 Das Aquarium ist nun betriebs bereit F llen Sie den Nachf lltank 19 mit Osmo...

Page 30: ...Wartung an Pumpe und Tank immer den Stecker aus der Steckdose Pumpe ffnen und Rotor und Keramikwelle entfernen Rotor und Welle in einer L sung von 50 Essig und 50 Wasser reinigen mindestens 15 Minuten...

Page 31: ...optional E Luftschlauch 7 Luftplatte G Anschlussverschraubung Platte zur Pumpe H Venturid se I Einstellschraube Wasserstand J Wasserablauf K Nylonschrauben Basisplatte L Nylonschraube zur Befestigung...

Page 32: ...kann OPTIONEN Ihr Blue Marine Skimmer hat die folgenden Optionen Sie k nnen Ozon hinzuf gen indem Sie die Gummi Endkappe D entfernen und dort Ihr Ozon Ger t anbringen seien Sie vorsichtig mit Ozon fo...

Page 33: ...33 UFO Led Teile D A i ii H J K B C D x2 G x3 L M N O x2 Q R S T V U P W X Y Z F x10 E x2...

Page 34: ...34 Anleitung UFO Led Q K D N R Z ii F F W S T F N R J F G E X Y 1 2 3 4 5 7 6 8 Schrauben F nicht ganz festziehen so dass die UFO auf den Pin N geschraubt werden kann Schritt 5...

Page 35: ...e Steuerfunktion verf gbar ist Wenn kein WiFi Signal gefunden wird w hlt die UFO die manuelle Steuerung MANUELLE STEUERUNG Manuelle Steuerung erfolgt durch Antippen der Oberseite der UFO Die UFO hat 5...

Page 36: ...que l aquarium soit align avec le meuble et dans sa position finale afin d viter de devoir le d placer Visser le presse toupe 4 et s curiser tape 4 ne pas oublier les joints A Montez A le flotteur 14...

Page 37: ...tion et de retour d eau sans oublier le joint Glue Glue Placer le tuyau de remont e d eau 5 dans le coude d aspiration retour 1 TAPE 8 Vissez le raccord du tuyau de pompe 10 la pompe A Fixez le tuyau...

Page 38: ...Tuyau Aspiration et sortie Placez la chaussette de pr filtration 20 et l cumeur 8 dans leur compartiment du bac d cantation Placez la pompe 11 dans son compartiment Placer le tuyau de trop plein 7 sur...

Page 39: ...age 43 pour son installation TAPE 14 TAPE 16 TAPE 17 TAPE 15 L aquarium est mainte nant pr t tre utilis Remplissez le r servoir d eau 19 avec de l eau osmos e A MAX WATER LEVEL Notre syst me n est pas...

Page 40: ...sur la pompe et l aquarium Ouvrez la pompe et retirez le rotor et l axe en c ramique Nettoyez le rotor et l axe dans une solution de 50 de vinaigre et 50 d eau laissez s cher au moins 15 minutes V ri...

Page 41: ...ptionnel E Tuyau air F R partiteur de bulles sup rieur G R partiteur de bulle inf rieur connect la pompe H Venturi I Ecrou de r glage niveau d eau J Refoulement K Vis nylon L Vis crou pour maintenir l...

Page 42: ...n trop d cume OPTIONS Options de votre Ecumeur Blue Marine Vous pouvez ajouter de l Ozone votre cumeur en enlevant le bouchon caoutchouc D et connecter votre ozoneur Attention suivez les instructions...

Page 43: ...43 UFO Led Composants F A i ii H J K B C D x2 G x3 L M N O x2 Q R S T V U P W X Y Z F x10 E x2...

Page 44: ...44 Assemblage UFO support Q K D N R Z ii F F W S T F N R J F G E X Y 1 2 3 4 5 7 6 8 Ne serrez pas les vis F compl tement de sorte que la broche N peut tre viss e dans l UFO tape 5...

Page 45: ...n WiFi est disponible S il ne trouve pas de signal WiFi issu du contr leur A100 l UFO choisi le contr le manuel CONTR LE Le contr le manuel s effectue en appliquant une pression des doigts sur le dess...

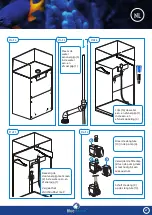
Page 46: ...t het meubel Zorg dat het aquarium op zijn definitieve plaats staat zodat het aquarium niet meer verplaatst hoeft te worden A Monteer A de vlotter 14 in de sump 18 Plaats de sump in het midden van het...

Page 47: ...rvoerpijp met kraan 2 in de water aan en afvoerpijp 1 Vergeet het afdichtrubber niet Glue Glue Plaats de water aanvoerpijp 5 in de water aan en afvoerpijp 1 STAP 8 Draai de slangtule 10 in de pomp A S...

Page 48: ...n plaats de deksel op de aan en afvoerkamer Plaats de filtersok 20 en de skimmer 8 in de daarvoor bestemde sumpvakken Plaats de pomp 11 in het daarvoor bestemde vak in de sump Plaats de overlooppijp 7...

Page 49: ...ucties naar de UFO sectie van de manual p 53 STAP 14 STAP 16 STAP 17 STAP 15 Het aquarium is nu gereed voor gebruik Vul de Bijvulbak 19 met osmose water A MAX WATER LEVEL Ons systeem heeft geen overlo...

Page 50: ...e pomp en aquarium altijd eerst de stekker uit het stopcontact halen Open de pomp en demonteer de rotor en keramische as Reinig de rotor en as in een oplossing van 50 azijn en 50 water laat deze minim...

Page 51: ...oneel E Luchtslang F Luchtverdeelplaat G Verdeelplaat pompbevestiging H Luchtventurie I Waterniveau instelknop J Wateruitlaat K Nylon bodemplaatschroeven L Nylon schroef voor het vastzetten van 2e luc...

Page 52: ...PTIES Uw Blue Marine skimmer heeft de volgende opties Toevoegen van Ozon verwijder hiervoor de rubberdop D sluit hierop uw Ozonapparaat aan wees voorzichtig met Ozon volg de gebruiksaanwijzing van uw...

Page 53: ...53 NL UFO Led Onderdelen A i ii H J K B C D x2 G x3 L M N O x2 Q R S T V U P W X Y Z F x10 E x2...

Page 54: ...54 Handleiding UFO Led Q K D N R Z ii F F W S T F N R J F G E X Y 1 2 3 4 5 7 6 8 Schroeven F niet helemaal vastdraaien zodat de UFO vastgeschroeft kan worden op de pin N stap 3...

Page 55: ...gsfunctie beschikbaar is Als er geen Wi Fi signaal wordt gevonden zal de UFO handmatige bediening kiezen BEDIENING Handmatige bediening is door te tappen op de aanraakknop aan de bovenzijde van de UFO...

Page 56: ...ways keep proof of purchase without a purchase note no warranty Bewahren Sie den Kassenbon immer auf ohne Kaufbeweis keine Garantie Toujours garder le bon d achat sans bon aucune garantie Bewaar altij...

Reviews: