background image

THANK YOU!

ASSEMBLY INSTRUCTIONS

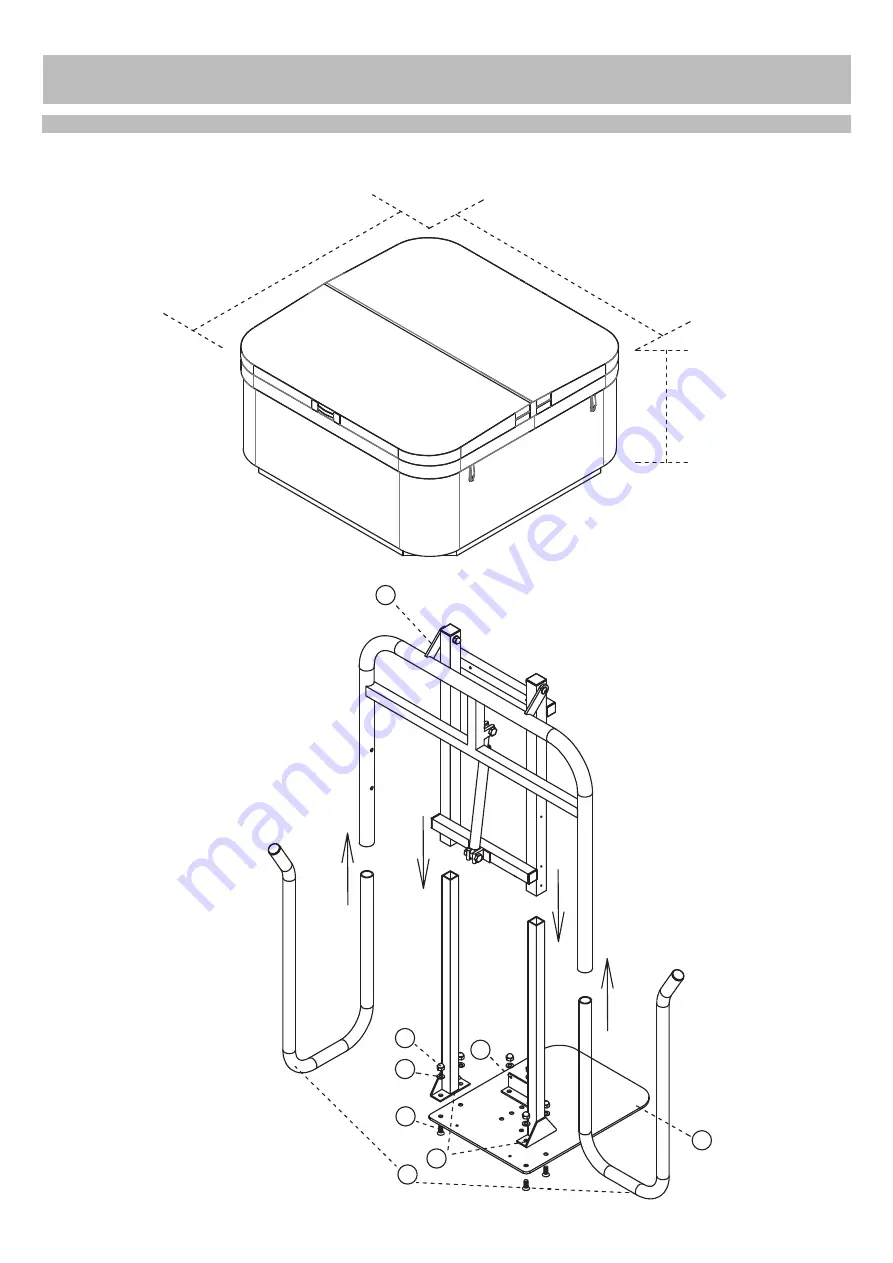
NOTE: Hand tighten all bolts in place, then tightening with wrench once fully assembled. 

1350mm - 2350mm

1900mm - 2500mm

800 mm - 1050mm

Cover

SPA

Dimension Range:

Assembly Parts:

See assembly steps on 

following pages

1

2

3

4

5

11

12

10

4

Summary of Contents for NP5869

Page 1: ...R ASSEMBLY INSTRUCTIONS Please Do Not Hesitate to Contact Our Consumer Hotline at 800 759 0977 with Any Questions That May Arise During Assembly or Use of This Product NP5869 Ver 0819GAO NP5869 Spa an...

Page 2: ...ox can be used as your work surface 2 Remove all of the contents from box and verify that you have all of the parts shown on the Parts List before you begin assembly Note Some parts may be pre install...

Page 3: ...NPP50496 NPP50495 NPP50494 Base x1 x6 8x16 mm Bolt 16 mm Washer 5x19 mm Screw 10 11 12 13 9 x6 x6 NPP50498 NPP50498 NPP50498 NPP50498 NPP50498 x1 x1 Allen Wrench Screwdriver Bit 3 2 mm Drill Bit 15 x1...

Page 4: ...S NOTE Hand tighten all bolts in place then tightening with wrench once fully assembled 1350mm 2350mm 1900mm 2500mm 800 mm 1050mm Cover SPA Dimension Range Assembly Parts See assembly steps on followi...

Page 5: ...mine location of Location Bracket 5 4 5 The first row of holes 25mm after installation The second row of holes 50mm after installation The third row of holes 75mm after installation 2 11 12 10 B Selec...

Page 6: ...e spa using Screws 7 as shown B Insert the Arms 1 into the ends of the Lift Assembly 3 by depressing the lock button then turn the Arms until they lock into Lift Asssembly holes when Arms are in prope...

Page 7: ...are the responsibility of the purchaser Labor charges and related expenses for removal installation or replacement of the product or components are not covered under this warranty The manufacturer re...

Page 8: ...RTE COUVERCLE POUR SPA QUICKLIFT INSTRUCTIONS D ASSEMBLAGE NP5869 Contactez notre service la client le au 800 759 0977 avec des questions sur le montage ou l utilisation de ce produit Ver 0819GAO NP58...

Page 9: ...ins de la bo te pour que le fond de la bo te puisse tre utilis comme surface de travail 2 Retirez le contenu de la bo te avant de commencer l assemblage assurez vous d avoir toutes les pi ces telles q...

Page 10: ...2 3 4 1 x1 base x1 x6 8x16 mm boulon 16 mm rondelle 5x19 mm vis 10 11 12 13 9 x6 x6 x1 x1 cl Allen embout de tournevis 3 2 mm foret 15 x1 14 Pi ces incluses dans le sac de quincaillerie NPP50498 x1 su...

Page 11: ...mm 2500mm 800 mm 1050mm couverture SPA gamme de dimension 1 2 3 4 5 11 12 10 pi ces d assemblage Voir les tapes d assemblage sur les pages suivantes 4 REMARQUE Serrer la main tous les boulons en place...

Page 12: ...du support d emplacement 5 4 5 La premi re rang e de trous 25mm apr s l installation La deuxi me rang e de trous 50mm apr s l installation La troisi me rang e de trous 75mm apr s l installation 2 11...

Page 13: ...indiqu B Ins rez les bras 1 dans les extr mit s de l ensemble de levage 3 en appuyant sur le bouton de verrouillage puis tournez les bras jusqu ce qu ils se verrouillent dans les trous de l ensemble l...

Page 14: ...i es au d placement l installation ou au remplacement du produit ou de ses composantes ne sont pas couverts par cette garantie Le fabricant se r serve le droit de faire des substitutions de recours en...

Reviews: