


-30-
Revision 4/F3591
©
Moffat Ltd, August 2004
6.4 ADJUSTMENT / CALIBRATION
6.4.1 DOOR CHAIN
4) The thermostat can now be removed.
5) Carefully remove two screws holding fan
switch to thermostat.
HINT: Tape fan switch assembly together
before removal to prevent it from springing
apart.
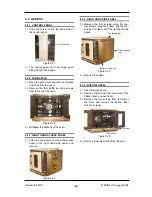
1) Remove the bottom lintel (refer 6.2.5).
2) Loosen the two locknuts on each of the
turnbuckles.
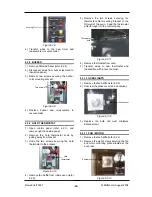
1) Loosen the ball catch locknut by one turn.
2) Use the adjusting tool provided with the
oven to rotate the ball catch clockwise or
anti-clockwise, moving it into and out of
the door respectively.
3) Tighten the locknut to secure the new
adjustment.
Figure 6.4.1
Turnbuckle Locknuts
6.4.2 DOOR BALL CATCH
3) Adjust the turnbuckles such that the right
hand door closes slightly ahead of the left
hand door.
To make the left hand door close earlier,
tighten the left hand turnbuckle, and
loosen the right hand turnbuckle.
To make the right hand door close earlier,
tighten the right hand turnbuckle, and
loosen the left hand turnbuckle.
4) Tighten the locknuts.
5) Replace bottom lintel.
Figure 6.4.2
6.4.3 THERMOSTAT CALIBRATION
IMPORTANT:
IF THE OVEN
TEMPERATURE NEEDS TO BE
INCREASED, ENSURE THAT THE
THERMOSTAT IS IN THE ‘OFF’ POSITION
BEFORE CARRYING OUT ADJUSTMENT.
IF OVEN TEMPERATURE NEEDS TO BE
DECREASED, ENSURE THERMOSTAT IS
IN THE ‘MAX’ TEMPERATURE POSITION
BEFORE CARRYING OUT ANY
ADJUSTMENT.
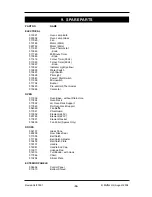
Thermostat Shaft
Fan Switch
Calibration
Nut
Thermostat
Figure 6.4.3
Figure 6.4.4
1) Turn off power.
2) Remove thermostat knob by pulling it
firmly away from control panel.
3) Open control panel (refer 6.2.1). Remove
the nut securing the thermostat to the
control panel.
Securing nut
Ball
catch
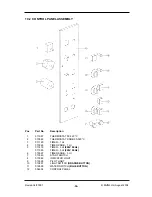
Summary of Contents for E1100
Page 1: ... 1 Revision 4 F3591 Moffat Ltd August 2004 SERVICE MANUAL E1100 ELECTRIC CONVECTION OVEN ...
Page 4: ... 4 Revision 4 F3591 Moffat Ltd August 2004 ...
Page 32: ... 32 Revision 4 F3591 Moffat Ltd August 2004 7 CIRCUIT SCHEMATIC ...
Page 37: ... 37 Revision 4 F3591 Moffat Ltd August 2004 10 3 DOOR ASSEMBLY ...


