background image

10

11

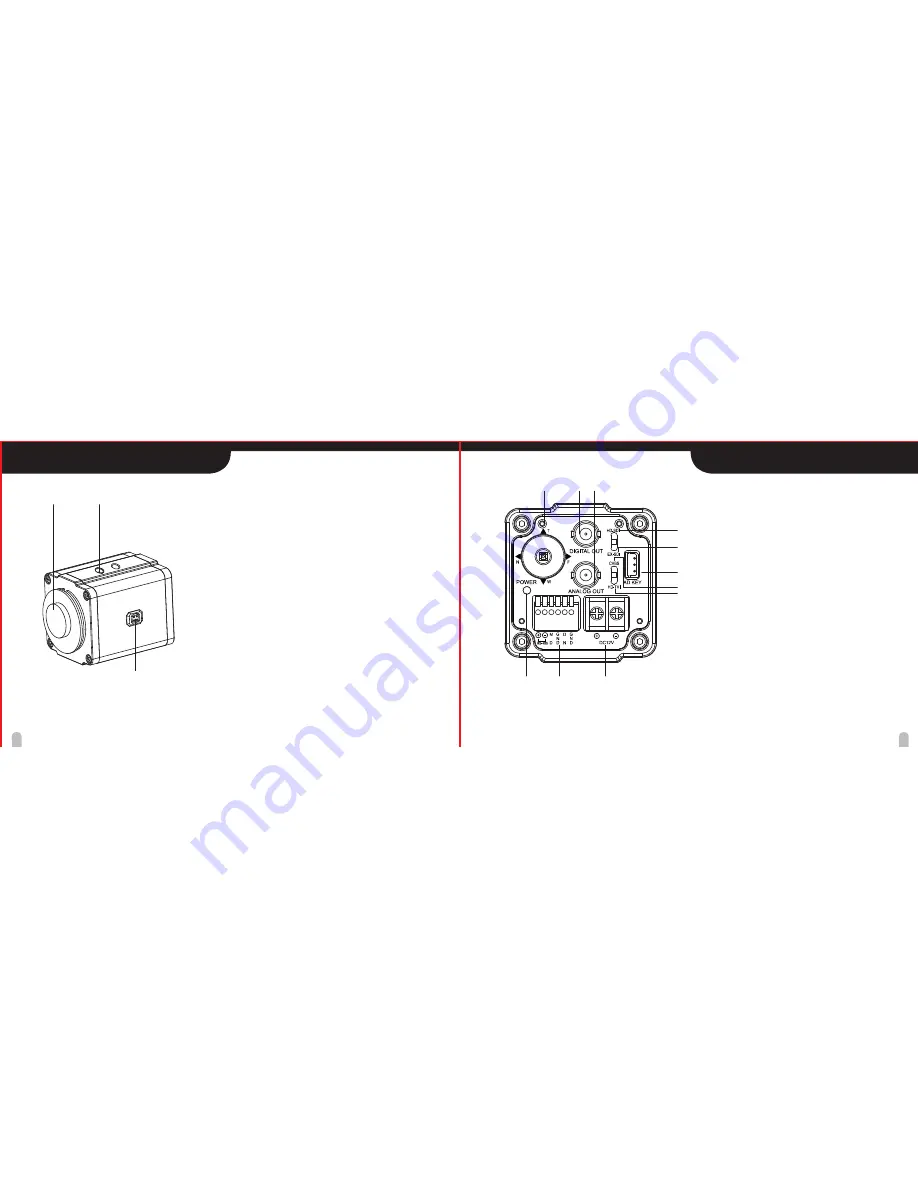
PART NAMES AND FUNCTIONS

PART NAMES AND FUNCTIONS

1

OSD Control

2

DIGITAL Out

3

ANALOG Out

4

HD-SDI

5

EX-SDI

6

CVBS

7

HD-TVI

8

AD Key

   1: GND

   2: AD-key

   3: GND

9

Power LED

10

Control Terminal

   1: RS-485 (+)

   2: RS-485 (-)

   3: Motion Detection Out

   4: Ground

   5: Day&Night Input (Low : Night, Open : Day)

   6: Ground

11

Power : DC12V

1

2

3

4

5

6

8

9

】 【

10

11

7

1

Lens mount cap


The cap is installed to protect the lens mount section.

          Romove the lens mount cap before installing a lens.

          (sold separately)

2

Camera installation bracket

          The braket can be fixed at the top or bottom of the

          camera.

3

Auto iris lens Connector

          Used to supply power and output signal to 

          control the iris of the lens.

2

3

1

Summary of Contents for BMH-S18

Page 1: ... P N P N INSTRUCTION MANUAL Before attempting to connect or operate this product please read these instructions carefully and save this manual for future use The design and specifications are subject to be changed without prior notice to improve product s quality ...

Page 2: ...uce a risk of fire or electric shock do not expose this product to rain or moisture CAUTION This installation should be made by a qualified service personrel and should conform to all local codes CAUTION To avoid electrocal shock do not open the cabinet Refer servicing to qualified personnel only CAUTION The apparatus should not be exposed to water dripping or splashing and no objects filled with ...

Page 3: ...ilar surface This product should not be placed in a built in installation such as a bookcase or rack unless proper ventilation is provided and the manufacturer s instructions have been adhered to 8 Do not install near any heat sources such as radiators heat registers stoves or other apparatus including amplifiers that produce heat 4 Follow all instructions All operating and user instructions shoul...

Page 4: ...USTMENT VIDEO OUT MENU OPERATION MAIN MENU EXPOSURE WHITE BALANCE IMAGE 7P 8P 9P 10P 12P 13P 15P 16P 17P 18P 19P 20P 23P 24P 1 2 Sony CMOS sensor Full HD Resolution 1920x1080p 30fps 25fps 1920x1080p 60fps 50fps 1280x720p 30fps 25fps 1280x720p 60fps 50fps DAY NIGHT ICR WDR Wide Dynamic Range DNR Digital Noise Reduction 2D 3D DIS Digital Image Stabilization EX SDI Long Reach Privacy mask Function On...

Page 5: ...ENTS SYSTEM CONFIGURATION RS485 RS485 RS485 DVR Keyboard TV Monitor VIDEO VIDEO VIDEO HD SDI Optional Remote Controller CAMERA Not used Far Right Tele Up Menu Set Wide Down Near Left MANUAL DC 12V CABLE WRENCH C MOUNT RING ...

Page 6: ... Out 4 Ground 5 Day Night Input Low Night Open Day 6 Ground 11 Power DC12V 1 2 3 4 5 6 8 9 10 11 7 1 Lens mount cap The cap is installed to protect the lens mount section Romove the lens mount cap before installing a lens sold separately 2 Camera installation bracket The braket can be fixed at the top or bottom of the camera 3 Auto iris lens Connector Used to supply power and output signal to cont...

Page 7: ...ord into a wall outlet The POWER indicator will light Adjust the picture on the monitor using the Brightness and Contrast controls etc To monitor s Video Input or Camera Input 2 3 1 DC12V RS 485 COMMUNICATION Connect to an external controller of RS 485 format Motion Detection Out When the motion detection function is working DC3 3V is outputed to OUT pin and GND pin Day Night input Day Night mode ...

Page 8: ... shape may not correspond to the terminal on the camera In such a case remove the original plug and using a soldering iron connect a lens iris plug according to the diagram Refer to next page Pin layout for the lens iris output connector No 1 2 3 4 DC type lenses Damping Damping Drive Drive Rewire the lens iris plug 1 Cut off the plug of the lens cable cut off approximately 8mm of the insulation a...

Page 9: ... adjusting mechanism is mounted and focus that is more accurate is needed 1 With the included Wrench unscrew the Set Screws on the right and bottom of the camera 2 Adjust the focus while watching the video by adjusting the Mount Adapter 3 After adjusting to the desired focus level use the included Wrench to fasten the Set Screws Note The object may be out of focus when using a source of near infra...

Page 10: ...his button is pressed Set button Executes selections and displays a submenu for an item with the mark Camera menu is subject to be changed without prior notice to upgrade and quality increase and we may use slip sheet for the change Please check the camera version and the slip sheet if the camera menu and this manual menu is not matched MAIN MENU Functions can be setup using Menu Key Command of Vi...

Page 11: ...1 2500 1 5000 1 7000 1 10000 1 30000 sec EXPOSURE LENS BRIGHTNESS SHUT SPEED DSS AGC FLICKERLESS WDR BLC DAY NIGHT BACK SAVE DFLT DC 8 AUTO OFF ON OFF OFF AUTO DSS Select maximum DSS Digital Slow Shutter 60 50 fps mode OFF x2 x4 x8 30 25 fps mode OFF x2 x4 FLICKERLESS Select Flickerless mode OFF ON remove screen flicker AGC Select Auto Gain Control OFF ON WDR BLC Select WDR Wide Dynamic Range or B...

Page 12: ...oves 0 20 BURST OFF ON POLARITY External Input polarity ACTIVE LOW ACTIVE HIGH NIGHT ANTI SAT LED saturation improves 0 20 BURST OFF ON MENU MODEL EXPOSURE WHITE BAL IMAGE INTELLIGENCE SPECIAL FUNC DISPLAY D N EXIT SAVE DFLT WHITE BALANCE WHITE BAL MODE RED GAIN BLUE GAIN CHROMA BACK SAVE DFLT AUTO 10 AWB Select WHITE BALANCE mode AUTO ONE PUSH MANUAL INDOOR OUTDOOR AUTO Automatically adjusts colo...

Page 13: ...DDLE HIGH AUTO MIRROR Select a flip mode OFF H V H V H You can flip the picture horizontally on the screen V You can flip the picture vertically on the screen H V You can flip the picture horizontally vertically on the screen SHARPNESS Adjust sharpness level 0 10 steps ACE Select Digital WDR Wide Dynamic Range OFF LOW MIDDLE HIGH DEFOG Carry out defog function OFF ON MODE AUTO MANUAL LEVEL LOW MID...

Page 14: ...me about changing MD mode 0 255sec DIS Select Digital Image Stabilizer mode OFF ON RANGE Setting the image compensation range 10 20 30 FILTER Setting the sensitivity to hold DIS function in worst case LOW MIDDLE HIGH AUTO C Setting Auto Centering mode OFF HALF FULL MENU MODEL EXPOSURE WHITE BAL IMAGE INTELLIGENCE SPECIAL FUNC DISPLAY D N EXIT SAVE DFLT INTELLIGENCE PRIVACY Hide an area you want to...

Page 15: ...IT SAVE DFLT SPECIAL FUNC DEFECT Compensates for bad pixels that may occur Occurs when the whole screen is in full black or if there is bad pixelation and it changes the THRS values until the screen is fixed IMAGE RANGE Select image bit range Full 100 Compressed 75 FULL COMP USER LEVEL Select user mode level 0 32 SYSTEM Select NTSC 30 60fps or PAL 25 50fps HD FORMAT Select Digital output 1080p 30 ...

Page 16: ... OFF ON TITLE OFF ON ZOOM RATIO OFF ON SYSTEM MSG OFF ON MD Alarm and Wait message SET TITLE Select camera title menu Text edit max 40 characters INIT SEL Select display initial message OFF ON ID OFF ON BAUDRATE OFF ON PROTOCOL OFF ON VERSION OFF ON INIT MSG OFF ON Character Table of Text edit Mode i SET INIT MSG modify initial message Text edit max 40 characters LANGUAGE Select language English S...

Page 17: ...ow Middle High Off On Auto Manual Model Lens Brightness Shutter Speed Digital Slow Shutter DSS Gain Control AGC Flickerless WDR BLC Day Night White Balance HLC DNR Mirror Sharpness ACE Defog Freeze Gamma E Zoom Privacy Mask Motion Detection Digital Image Stabilizer Defect DET Image Range System HD Format Comm Disp Sel Off On Set Title Init Sel Off On Set Init Msg Language Power Source Power Consum...

Page 18: ...if MOTION DETECTION mode is turned on Please check if the MD Sensitivity is too high Please check the setting of the MD AREA The WDR function is not working Please check if the WDR Level is too low Please check if the AE Mode is set to MANUAL The WDR doesn t work in MANUAL Shutter priority Exposure mode Colors are not quite right Please check if the camera is facing directly into sunlight or fluor...

Reviews: