Blue Coat recommends that you connect the appliance and verify the LEDs and LCD display to
ensure functionality before rack mounting the appliance.
If you want to install the appliance into a rack before performing any configuration tasks, begin with
Rack Mount the Appliance
.
Note
: Network cables are not included and must be supplied by the user.
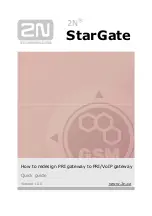
Figure 1 shows a typical Blue Coat ASG-S200 network deployment:
The following installation assumes the network deployment shown in Figure 1 is in use. For more
information, see the product guides
at:
https://bto.bluecoat.com/products/advanced-secure-gateway
To deploy your ASG-S200 appliance
(Figure 2)
:
1.
Remove the EULA (End User License Agreement) sticker located
on the rear of the appliance. Be aware that you are agreeing to
the terms and conditions of the EULA by removing the sticker and
installing the product.
2.
Disconnect the existing LAN switch cable from the WAN router.
3.
Connect the Ethernet cable from the LAN switch and plug it into the
2:1
port network interface on
the ASG-S200 appliance.
4.
Connect an Ethernet cable from the WAN router to the
2:0
port network interface on the ASG-
S200 appliance. The interface auto-negotiates 10/100/1000 Base-T speed and duplex settings.
5.
Connect a network cable between the
SYS MGMT 0:0
port network interface and the router (or
switch) leading to the management network.
6.
Connect a null-modem serial cable from the ASG-S200 appliance to a PC (or serial terminal).
This connection is used to perform initial configuration via a direct serial connection.
7.
Connect the socket end of the enclosed power cord into the power supply inlet, and then connect
the plug into a power source.
If the appliance does not automatically power on, switch the
appliance on by pressing the rear soft power switch and continue to .
Note:
This appliance retains memory of being turned off with the soft power switch. In such cases,
the soft power switch must be used to turn it back on after power is connected. However, if power is
disconnected while the appliance is on, it will automatically turn on when power is restored.
3
Connect the Cables
2
Unpack the shipment package and verify the contents of the box.
The Blue Coat ASG-S200 series appliance ships with the following components:
Blue Coat ASG-S200 series appliance
Software License Agreement
One AC power cord
Safety and Regulatory Compliance Guide
Null-modem serial cable
Quick Start Guide
(this document)
Fixed mount brackets w/ installation hardware
Rack mount ears (for use with optional slide-
rail kit)
3
Unpack the Appliance
1
Quick Start Guide
Advanced Secure Gateway: ASG-S200 Series
Flip over to complete the installation
3
Perform Initial Configuration
4
You must have the following network information on hand to perform initial configuration:
To access the ASG-S200 command-line interface and run the initial configuration wizard:
1.
Confirm that a null-modem serial cable is connected from the ASG-S200 appliance to your
workstation serial port. For cabling instructions, see
Connect the Cables
.
2.
Open a terminal emulation program such as Microsoft HyperTerminal
®
, PuTTY, Tera Term, or
Procomm
™
.
3.
Configure the terminal emulation software to the following settings:
4.
Power on the ASG-S200 appliance. After the appliance boots up, you will be prompted to press
<
Enter
>
three times to start the initial configuration wizard.
5.
Press
<
Enter
>
three times. The configuration process begins.
6.
Choose a configuration method:
[
Manual Setup
] Select this method if you are configuring the ASG-S200 appliance without
Director (provides centralized management for ASG appliances).
[
Director-managed setup
] Select this method if you are registering this ASG-S200 with
Director. You will need the Director appliance IP address and registration password.
7.
Enter the network configuration parameters when prompted. If your ASG-S200 appliance is
connected to the network, the configuration wizard will attempt to verify DNS server addresses
and auto-detect link settings.
Baud rate:
9600 bps
Data bits:
8
Flow control:
none
Parity:
none
Stop bits:
1
ASG-S200 IP address
Default Gateway IP address
Subnet mask
Primary DNS server IP address
Console password to access advanced
commands in the CLI
Admin password for authorizing access to the
appliance
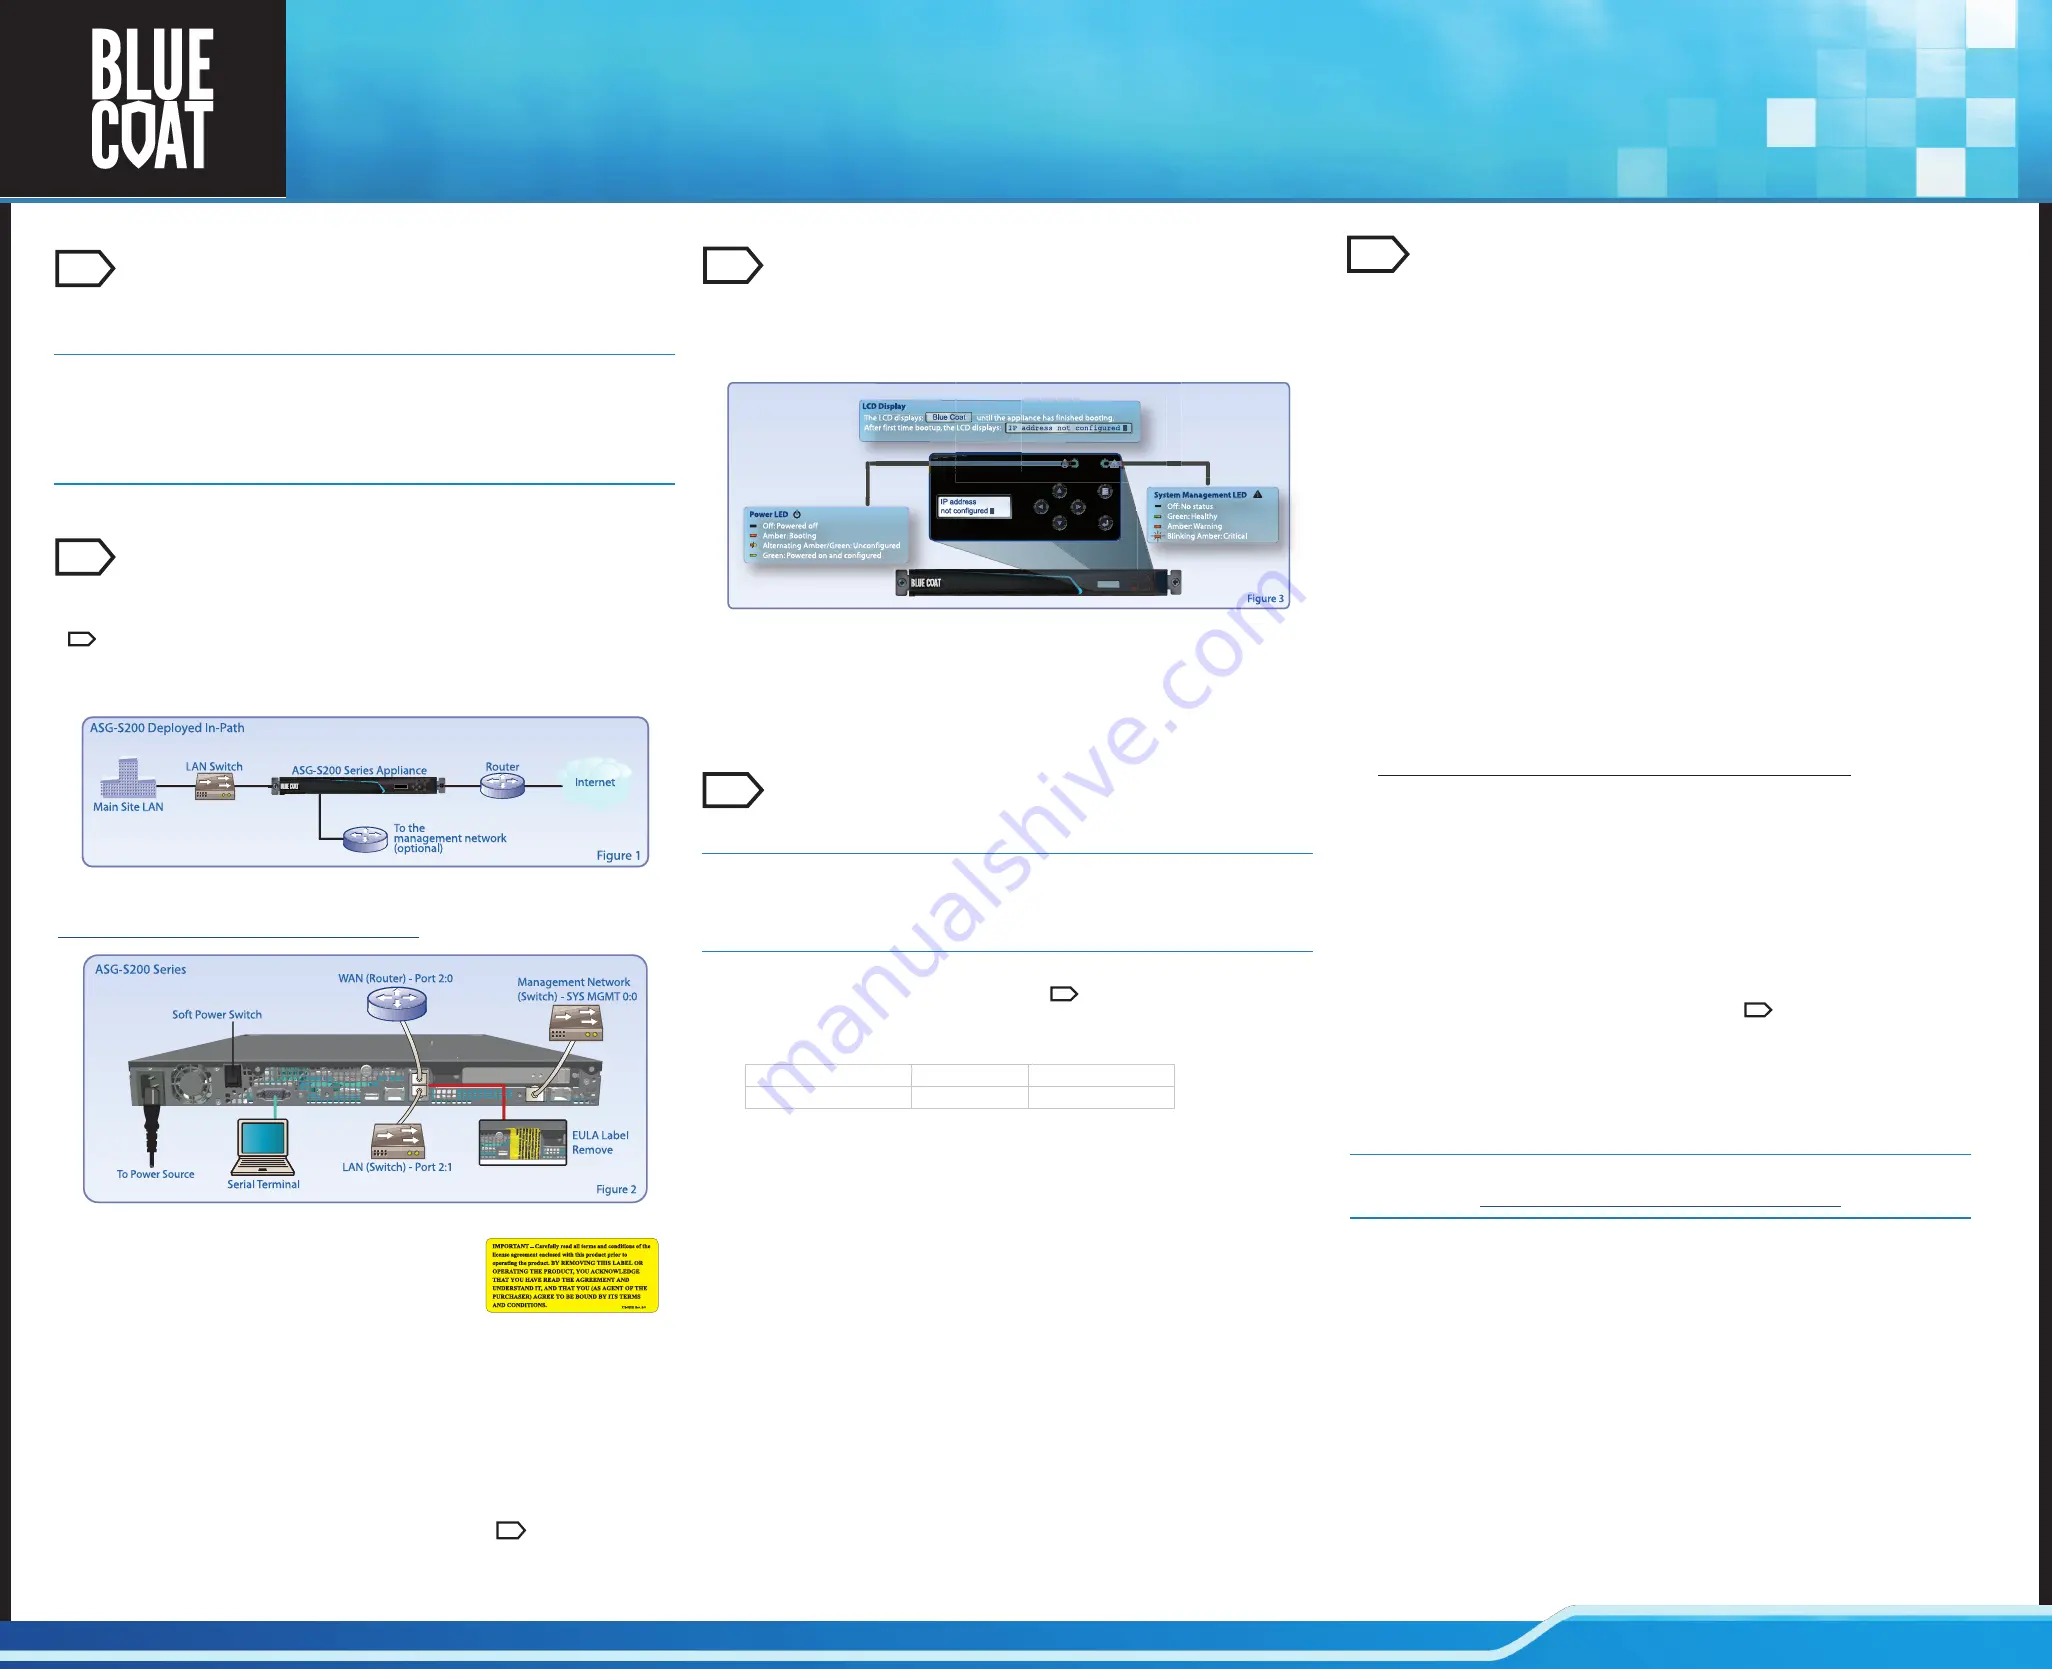
Verify the LEDs and LCD Display
3
To verify that the appliance has booted and is operational, check the following:
Figure 3 shows the location of all the major control functions located on the front panel of the ASG-
S200 series appliance. After the appliance boots up, the
System Management LED
should be
Off
while the
Power LED
should alternate between
amber
and
green
, denoting an unconfigured state.
Note:
Following the initial configuration, the System Management LED continues blinking amber until
a valid license is applied to the appliance.
After the appliance has been configured for network access, the LCD displays various system
statistics. You can use the left and right arrows to manually scroll through the statistics modes.
6
3
2
4
For additional installation details and configuration options, see the
Advanced Secure Gateway
documentation available at:
https://bto.bluecoat.com/products/advanced-secure-gateway
After your ASG-S200 appliance is configured for network access, complete the installation by verifying
network connectivity and licensing the appliance. The ASG-S200 relies on a
base license
, consisting of
the primary operating components of the Proxy and Content Analysis features, and
add-on licenses
which includes optional elements, such as file inspection subscriptions and specialized Proxy features.
Licensing the ASG is a multi-step process. You must first install the base license, activate and install the
Proxy licenses, and then activate and install the file inspection subscriptions. Keep in mind, you’ll need
Internet connectivity to access the Blue Coat Licensing Portal (BCLP) to activate your optional add-ons.
To complete the ASG-S200 installation:
1.
Verify that you can log in to the appliance via the Web browser. To log in to the appliance:
a.
Enter the ASG-S200 IP address into your Web browser's
Address
or
Location
box using
the following format:
https://A
SG_ipaddress
:8082
.
b.
Enter the user name and password specified during configuration to access the
management console. The management console loads within your browser window.
2.
Activate the base license from the management console:
a.
Navigate to the License page:
Proxy > Maintenance > Licensing > Install
b.
Click
Retrieve
. The appliance automatically contacts the Blue Coat licensing server and
installs the base license.
3.
Activate optional Proxy licenses and/or file inspection subscriptions, if any were purchased:
a.
Visit the Blue Coat Licensing Portal at:
https://services.bluecoat.com
and log in using your
BlueTouch Online credentials.
b.
Enter an activation code provided in your e-fulfilment letter and click
Next
.
c.
Enter your appliance serial number, click
Next
and follow any on screen prompts to
complete the activation.
d.
Repeat 3b
–
3c for each optional license and subscription you wish to activate.
4.
Download and install the updated license:
a.
Navigate to the License page:
Proxy > Maintenance > Licensing > Install
b.
Click
Retrieve
. The appliance automatically contacts the Blue Coat licensing server and
installs the updated license.
5. To validate that all services are available,
you must restart your appliance
:
a.
Navigate to
Proxy > Maintenance > Tasks
.
b.
Select the
Hardware and software
radio button.
c.
Click
Restart now.
Note
: The appliance can take up to 10 minutes to restart.
DO NOT unplug the power
cables during the restart process as this can cause a corruption of the configuration.
6.
Enable file inspection subscriptions, if any were purchased:
a.
Navigate to the Content Analysis License page:
Content Analysis > System > Licensing
.
Each licensable service shows the following details:
Status
: The availability of a service component and the expiration date.
Active
: The activation status of the component.
b.
Select a service component checkbox to activate it.
c.
Click
Save Changes
.
7.
To prepare the ASG-S200 for rack mounting, gracefully shutdown the appliance using the
shutdown
command.
a.
Access the ASG-S200 command-line interface (see for more information).
b.
When prompted, press
1
to access the CLI.
c.
Enter
enable
to access privileged commands.
d.
Enter
shutdown
to turn off the appliance.
Important! Do not shut down the appliance using the switch or by removing the power cables!
Abruptly removing power can result in irreparable data loss.
Always
use the shutdown command
from the CLI to power down the appliance
3
License the ASG-S200 Appliance
5